SignalWire Click-to-Call (C2C) is an embeddable real-time communications widget that lets you add one-click voice and video calling directly to your website with minimal setup. After configuring a Click-to-Call widget in your SignalWire Space, you can embed a simple script into your HTML to enable visitors to connect instantly to AI agents, call flows, SIP endpoints, video conferences, and other SignalWire resources. This solution reduces user friction, improves conversion, and extends real-time interactions without building custom backend call logic.
How to Add a Click To Call Button to Any Website
SignalWire Click-to-Call (C2C) is a simple script that allows you to add real-time communications directly to your website. With C2C, you can embed a one-click call button that instantly connects visitors to AI agents, video conferences, SIP endpoints, or any other SignalWire resource. It only takes a few lines of code and minimal setup.
Reducing friction in communication is an easy way to increase conversions and improve customer experiences. A single-click calling option achieves this by allowing customers to reach the right resource instantly instead of navigating complex menus or waiting for an email response. Website visitors can reach out with a sales inquiry, support request, billing question, or any other query.
C2C is also mobile-friendly, making it an ideal solution for smartphone users who expect instant interactions. Instead of manually dialing numbers or copying contact information, visitors can tap a button to start a call directly from your website. This reduces drop-offs and funnels in more meaningful engagements with customers.
Supported resources
Resources in SignalWire Call Fabric are programmable building blocks you can call. Click-to-Call can connect to any SignalWire resource, including:
AI agents: Route calls to a virtual assistant for automated customer interactions.
Video conferences: Instantly join a video call with a single click.
Call flows: Trigger custom call routing logic.
SIP endpoints: Connect directly to a phone number through a SIP endpoint.
SignalWire Markup Language (SWML) scripts: Execute custom telephony workflows that can include AI.
CXML webhooks: Integrate with external APIs for dynamic call handling.
RELAY applications: Use the SignalWire RELAY API to build custom voice and video applications with advanced event handling.
FreeSWITCH connectors: Send calls to your FreeSWITCH deployment with cloud-based click-to-call capabilities.
Note: As of right now, you can only dial SignalWire resources. You cannot dial a PSTN number directly. To connect a call to a PSTN number, you will have to select a resource that is capable of routing to your chosen PSTN number.
How to set up Click-to-Call
Step 0: Create your resource
Before setting up Click-to-Call, decide what happens when a visitor clicks the button. Will it launch a video call? Connect to an AI agent? Trigger a complex call flow?
Set up your desired resource in your SignalWire Space if you haven’t already. This is the most time consuming part of the project. Once you have your resource ready to go, you can set up C2C in a matter of minutes.
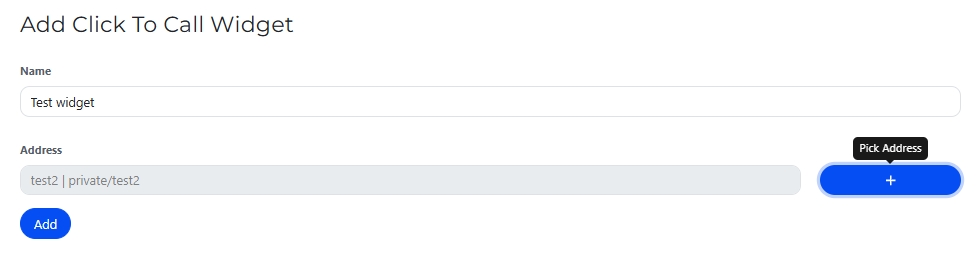
Step 1: Create your Click-to-Call widget
Log in to your SignalWire Space.
On the lefthand sidebar, navigate to Tools > Click To Call.
Select + Add to create a new widget.
Step 2: Configure your widget
Give your widget a descriptive, easily identifiable name.
Select the destination for the widget to dial by picking the address from your list of resources.
Step 3: Embed the Click-to-Call button on your website
1. Click Copy Embeddable Widget to get your unique script.
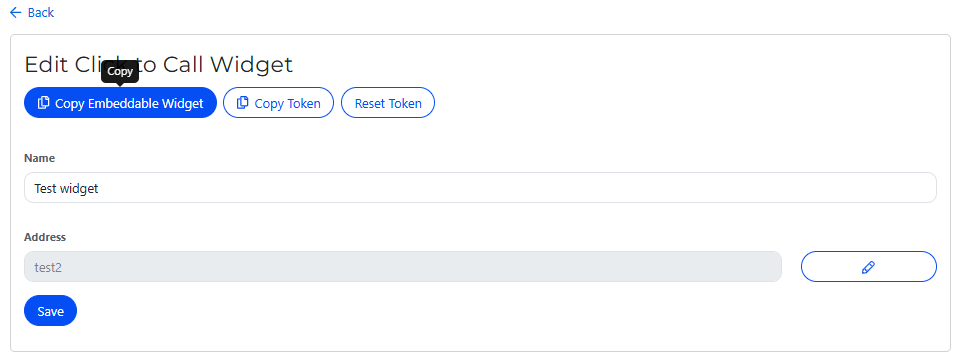
2. Add container elements to place the call button and interface:
<!-- Add these elements where you want the C2C components to appear -->
<div id="click2call"></div> <!-- This will become your call button -->
<div id="call"></div> <!-- This will display the call interface when active →
3. Paste the script into your website’s HTML, placing it inside either:
The <head> section (recommended for faster loading).
Just before the closing </body> tag (to load after page content).
Testing your Click-to-Call button
We always recommend thorough testing before launching customer-facing updates. After saving your changes, refresh your website and look for the call button. Click the button to initiate a test call, and ensure the call connects to your configured SignalWire resource.
If needed, debug by making sure your script is properly placed within the HTML, or check your browser’s console for errors.
Advanced customization
Advanced customization options are available for SignalWire Click-to-Call, including:
Custom styling to modify the button’s appearance
Callback functions to execute code at specific points in the call lifecycle
Delayed loading to initialize C2C only when triggered by user action
Security and compliance considerations
When using any real-time communication tools, security is a top priority. SignalWire’s Call Fabric platform is designed with enterprise-grade security to protect against unauthorized access and abuse. This includes features such as restricting calls to subscribers. You can use authentication tokens to ensure only authorized users can initiate calls, or monitor call logs and analytics from your Dashboard.
For heavily regulated industries such as healthcare, finance, or legal, compliance with data privacy laws is non-negotiable. SignalWire allows you to maintain compliance with HIPAA, PCI-DSS, and SOC 2 Type II certified infrastructure while offering a smoother communication experience.
Scaling with SignalWire
As your business grows, so do your communication needs. SignalWire’s Call Fabric infrastructure is designed for scalability, so that you can go from managing a handful of calls per day to thousands per hour.
Deploy multiple widgets across different sections of your site, each routing to a different destination, like sales, support, or billing. Leverage AI agents to handle high call volumes and provide automated responses before escalating to a human agent. You can even integrate with FreeSWITCH or other existing infrastructure.
Because Click-to-Call is built on SignalWire’s Programmable Unified Communications (PUC) framework, you can expand beyond voice by adding video, messaging, or AI into your workflow, all using the same platform. C2C is just one of many tools that make it easy to integrate communications into your applications without building complex infrastructure from scratch.
Ready to add instant calling to your website? Get started today with a free account, and bring any questions to our community on Discord.
Frequently asked questions
What is SignalWire Click-to-Call?
SignalWire Click-to-Call is an embeddable script that adds a one-click voice or video call button to your website, enabling visitors to initiate real-time connections without additional software.
What resources can I connect with a Click-to-Call widget?
Click-to-Call can connect to any SignalWire resource you’ve configured — including AI agents, video conferences, programmable call flows, SIP endpoints, SWML scripts, CXML webhooks, and Relay apps — but it does not directly dial traditional phone numbers without a routing resource.
How do I embed Click-to-Call on my website?
After creating and configuring the widget in your SignalWire Space under Tools > Click To Call, copy the generated script and paste it into your site’s HTML — ideally in the <head> or just before </body> — along with container elements for the button and interface.
Do I need backend development to use Click-to-Call?
No. Click-to-Call is designed to require minimal setup; embedding the script is all that’s needed for basic use. Advanced custom behavior can be added with callbacks or script configuration.
What security and compliance considerations should I keep in mind?
While Click-to-Call embeds easily, you should ensure proper authentication, restrict access to authorized users, and comply with data privacy regulations such as HIPAA or PCI-DSS if operating in regulated industries.