Since the launch of our RELAY Realtime SDK in May 2022, we've been actively encouraging its use among our customer base. Our SDK has undergone significant enhancements, now incorporating Voice, Messaging, Video, Tasks, and Chat all under one roof.
We suggest that those using the outdated RELAY SDK (v2) consider upgrading to this new version to leverage its expanded capabilities. With the integration of Voice and Messaging into the v3 Realtime SDK came some syntax modifications - changes we're more than ready to help you navigate.
Introduction
In both the legacy and the latest versions of the RELAY SDK, there's no requirement to incorporate your SignalWire phone number into the code for the purpose of receiving calls and messages. Rather, we set up a corresponding Context in the Dashboard for the number you intend to use.
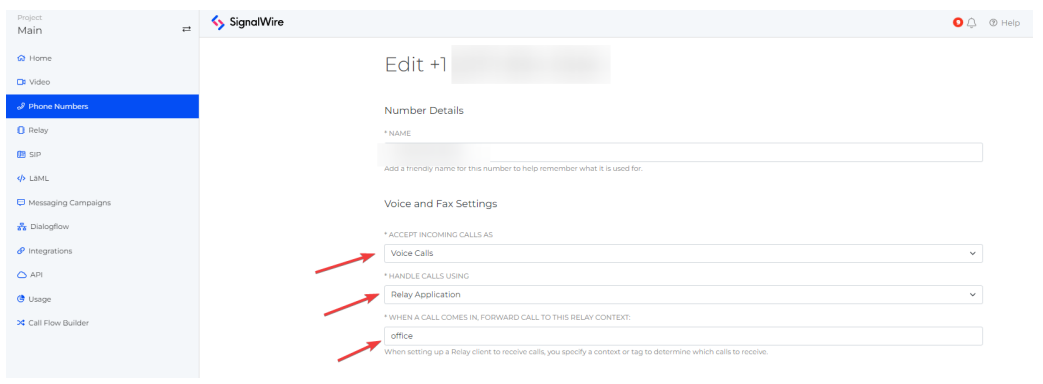
You can achieve this by going to the Phone Numbers tab within your SignalWire Space, choosing the number you want to modify, and then hitting the “Edit Settings” button on the new page that appears. Moving forward, you'll want to arrange the Voice settings as follows:
Configure "Accept Incoming Calls as" to: Voice Calls
Define "Handle Calls using" as: Relay Application
Specify "Context" as: The context you've already set up on your Relay Server
The major shifts from v2 to the v3 Realtime SDK involve the removal of the consumer and the exclusive use of asynchronous methods. If you haven't yet delved into the documentation, we offer some practical examples to kickstart your refactoring journey.
In our v2 samples, you'll notice the use of Consumers and a blend of synchronous and asynchronous methods. On the other hand, Realtime SDK examples employ event listeners to track ending events and utilize top-level asynchronous wrappers. By comparing these two approaches, we aim to illuminate the upgrade process and make it less of a mystery.
Connection
In the context of the v2 Node SDK, the RelayConsumer was an integral component for developers. It encapsulated much of the connection management details. This simplicity, however, came at the cost of reducing the developers' control over their connections.
v2 Node Relay SDK Example:
Conversely, the newer Realtime SDK shifts connection management responsibility to the client object. This transfer of control enables developers to manage their connections manually, affording a higher level of flexibility and specificity.
This change also makes it possible for developers to create different client objects for various services like Voice and Messaging. This can be quite advantageous, particularly in large and complex applications where unique settings and handlers are necessary for different application aspects.
This approach offers developers increased control over their connections and their interaction with the SignalWire API.
v3 Realtime Relay SDK Example:
Voice
SignalWire's Voice namespace has many available methods to help you build powerful and full-featured voice applications like an Interactive Voice Response (IVR) and automated appointment reminders.
We will utilize several of these methods as we demonstrate how to make, receive, and record calls. We will even look at more complex methods like playing text-to-speech messages over an audio track. Then you can mix and match any of these methods to best suit your needs.
Making a Call
In the previous version (v2) of the RELAY SDK, Voice API interactions were performed and handled via a RelayConsumer, tasked with managing real-time calling events. The following v2 example demonstrates how a call might have been made using a consumer.
v2 Node Relay SDK Example:
Unlike the deprecated RELAY SDK, the updated RELAY Realtime SDK does not make use of consumers. Instead, it operates via a Client within a specific namespace that you want to access.
You can find all available methods and events in our Voice Client SDK reference. The Realtime Client methods must be awaited, thus our logic should be encapsulated in an asynchronous function. The new way to initiate a call with this version is as follows:
v3 Realtime Relay SDK Example:
Receiving a Call
When receiving a call with the deprecated (v2) RELAY SDK, we could use our Consumer to set up an event listener to listen for incoming calls.
v2 Node Relay SDK Example:
Inbound calls with the (v3) Realtime-Relay version do not require a consumer but instead put a call.received event listener directly on the namespace Client.
v3 Realtime Relay SDK Example:
Playing TTS Over Audio
In our next voice example, let’s look at how you might utilize text-to-speech. In the deprecated (v2) RELAY SDK, playTTS was available as an asynchronous or synchronous function. In the synchronous version, we can simply allow the script to move on synchronously after the TTS is finished:
However, when using the asynchronous version of playTTS, called playTTSAsync in v2, all operations will occur asynchronously. Therefore, we need to listen for events to guide our code when to trigger. We can use the on, waitFor or waitForEnded methods for this purpose.
However, we can't use these methods directly on the playAction. Instead, we need to apply one of these methods to the call directly. As a result, we'll listen for all play.finished events that happen on the call.
Since we're listening to all play.finished events, we need to keep track of the last playAction that finished, so we can accurately point to the correct callback/trigger. In the following example, we will track if the current playAction is the first playTTSAsync that has occurred on the call with:
let firstTTS = true
Once the first playTTSAsync event has been passed to us, we then set firstTTS to false, so the next event will point to the correct part of the code.
v2 Node Relay SDK Example:
The Realtime SDK (V3) implementation does not have synchronous methods, however, V3 no longer has the limitation of not being able to utilize the waitForEnded (which is now ended) method directly on the playAction.
Due to this, we can directly listen for when the playTTS is finished before moving forward to the next logic within our code. This results in a much simpler syntax and more granular control of the call.
v3 Realtime Relay SDK Example:
Recording a Call
For our final Voice example, let’s look at how we could utilize the Call Recording method. RELAY v2 SDK provided synchronous and asynchronous call recording methods while the v3 version remains to only have synchronous methods.
For this example, we will initiate the first playAction when the call is answered. Once the first playAction has finished playing, we will then begin the recording of the call. After the second playAction is finished playing, we will then end the recording with the stop method. Once the recording has returned the ended event, we then log the recording url and then end the call with the hangup method.
In the below example, we will be utilizing the recordAsync method, so we will need to add another event listener for when a recording has ended.
v2 Node Relay SDK Example:
In the Realtime Relay (v3) SDK, this becomes a lot simpler to pull off. Like above in the playTTS, we will simply just need to wait for the playAction to end with the ended method, which we will then follow up and stop the recording with the stop method.
v3 Realtime Relay SDK Example:
Messaging
Messaging is much less complex than voice because the only interactive methods available are sending and receiving. So, let’s look at the differences in examples of outbound messages, inbound messages, and forwarding messages.
Sending a Message
In our v2 example, we used a RelayClient to send the SMS and, if successful, logged the message id.
v2 Node Relay SDK Example:
Our latest version creates a messaging client, sends a message using the same syntax, and returns a promise with a message result string rather than a success boolean.
v3 Realtime Relay SDK Example:
Receiving a Message
With the old v2 version of the SDK, you would listen for incoming messages with a consumer. If we wanted to send an automatic SMS response, we'd have to access the send method within onIncomingMessage with consumer.client.messaging.send.
v2 Node Relay SDK Example:
The new Realtime SDK provides the same functionality with a simpler syntax.
v3 Realtime Relay SDK Example:
Conclusion
As you can see from all the examples above, the new RELAY Realtime SDK introduces just a few minor changes from the old RELAY SDK v2. Some small syntax changes to an existing v2 application can make it easier to take advantage of all the namespaces and products SignalWire offers if you want to improve or expand your application in the future. A chat feature can trigger Voice calls, or an IVR could allow a customer to call into a video call.
You can refer to our getting started guide or our RELAY Realtime SDK technical reference.
We hope you can easily take advantage of new features as they are released, but if you need help, you can always reach out to our world-class support team with the help button on your dashboard, or reach out to us on Slack!