Relay is SignalWire’s real-time communications API approach for building interactive voice, messaging, video, and chat applications over persistent WebSocket connections. This article explains what Relay is, why bidirectional event-driven control matters compared with one-way REST patterns, and what you need to start building, including where to find SDKs, basic connection concepts, and the kinds of real-time call control patterns Relay is designed for.
RELAY is the next generation of interactive communication APIs available at SignalWire. It is a real-time web service protocol that provides for persistent, asynchronous connections to the SignalWire network.
Most providers use REST APIs that rely on one-way communication. This adds latency and limits interactivity of real-time events. SignalWire's Relay APIs use WebSocket technology, which allow for simultaneous, bi-directional data transmission. Using Relay, you can deploy reliable, low latency, real-time communications.
Relay allows for interactive and advanced command and control. Complete control will enable easy transfers and injections across all endpoints, making it easier and quicker to build applications. Relay integrates easily with your products and infrastructure, enabling simple but powerful applications using Artificial Intelligence (AI) tools, data exchange, serverless technologies and more.
Finally, Relay enables communications tools to perform in the most popular and widely used environments, like web browsers, mobile devices, in the cloud, or within your own infrastructure.
How to start building with SignalWIRE RELAY
You can install the SDK of your choice, or get started using our ready to go Docker images.
We will be basing the tutorial on the code contained in the latter repo.
What do I need to start with RELAY?
If you would like to test this example out, the first thing to do is getting your SignalWire API keys.
You can create a SignalWire account and space here.
Your account will start in trial mode, which you can exit by making a manual top up of $5.00.
If you are looking for more information about using SignalWire, refer to our Getting Started guide.
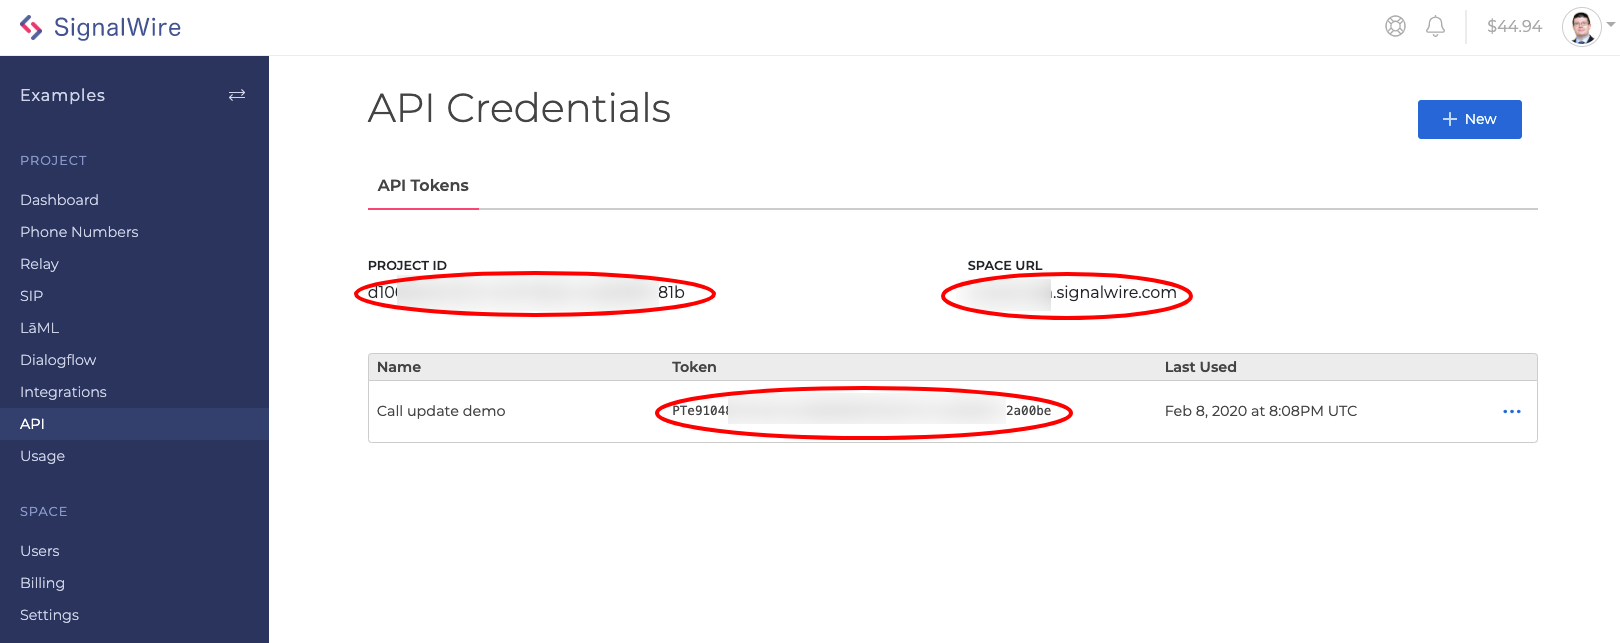
Getting your SignalWire credentials
Head to API in your dashboard and create a new token. Take note of the Project ID and token and keep it on hand for later.
Get a phone number
You will also need to set up a phone number to handle a call with Relay. Purchase a DID from the SignalWire dashboard, select "Relay" as the handler, and input office as the context.

Relay consumer
The starting point for all Relay application is a Consumer. This class encapsulates the main connection and call handling features of Relay, and makes it very easy to add real time communications to your application.
In this article, we will be setting up our code for receiving a phone call.
Here is an example Consumer in various languages:
Looking at the Node.JS example in particular, we can see a few moving parts:
Running the consumer
To run the consumer using Docker, execute:
docker run -e SIGNALWIRE_PROJECT_KEY=<YOUR PROJECT> -e SIGNALWIRE_TOKEN=<YOUR TOKEN> -e ENABLE_DEBUG=true -v "/path/to/your/consumer.js:/app/consumer.js" signalwire/relay-example-node
You can find the complete Docker example here.
Deploying Relay
Relay runs in its own process, not within an HTTP server, and requires no open ports, just an outbound connection to the SignalWire servers. This allows a Consumer to be very efficient, with a small footprint. The process can communicate with the other parts of your application using mechanisms such as REST, a processing queue, or using Relay Tasks, which we will touch on in Part 2.
Make a phone call
Call the SignalWire number you purchased above, and hear the welcome!
Remember, if you are in Trial Mode you will need to call in from a verified phone number, or add $5 in credit to your account.
RELAY Resources
Relay offers a huge amount of features, including speech recognition, text-to-speech, answering machine detection, media manipulation and much more.
Our Relay Dialer Demo and Live Sentiment Analyis Demo provide a look at more complex Relay apps.
Please feel free to reach out to us on our Community Discord if you need guidance!
Frequently asked questions
What is SignalWire Relay?
SignalWire Relay is a real-time communications API approach built on persistent, asynchronous connections to the SignalWire network, designed for interactive command-and-control applications.
Why use WebSockets for communications APIs?
WebSockets enable simultaneous, bidirectional data transmission, which reduces latency and makes it easier to react to real-time events than one-way request patterns.
What can you build with Relay?
Relay is designed for low-latency, real-time applications, such as interactive voice call control, messaging workflows, and other event-driven communication features that benefit from persistent connections.
Do I need a server to use Relay?
Relay is designed for applications that maintain a persistent connection and handle asynchronous events, which typically means running an app process that stays connected while it receives events and issues commands.