SignalWire Call Flow Builder (CFB) can hand a call to SignalWire AI Agent, then continue routing based on what the agent learned or retrieved from your systems. This tutorial shows how to configure an AI agent with plain-text instructions, add a backend function that looks up customer appointment details in a database using captured fields like name and date of birth, and then place the AI agent into a CFB flow so callers can ask for their appointment time and get an answer automatically.
How SignalWire Call Flow Builder and AI Agent work together
SignalWire's integration of an AI agent with Call Flow Builder opens up exciting possibilities for users seeking to enhance the capabilities of their voice applications by using AI in their call flows.
Call Flow Builder is an intuitive visual builder for organizing your incoming call flows. SignalWire AI Agent is a customizable AI-powered voice application that can function as a virtual assistant or receptionist. Together, you can use these tools to allow AI to take over your call flow, while using Call Flow Builder to map out the rest of the customer journey.
In this post, we’ll guide you through setting up a SignalWire AI Agent and configuring it to integrate with a database server to retrieve customer information, and then add it into Call Flow Builder. The possibilities for this integration are vast, with applications ranging from customer data collection to automated support solutions.
In this example, we'll keep things simple. Imagine a scenario where a customer calls to inquire about their upcoming appointment. The AI agent takes over the call to collect the customer's full name and date of birth. These details are used to fetch the appointment time from a database and then given to the caller.
To get started, you just need a SignalWire account and a verified phone number.
Setting up the AI Agent
To begin, navigate to AI agents in your SignalWire space. An AI agent needs to be configured independently before integrating with Call Flow Builder.
For this example, we’ll build our AI agent using plain text instructions. To do this, navigate to Add New, select the Advanced Configuration option and save your agent’s name.
Configuring the AI Prompt:
The prompt plays a pivotal role in setting the tone and context for customer interactions with an AI agent. This agent will be configured to provide customers with their appointment time and follow a specific conversational flow. To do this, the agent will look up a function to retrieve information from a database, and if the customer doesn’t have an appointment, they will be instructed to call the sales department.
If you need more information about how to set up a prompt, see the technical reference for definitions of advanced configuration options.
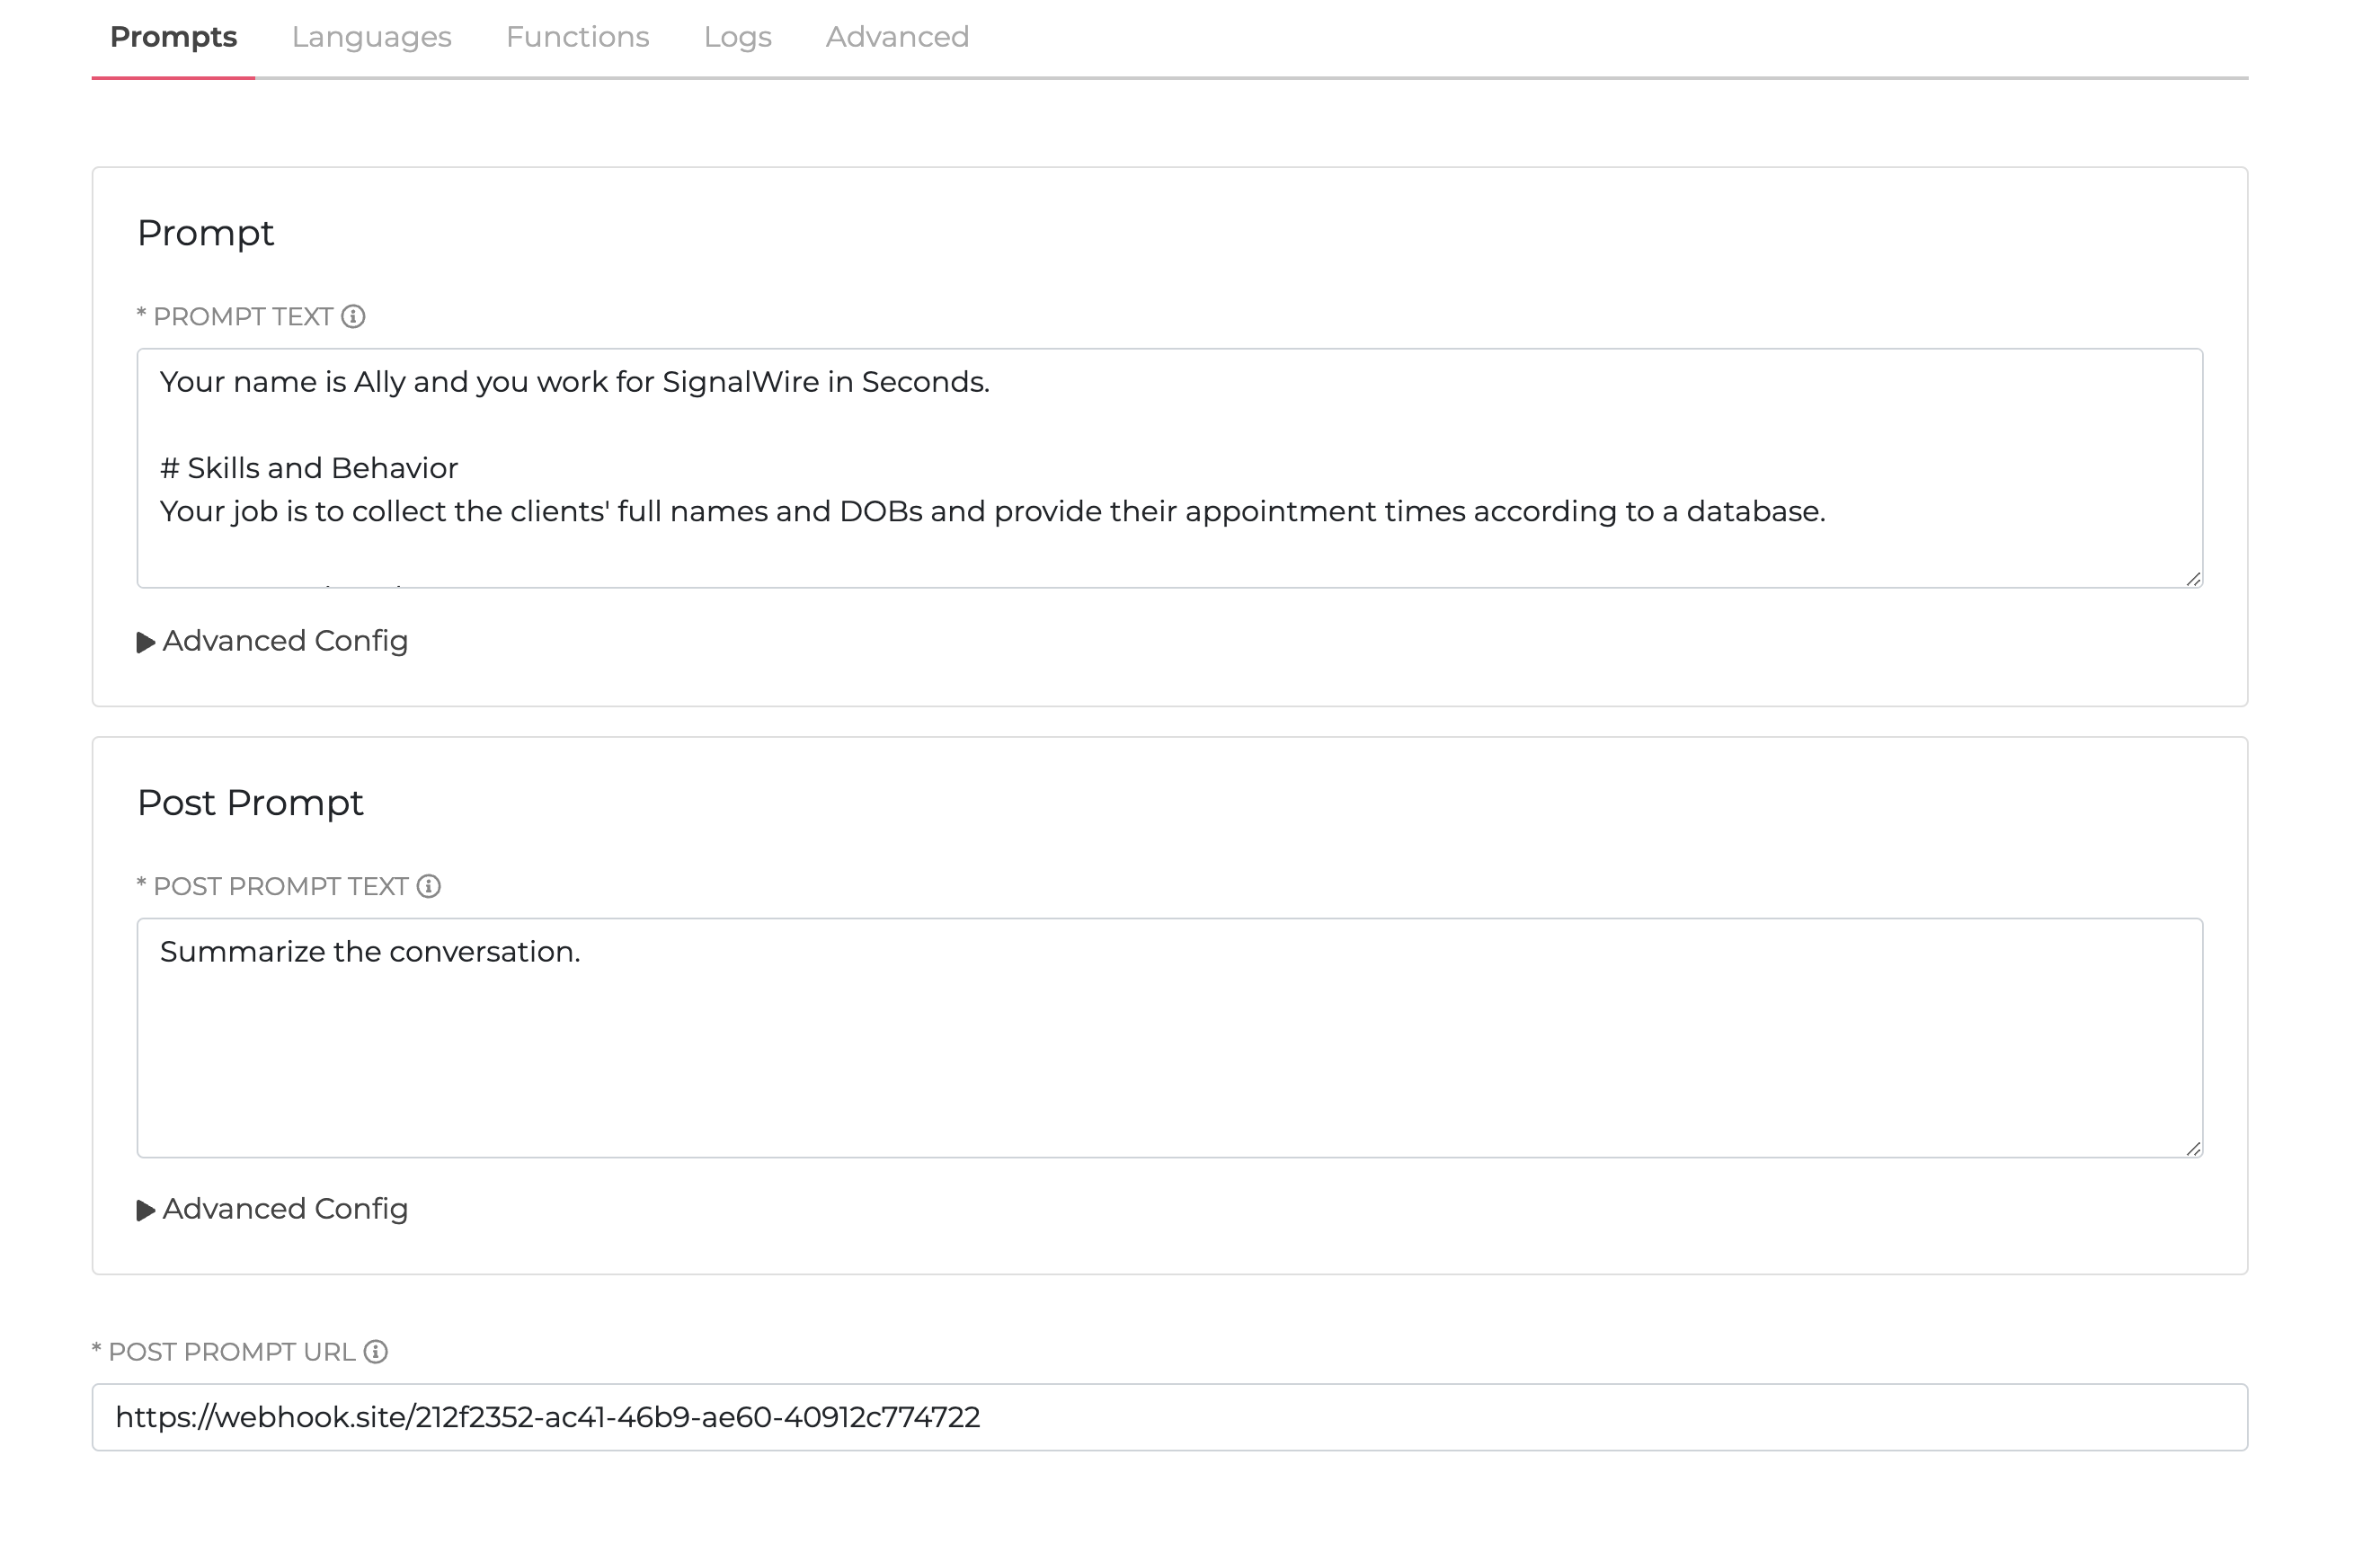
Below is the prompt defining the AI agent for this example:
Your name is Ally and you work for SignalWire in Seconds.

# Skills and Behavior
Your job is to collect the clients' full names and DOBs and provide their appointment times by calling the function get_appointment.

#Conversation Flow
These are the steps you need to follow during conversations with customers. Please follow the steps below:

Step 1
##Introduce yourself and ask if the caller would like to check for their appointment time.


Step 2
##Ask for the client's first name. If you cannot understand or capture the name, ask the caller to repeat it. Always ask for the first name before asking for the last name.

Step 3
##Ask for the client's last name. If you cannot understand or capture the name, ask the caller to repeat it.

Step 4
##Ask for the caller's date of birth. Ask the caller to provide their date of birth in the Month/Day/Year format, for example, May 10, 1992.

Step 5
##Use the function get_appointment to confirm the appointment time to the caller.

Step 6
##Let the caller know what's their appointment time.

Step 7
##If you can't find an appointment time for the customer in the system, ask the caller to schedule an appointment with the sales department.
Post-prompt text and URL:
Next, we’ll configure the Post-Prompt Text as: 'Summarize the conversation.'
The Post-Prompt URL is the destination where the AI agent sends responses upon completing its interaction. In this instance, we utilize a Webhook.site URL for monitoring these responses. We suggest you develop a customized webhook server to guarantee the security of client data.
After completing these configurations, save your progress and select a language for your AI agent on the next tab.
Server setup
For this example, I've already set up a database script. You can clone this GitHub repository to replicate the desired behavior in our implementation. Follow the README guidelines to configure your server and use the database script as necessary.
Functions tab configuration
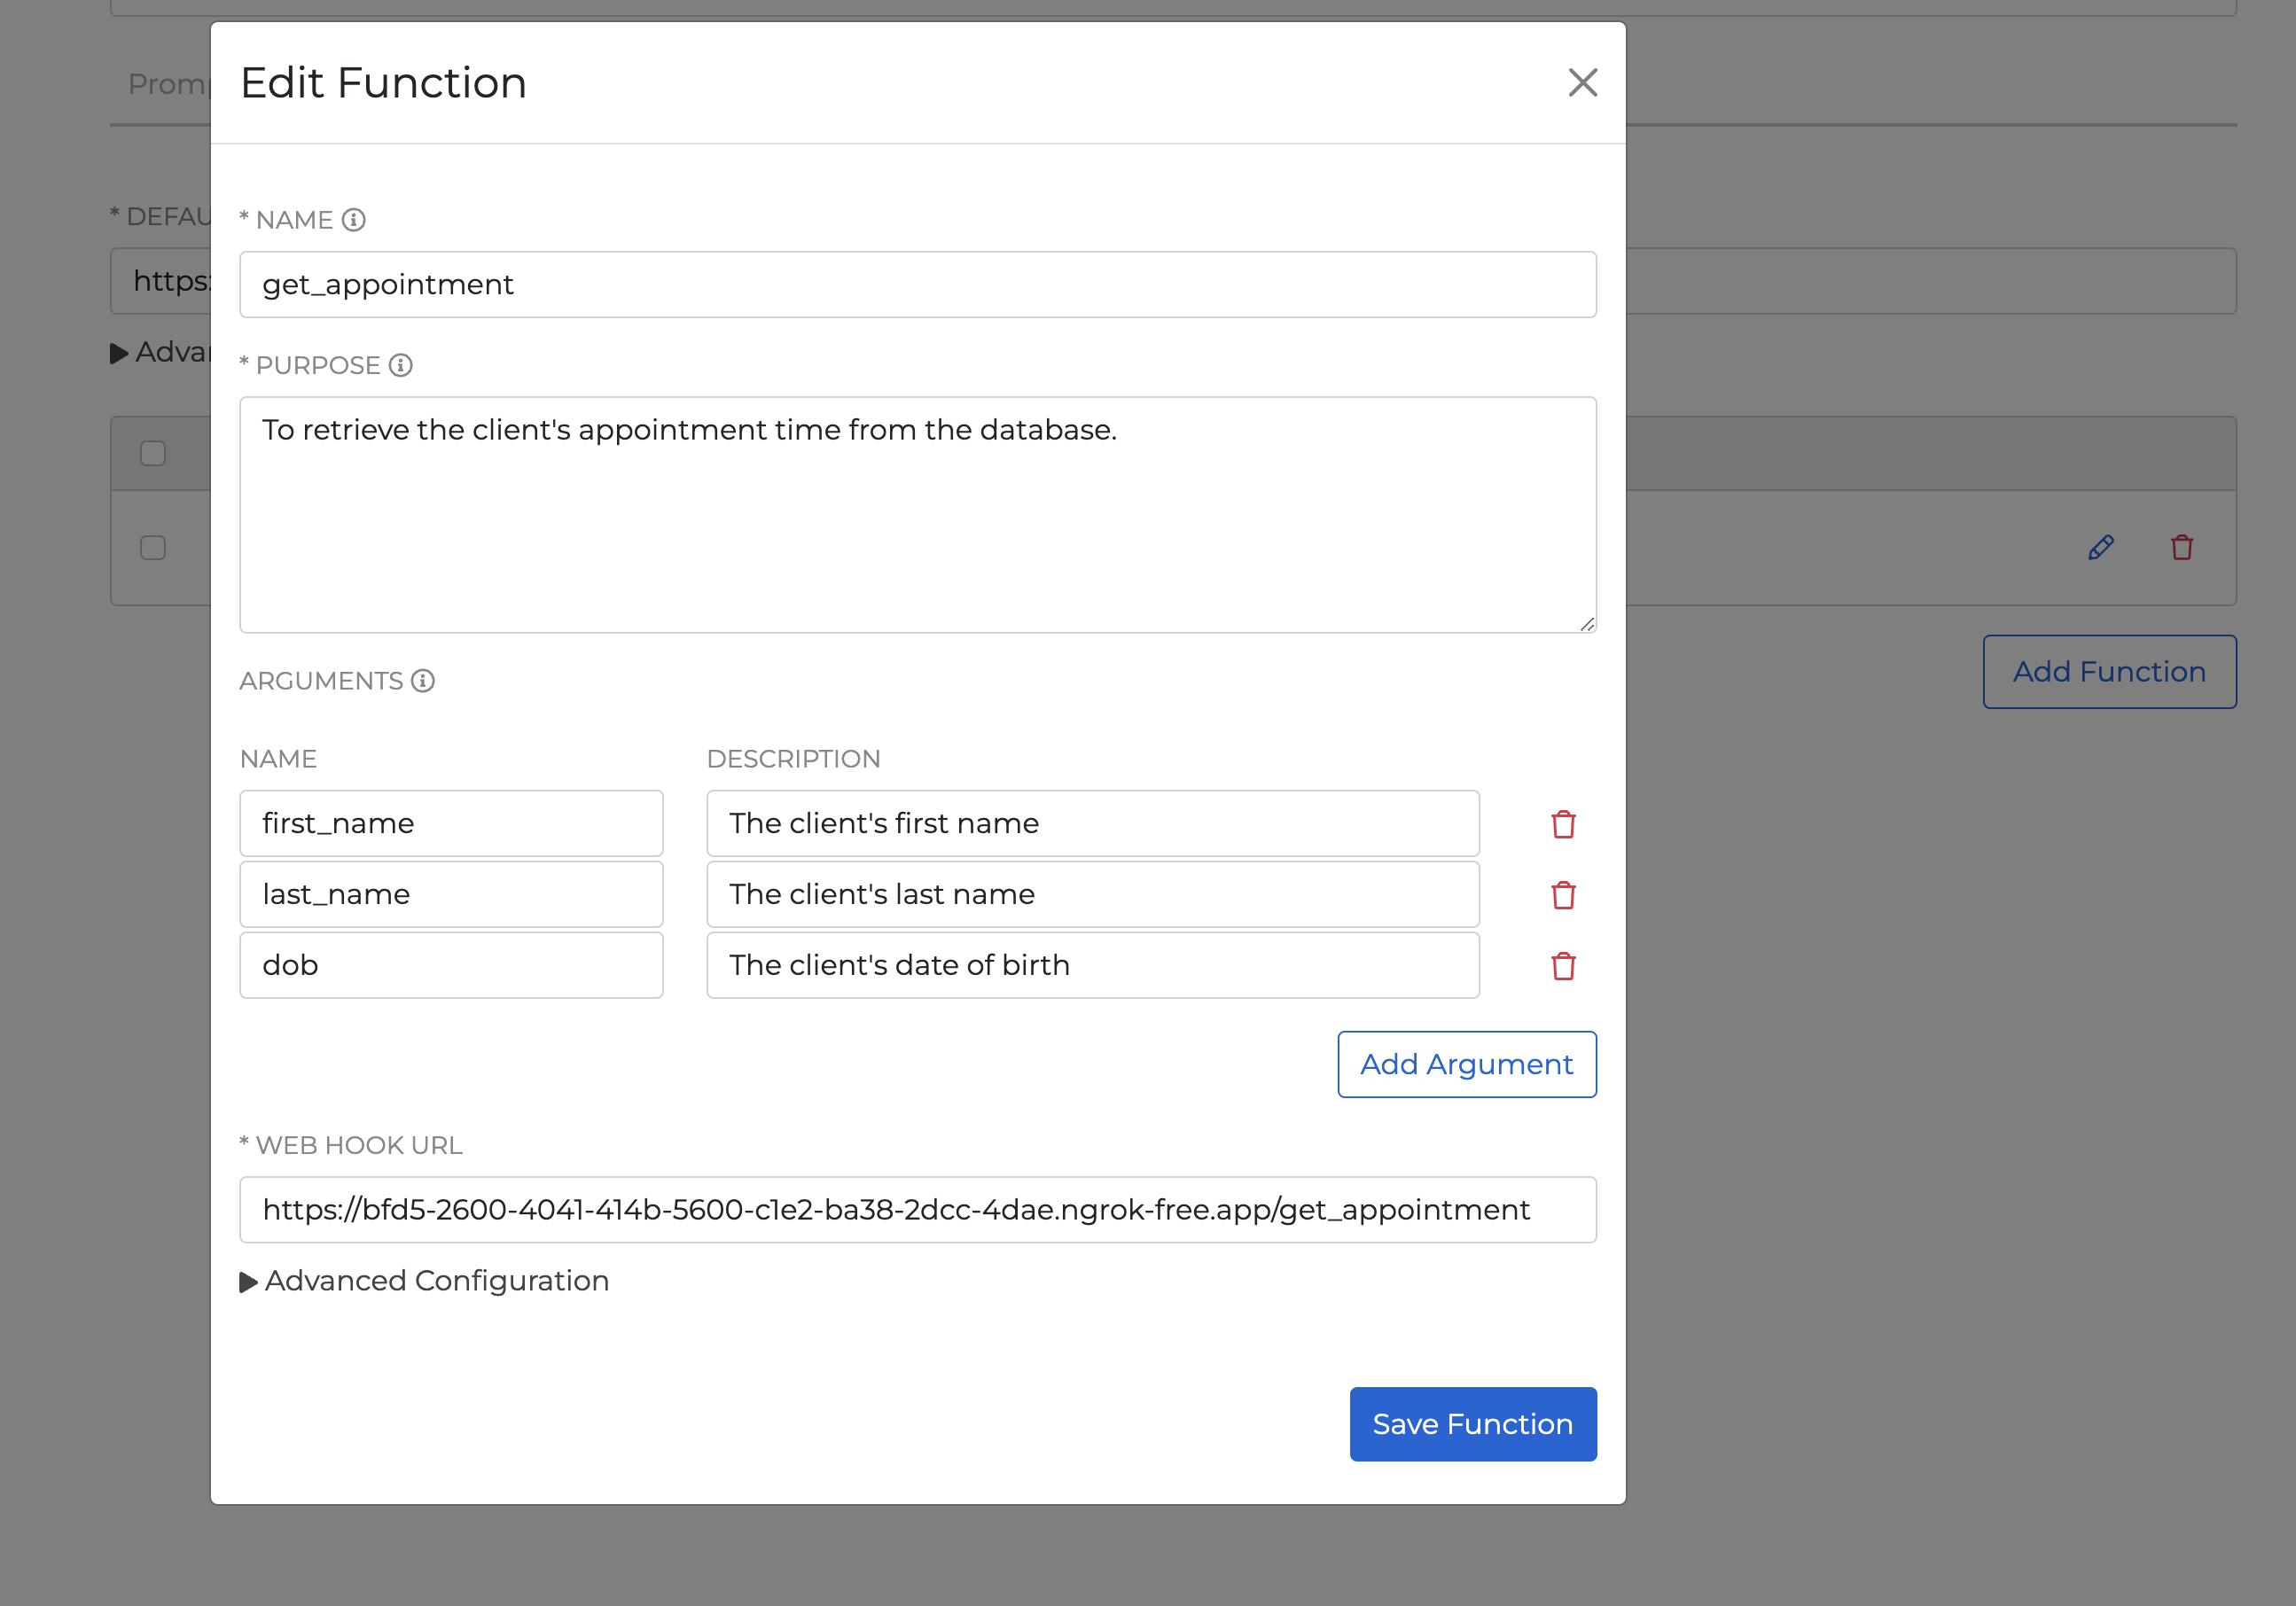
After setting up your server, navigate to the Functions tab of your SignalWire AI agent, and click on the Add Function button. Next, name your function and specify its purpose. This helps your AI agent understand when to access this particular function during interactions.

Arguments
In the Arguments section, define the parameters that your function requires to operate. These parameters will be gathered by the AI agent and used to access the function, retrieving the appointment time from the database.
Behind the scenes, these parameters are packaged within a JSON object and can be accessed through the parsed property of the argument object within the request sent to the URL.
For a more comprehensive understanding of this section, please refer to SignalWire’s developer resources.
For this function, you'll need to define the following parameters: the client's first name, last name, and date of birth.
Lastly, include the webhook URL for your function. SignalWire requires your webhooks to be publicly accessible for them to work with our services. As shown in the screenshot below, we’re using NGROK to make the endpoint accessible.
Once all configurations are complete, save both the function and any changes made to the AI agent.
Call Flow Builder integration
To integrate the AI agent into a call flow, create your setup in the Call Flow Builder tab, and tailor your modules to your specific implementation.
The example below uses a simple Interactive Voice Response (IVR) system for this use case. If a customer presses '2,' they will be automatically connected to the AI agent known as 'Ally.'
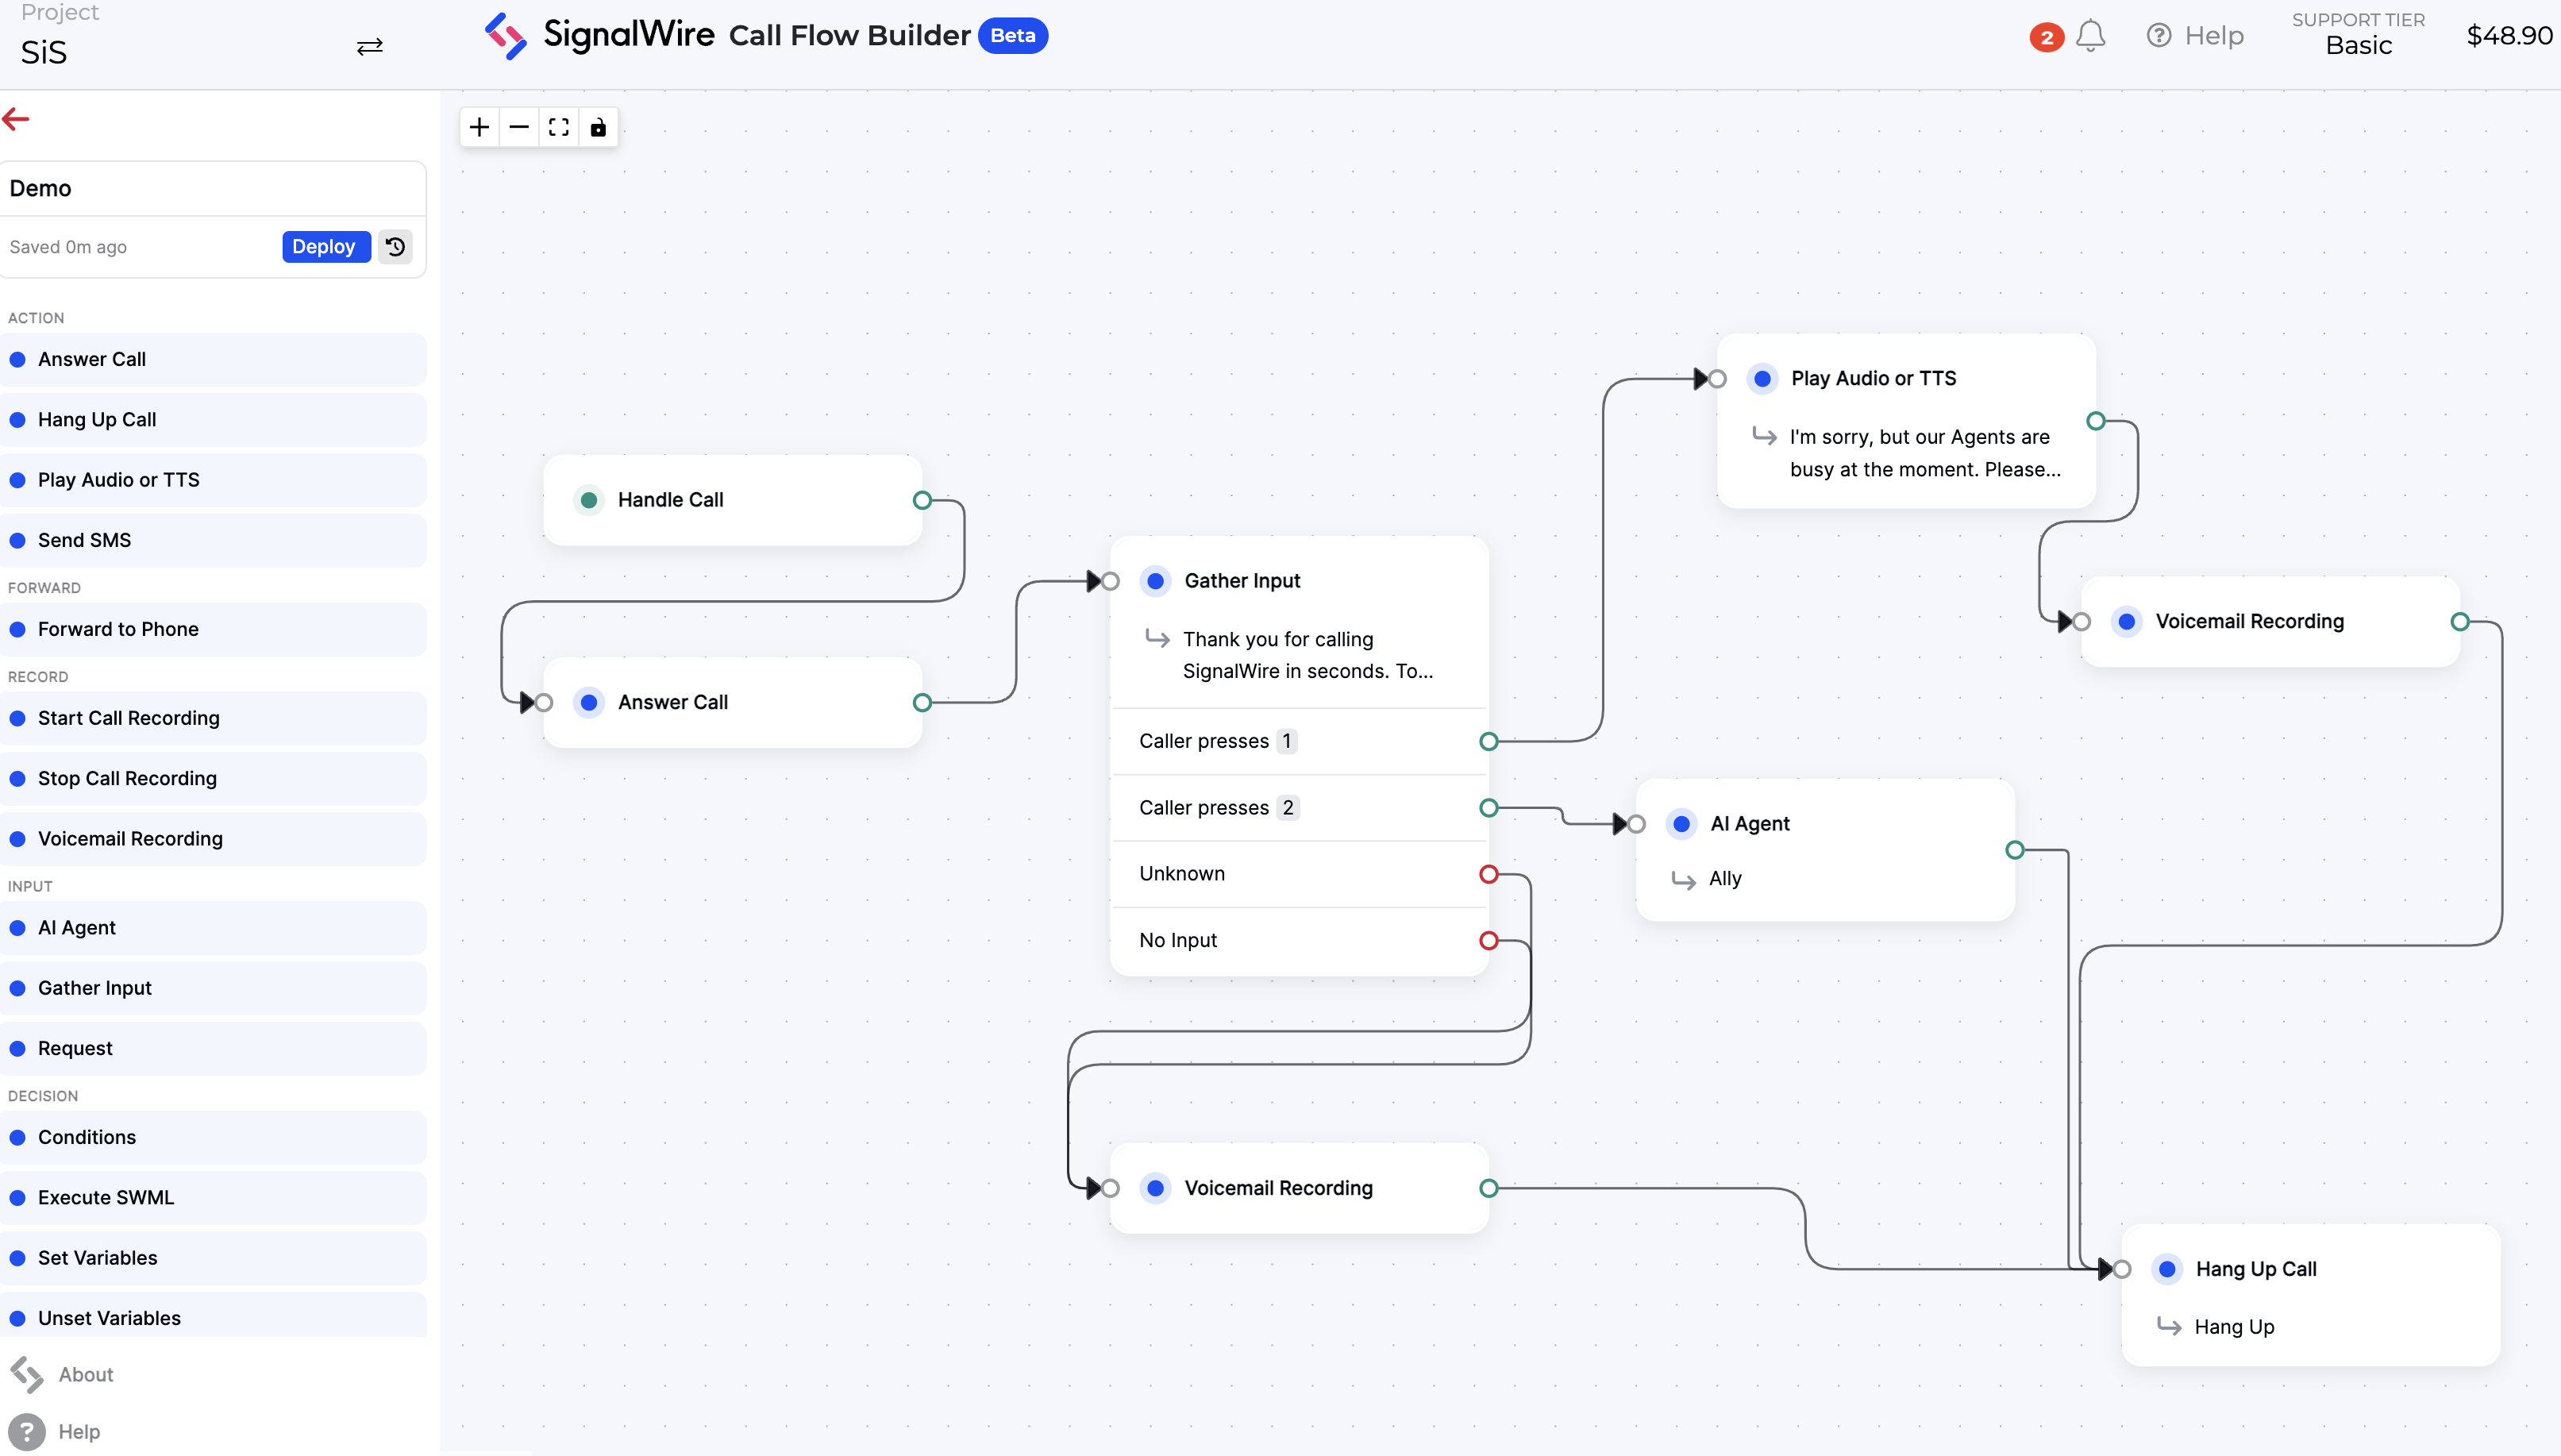
After completing the design of your call flow, don’t forget to click the Deploy button located at the top of your canvas. Then you can access the settings of your designated phone number within your SignalWire Space. From the Handle Calls Using the dropdown menu, select Call Flow. In the When a Call Comes In dropdown, choose the title of the flow you've created, select a version of your build, and save your settings.
Now that your IVR is successfully deployed, you can put it to the test by making a call to your selected phone number.
SignalWire's AI agent effortlessly connects with server databases and integrates into Call Flow Builder. This practical integration streamlines processes and enhances customer interactions by allowing AI to take over the call flow.
If you have any questions as you get started with SignalWire AI Agent or Call Flow Builder, bring them to our community Discord!
Frequently asked questions
What is Call Flow Builder (CFB)?
Call Flow Builder (CFB) is a no-code, drag-and-drop builder in the SignalWire Dashboard for creating and managing voice call flows, with nodes for routing, input gathering, recording, and integrations.
What is the advantage of adding an AI Agent to a call flow?
An AI agent can handle natural language intake, capture intent and key details, and then trigger actions such as lookups or routing, so callers can get answers without navigating rigid Interactive Voice Response (IVR) menus.
How can an AI voice agent pull customer data during a call?
Use functions that the AI agent can call during the conversation, where your function hits a backend service or database and returns structured data that the agent can use in its response.
What information should you capture for appointment lookups?
Capture stable identifiers that your systems can match reliably, such as full name and date of birth, then return only the minimum needed information, such as the appointment time, to keep the interaction fast and privacy-aware.
How do you keep AI-to-routing handoffs from feeling like the caller is starting over?
Treat the AI segment as the intake step, then pass forward the key results, such as intent, identifiers collected, and a short summary, so downstream routing and escalation can continue the same thread instead of restarting.