


Article
18 min
read
Exploring the Request Module in Call Flow Builder
Harness the power of web connectivity in your voice calls
Daniele Zils
Technical Success Manager

SignalWire Call Flow Builder (CFB) includes a Request Module that lets your voice call flows call web APIs, store responses as variables, and route calls based on real-time data. This tutorial shows how to use the Request Module with a time service to determine business hours, then use variables and conditions to route callers to an agent during business hours or to voicemail after hours and on weekends. It also covers error handling patterns for failed requests and how to deploy the finished flow to a SignalWire phone number.
What is Call Flow Builder?
SignalWire's Call Flow Builder (CFB) is an intuitive visual builder for managing voice calls. It's built for low-code development, making it easy to use for both tech-savvy users and beginners.
With a simple drag-and-drop interface, CFB allows anyone to organize a call flow. Users can program more advanced call flows using SignalWire Markup Language (SWML) scripts.
One of CFB’s standout features is the Request Module. This module connects your voice applications to the web, whether you're pulling data, saving call details to databases, or working with third-party APIs.
In this post, we'll demonstrate how to use the Request Module to fetch the current time from an API. This determines whether the call is within business hours or not.
This ensures that callers are directed appropriately, be it to a live representative or a voicemail, based on the time of their call.
To get started, you just need a SignalWire Space and a verified phone number.
Setting up the call flow
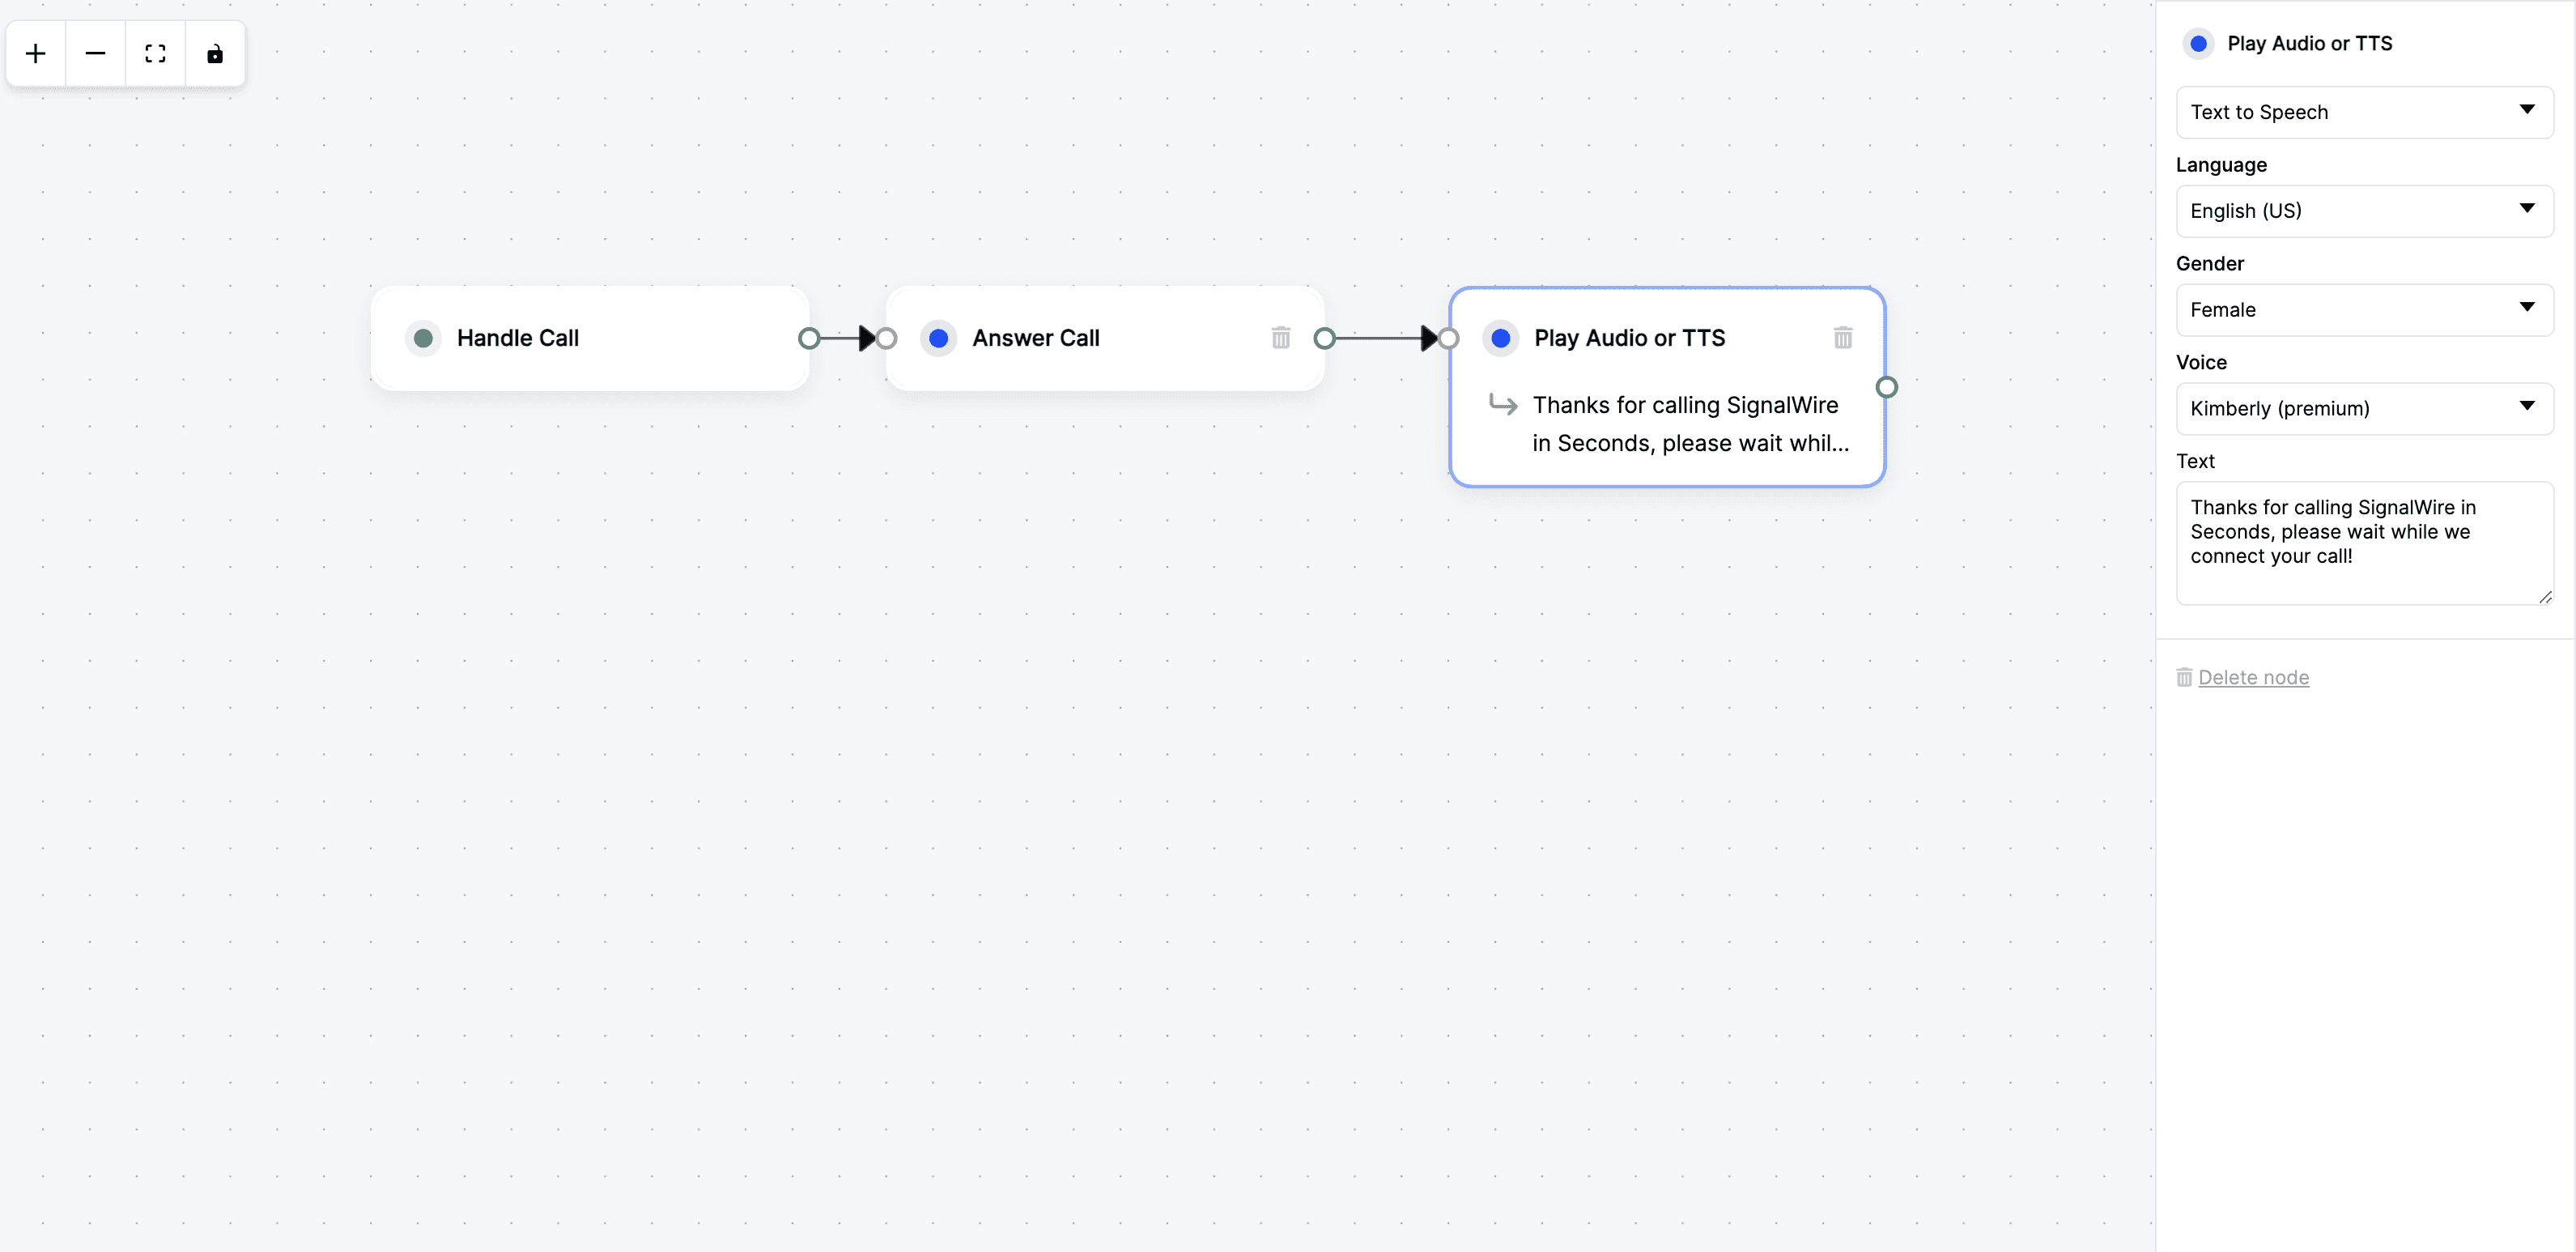
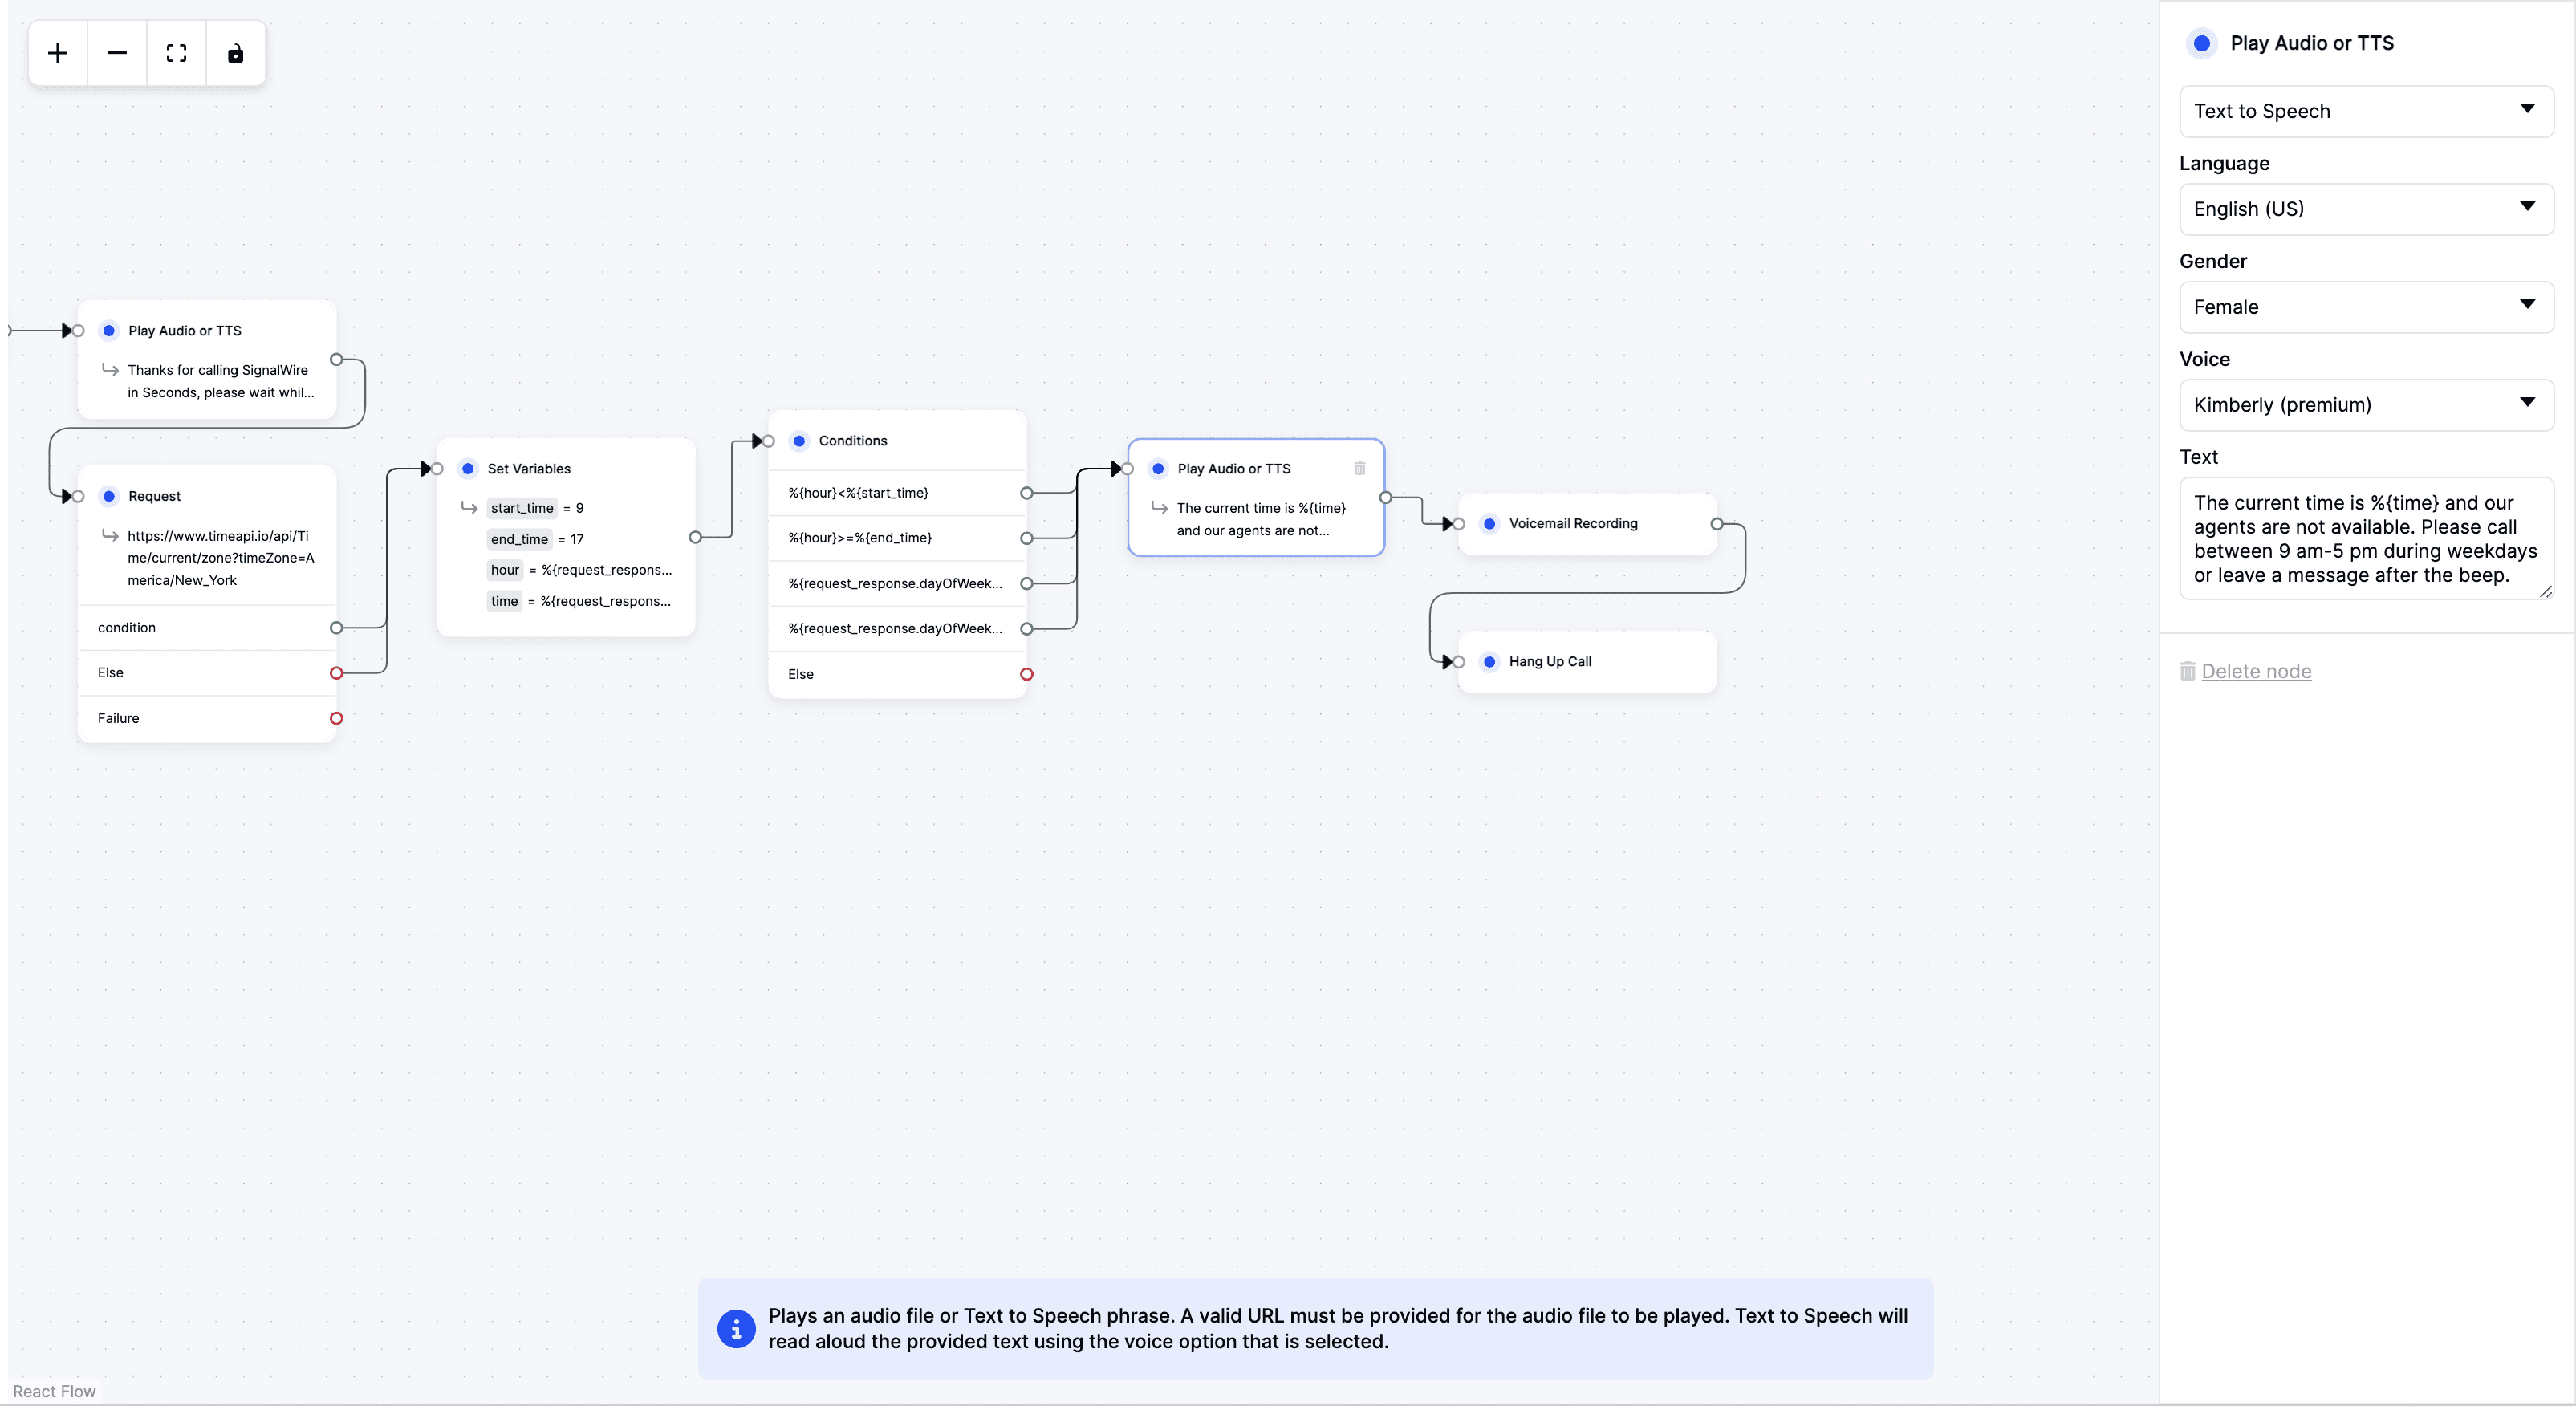
Start by heading to the Call Flow Builder tab within your SignalWire Space and initiate a new call flow by clicking on ‘Add New. Upon saving, the canvas will present the initial 'Handle Call' module.
To provide an immediate response to the caller, link the 'Answer Call' module to the 'Play Audio or TTS' (Text to Speech) module. This step ensures that every caller is promptly acknowledged as their call enters the system.
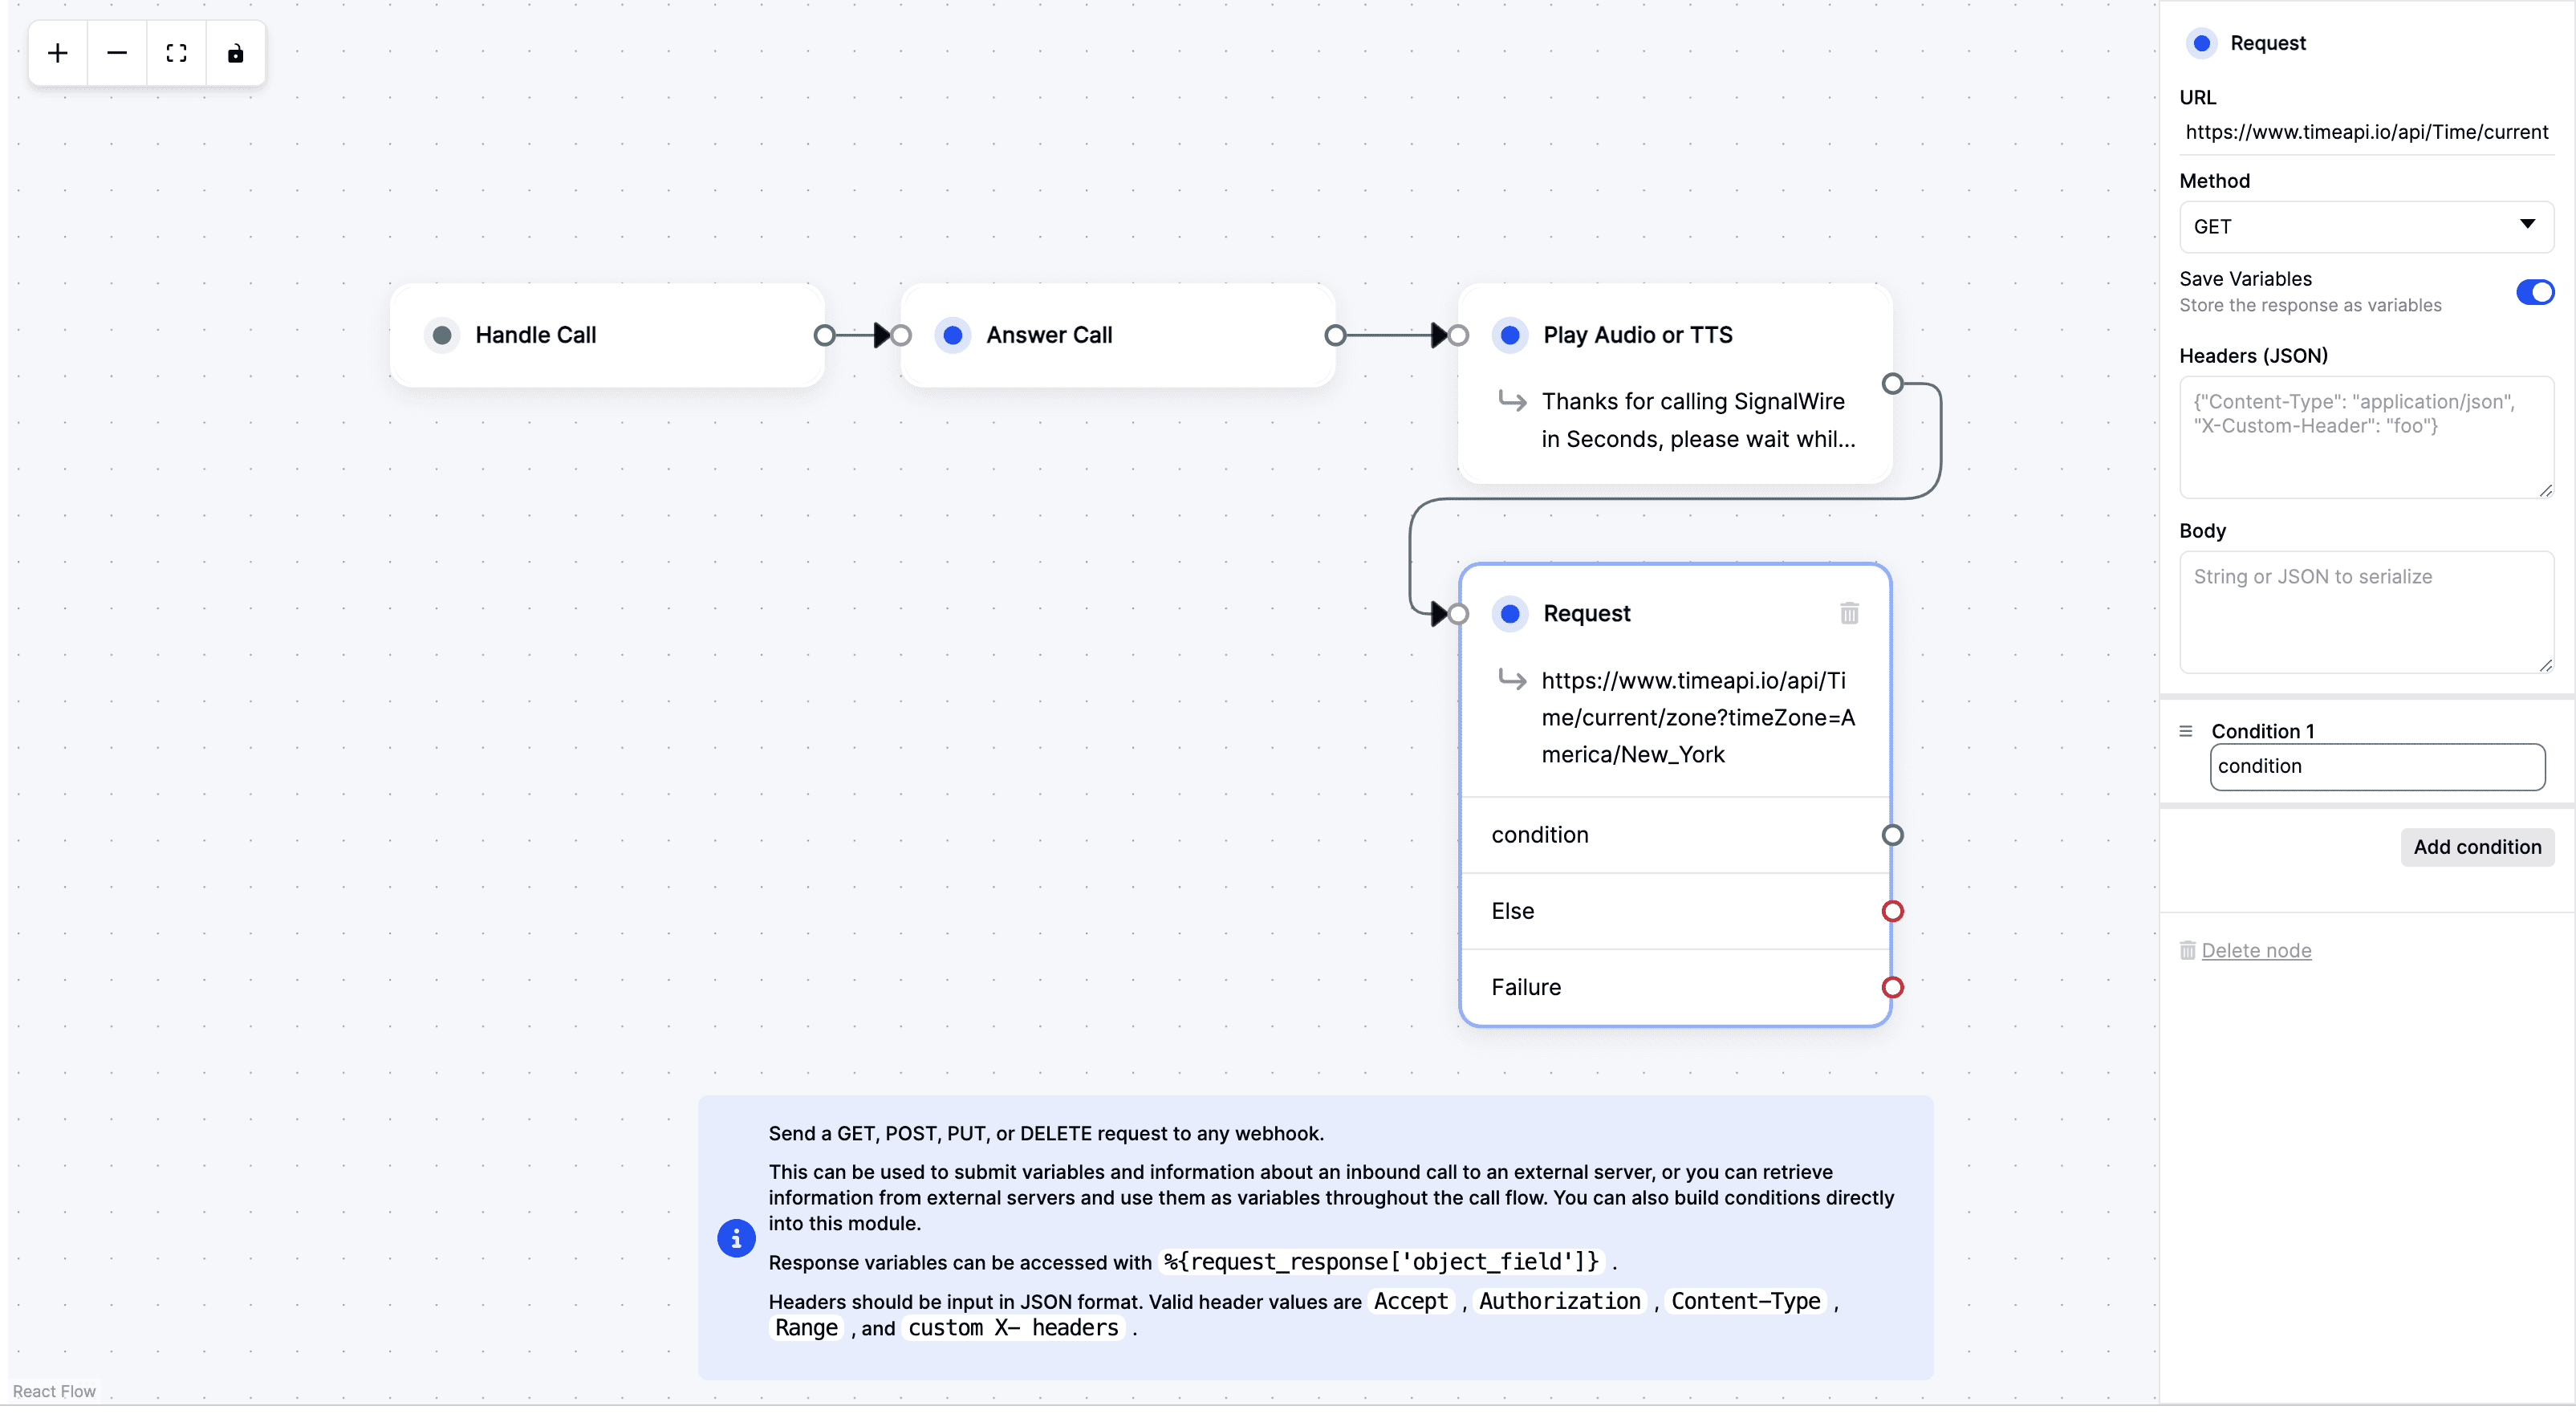
Implementing the Request Module
Next, configure the Request Module to verify if the call is incoming during business hours. This is achieved by connecting it to the Time API.
Note: The Time API offers real-time data on the current time based on a given timezone. Dive deeper into its capabilities on the Time API official website.
Set the method to ‘GET’, to retrieve information. In the "Save Variables" section, toggle on "Store the response as variables." This action ensures the data fetched from the Time API is stored for later use in the call flow.
For this API request, headers aren't necessary, and because it's a GET request, there's no need for a body.
The "Condition" section is where we apply logic to the fetched data. Instead of writing out conditions directly within this module, link to predefined variables.
These variables hold the logic that determines whether the call is within business hours.
Remember to consult the SWML documentation if you’re ever in doubt about what to include in the Request Module.
Set variables
In the Call Flow Builder, the "Set Variables" module plays a pivotal role in defining and managing data specific to a call flow. Here's a breakdown of the variables we've set up for our use case:
START_TIME: This variable marks the beginning of business hours, set at 9 AM.
END_TIME: Denoting the end of business hours, this variable is set to 17, which in the 24-hour format used by our Time API translates to 5 PM.
HOUR: This variable dynamically captures the current hour from the API's response. It's fetched using the SWML syntax %{request_response.hour}, allowing us to pull real-time data directly from the API's response.
TIME: Similarly, this variable fetches the precise moment the API is accessed, giving us the current time in the format "HH:MM". This is retrieved using the SWML syntax %{request_response.time}.
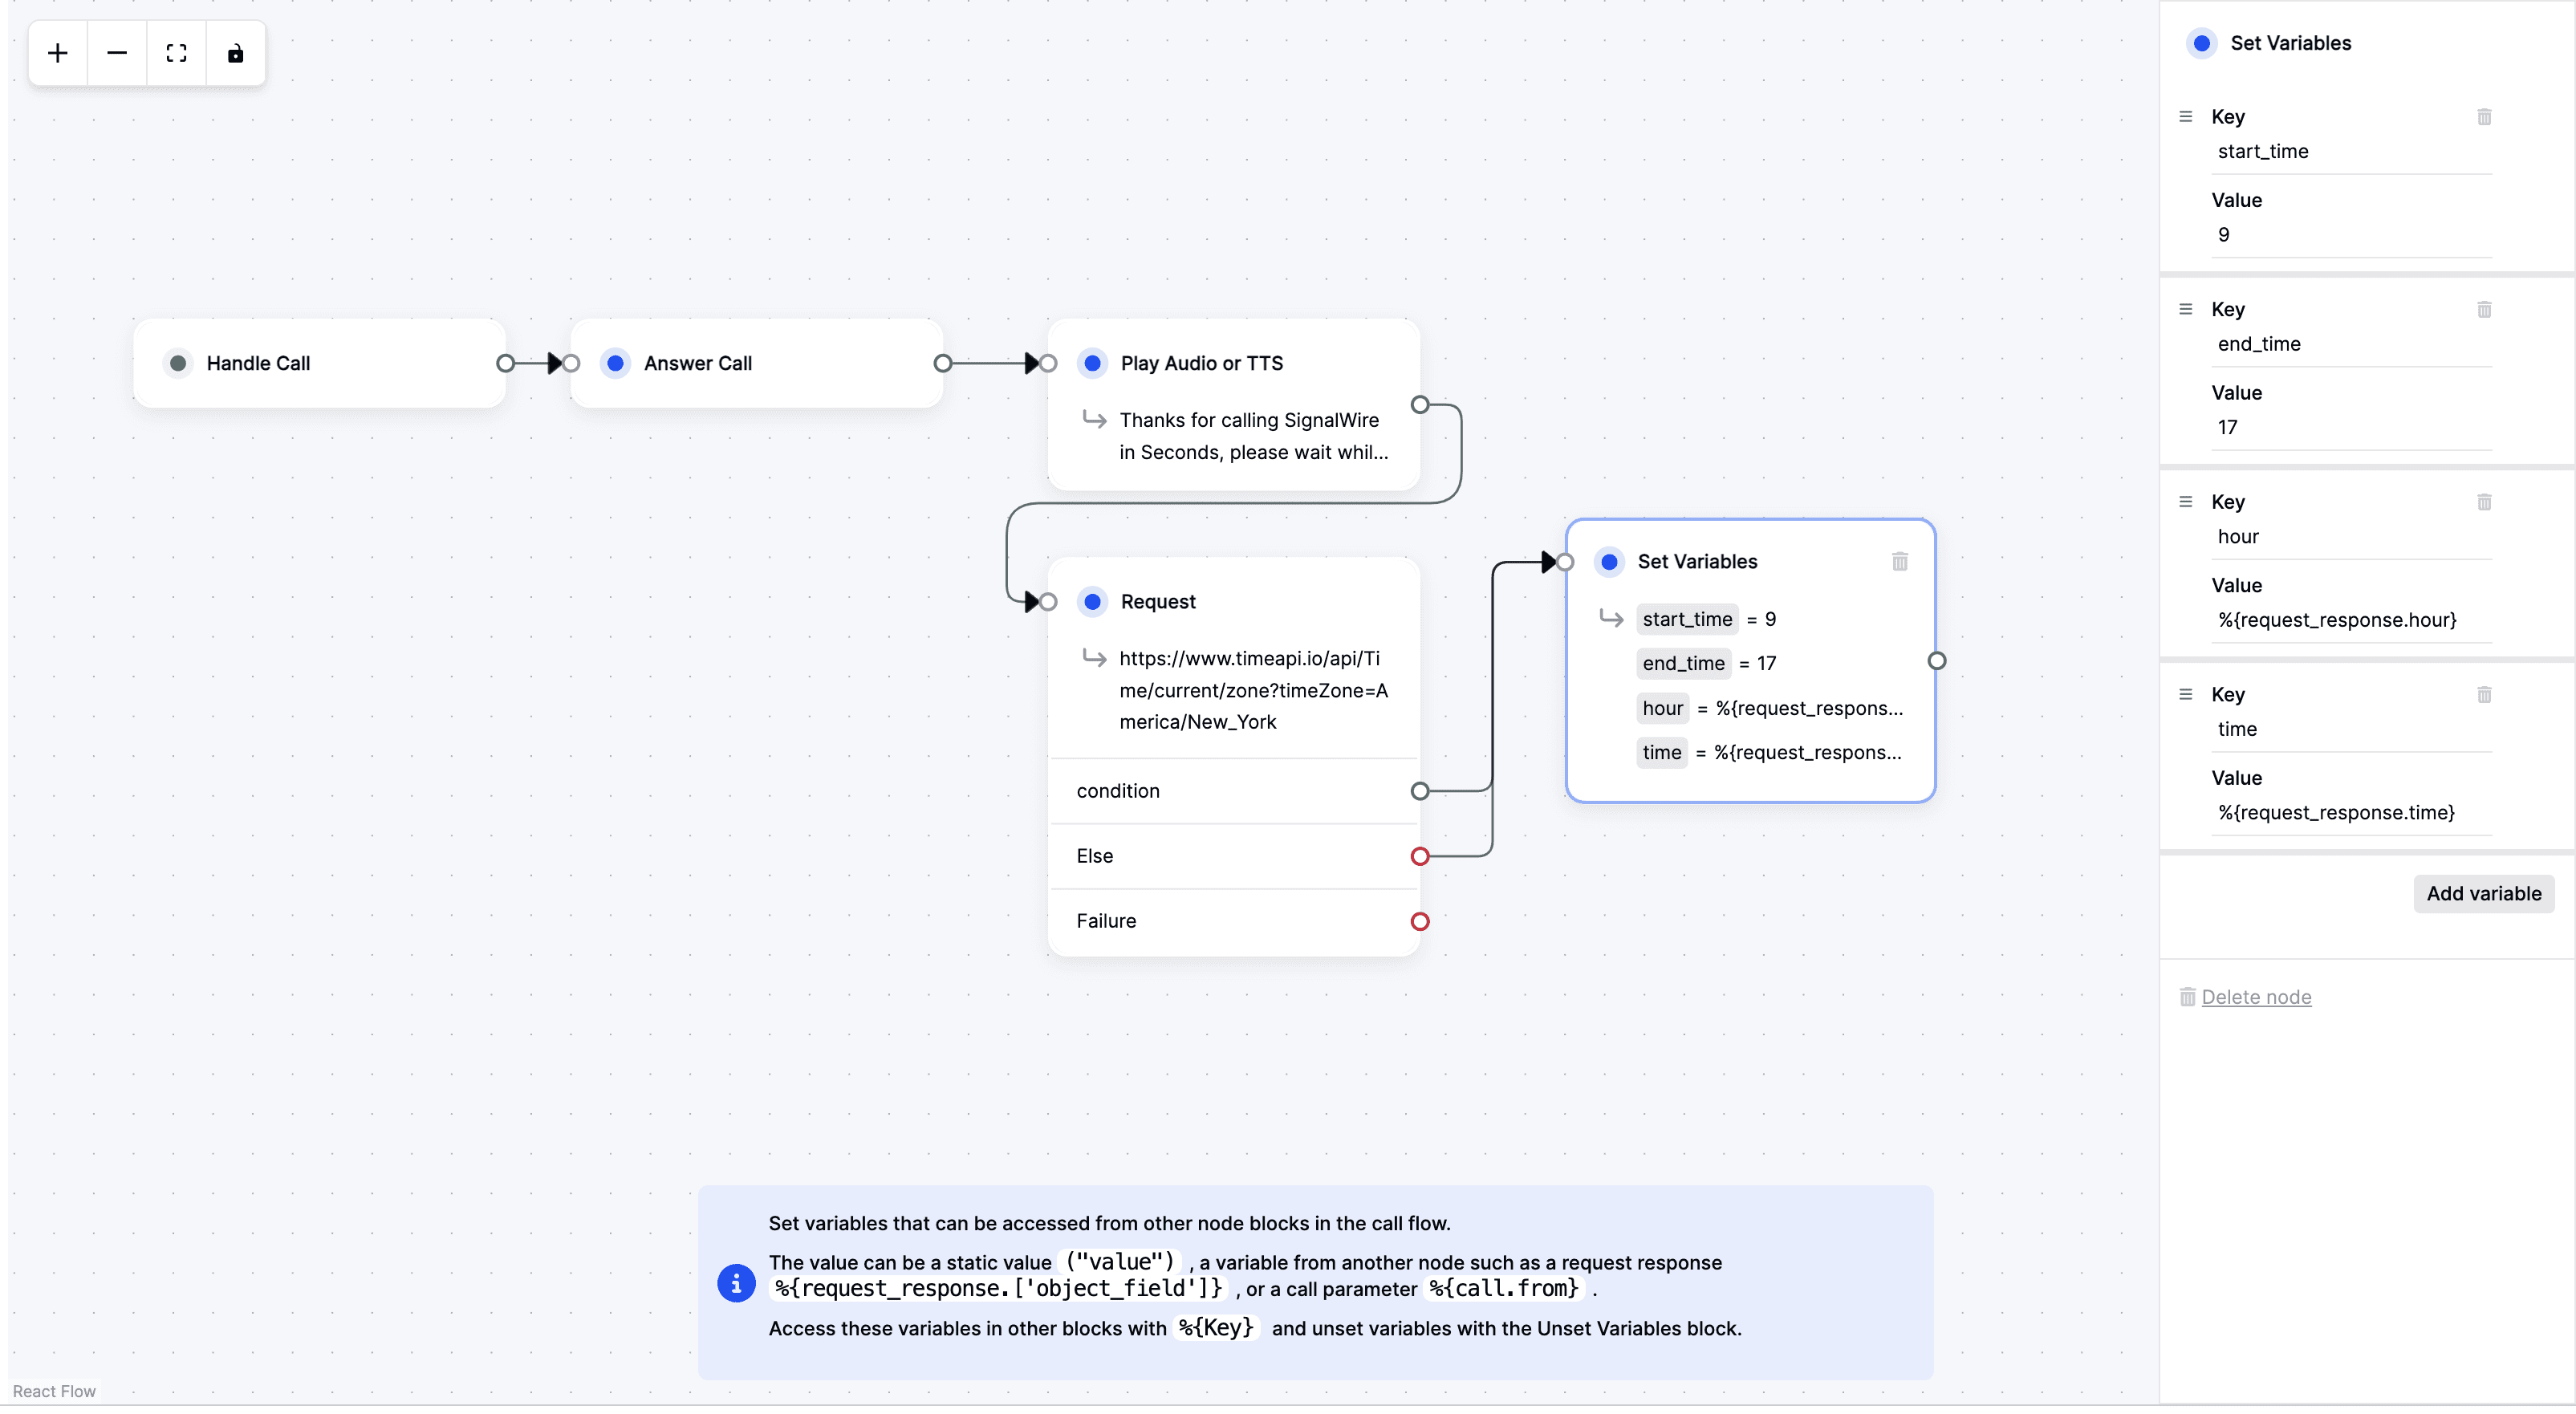
With these variables, we can craft a custom experience for the caller, ensuring they receive the right response based on the time of their call.
Conditions
The conditions we set in the Call Flow Builder are the backbone of the dynamic call routing. They determine the path a call will take based on real-time data. Here's how we've structured our conditions:
Condition 1: Check if the current hour is before the office's start time, with the SWML syntax %{hour}<%{start_time}.
Condition 2: This condition verifies if the call is being made post business hours, %{hour}>=%{end_time}.
Condition 3: Here we set a condition that checks if the current day is a Saturday using the API's dayOfWeekresponse, %{request_response.dayOfWeek=='Saturday'}.
Condition 4: Similarly, we've set another condition to verify if it's a Sunday.
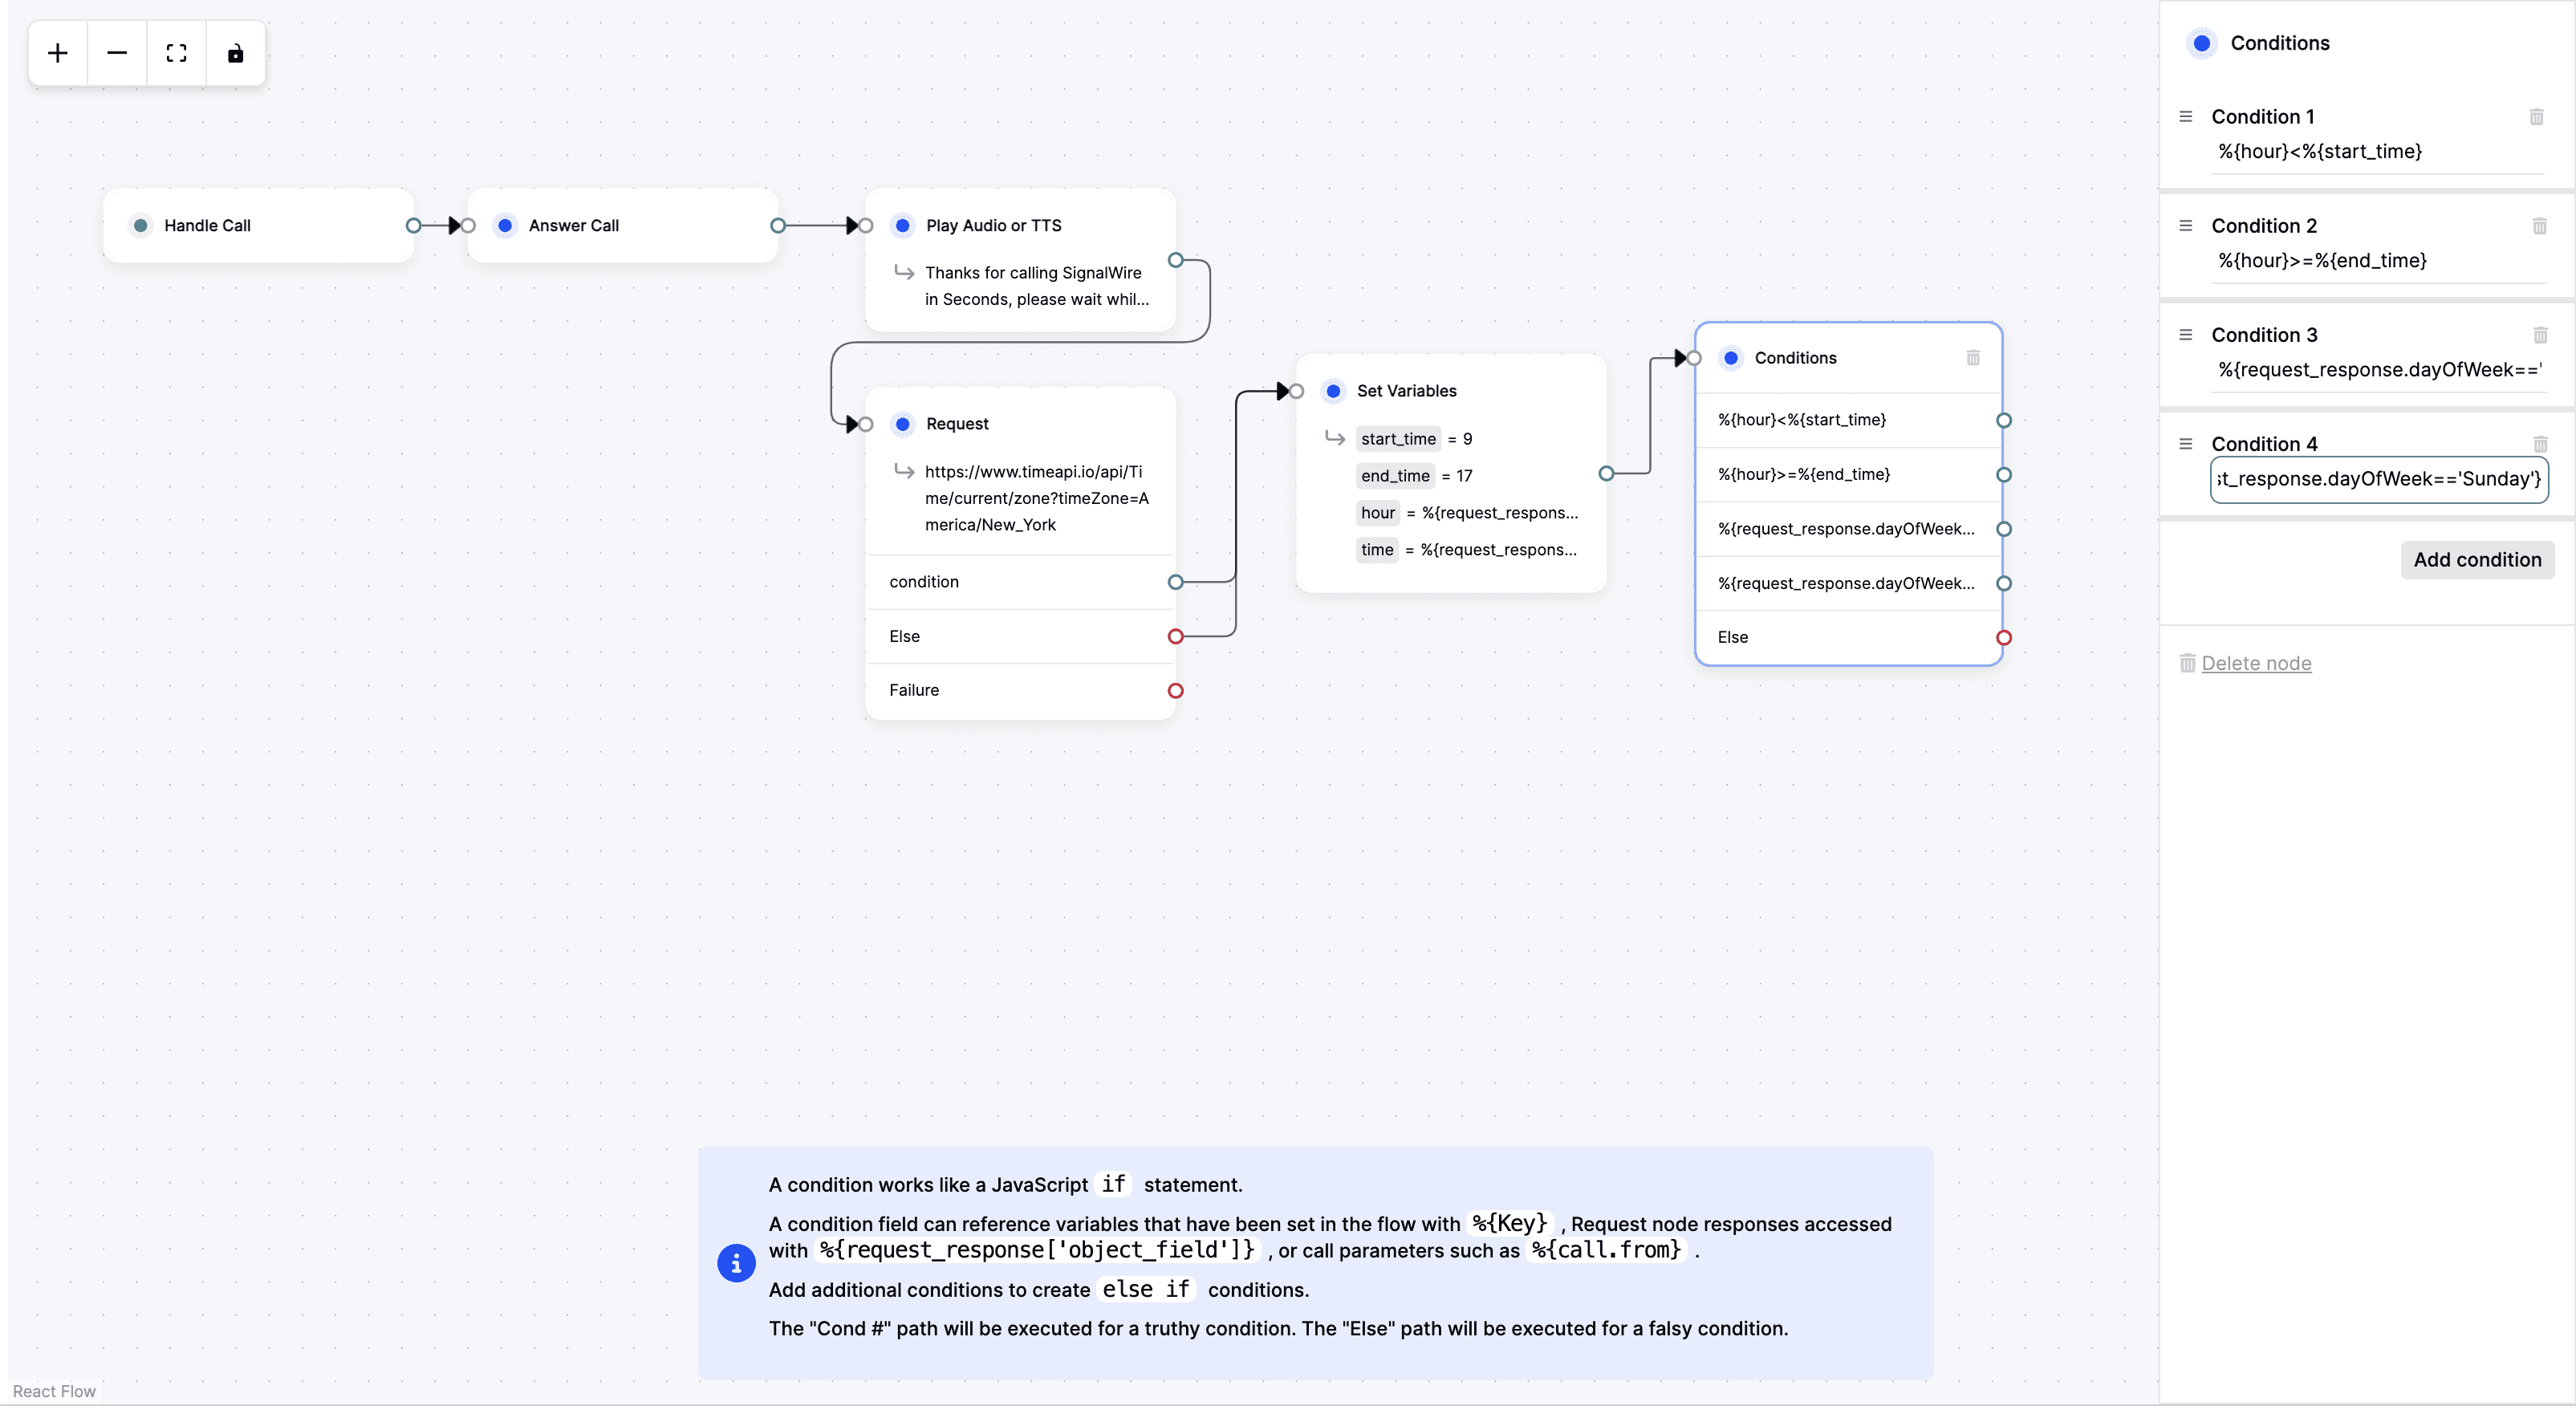
With these conditions in place, we can ensure that callers are routed appropriately based on the time of day, whether it's to an agent or to a voicemail system.
Caller experience based on conditions
If a call comes in over the weekend, the caller is greeted by an automated message generated using the Text to Speech (TTS) module. This message is dynamic, leveraging the time variable from our Time API request.
Following this greeting, the Voicemail Module is activated, allowing the caller to leave a message.
If someone calls during business hours, they're informed via a Play TTS module that their call will be recorded. After this brief alert, the Forward Phone Module is triggered, setting the call to be routed to a live agent's phone number.
If the call doesn't connect to an agent, the Voicemail Module is activated, prompting the caller to leave a message.
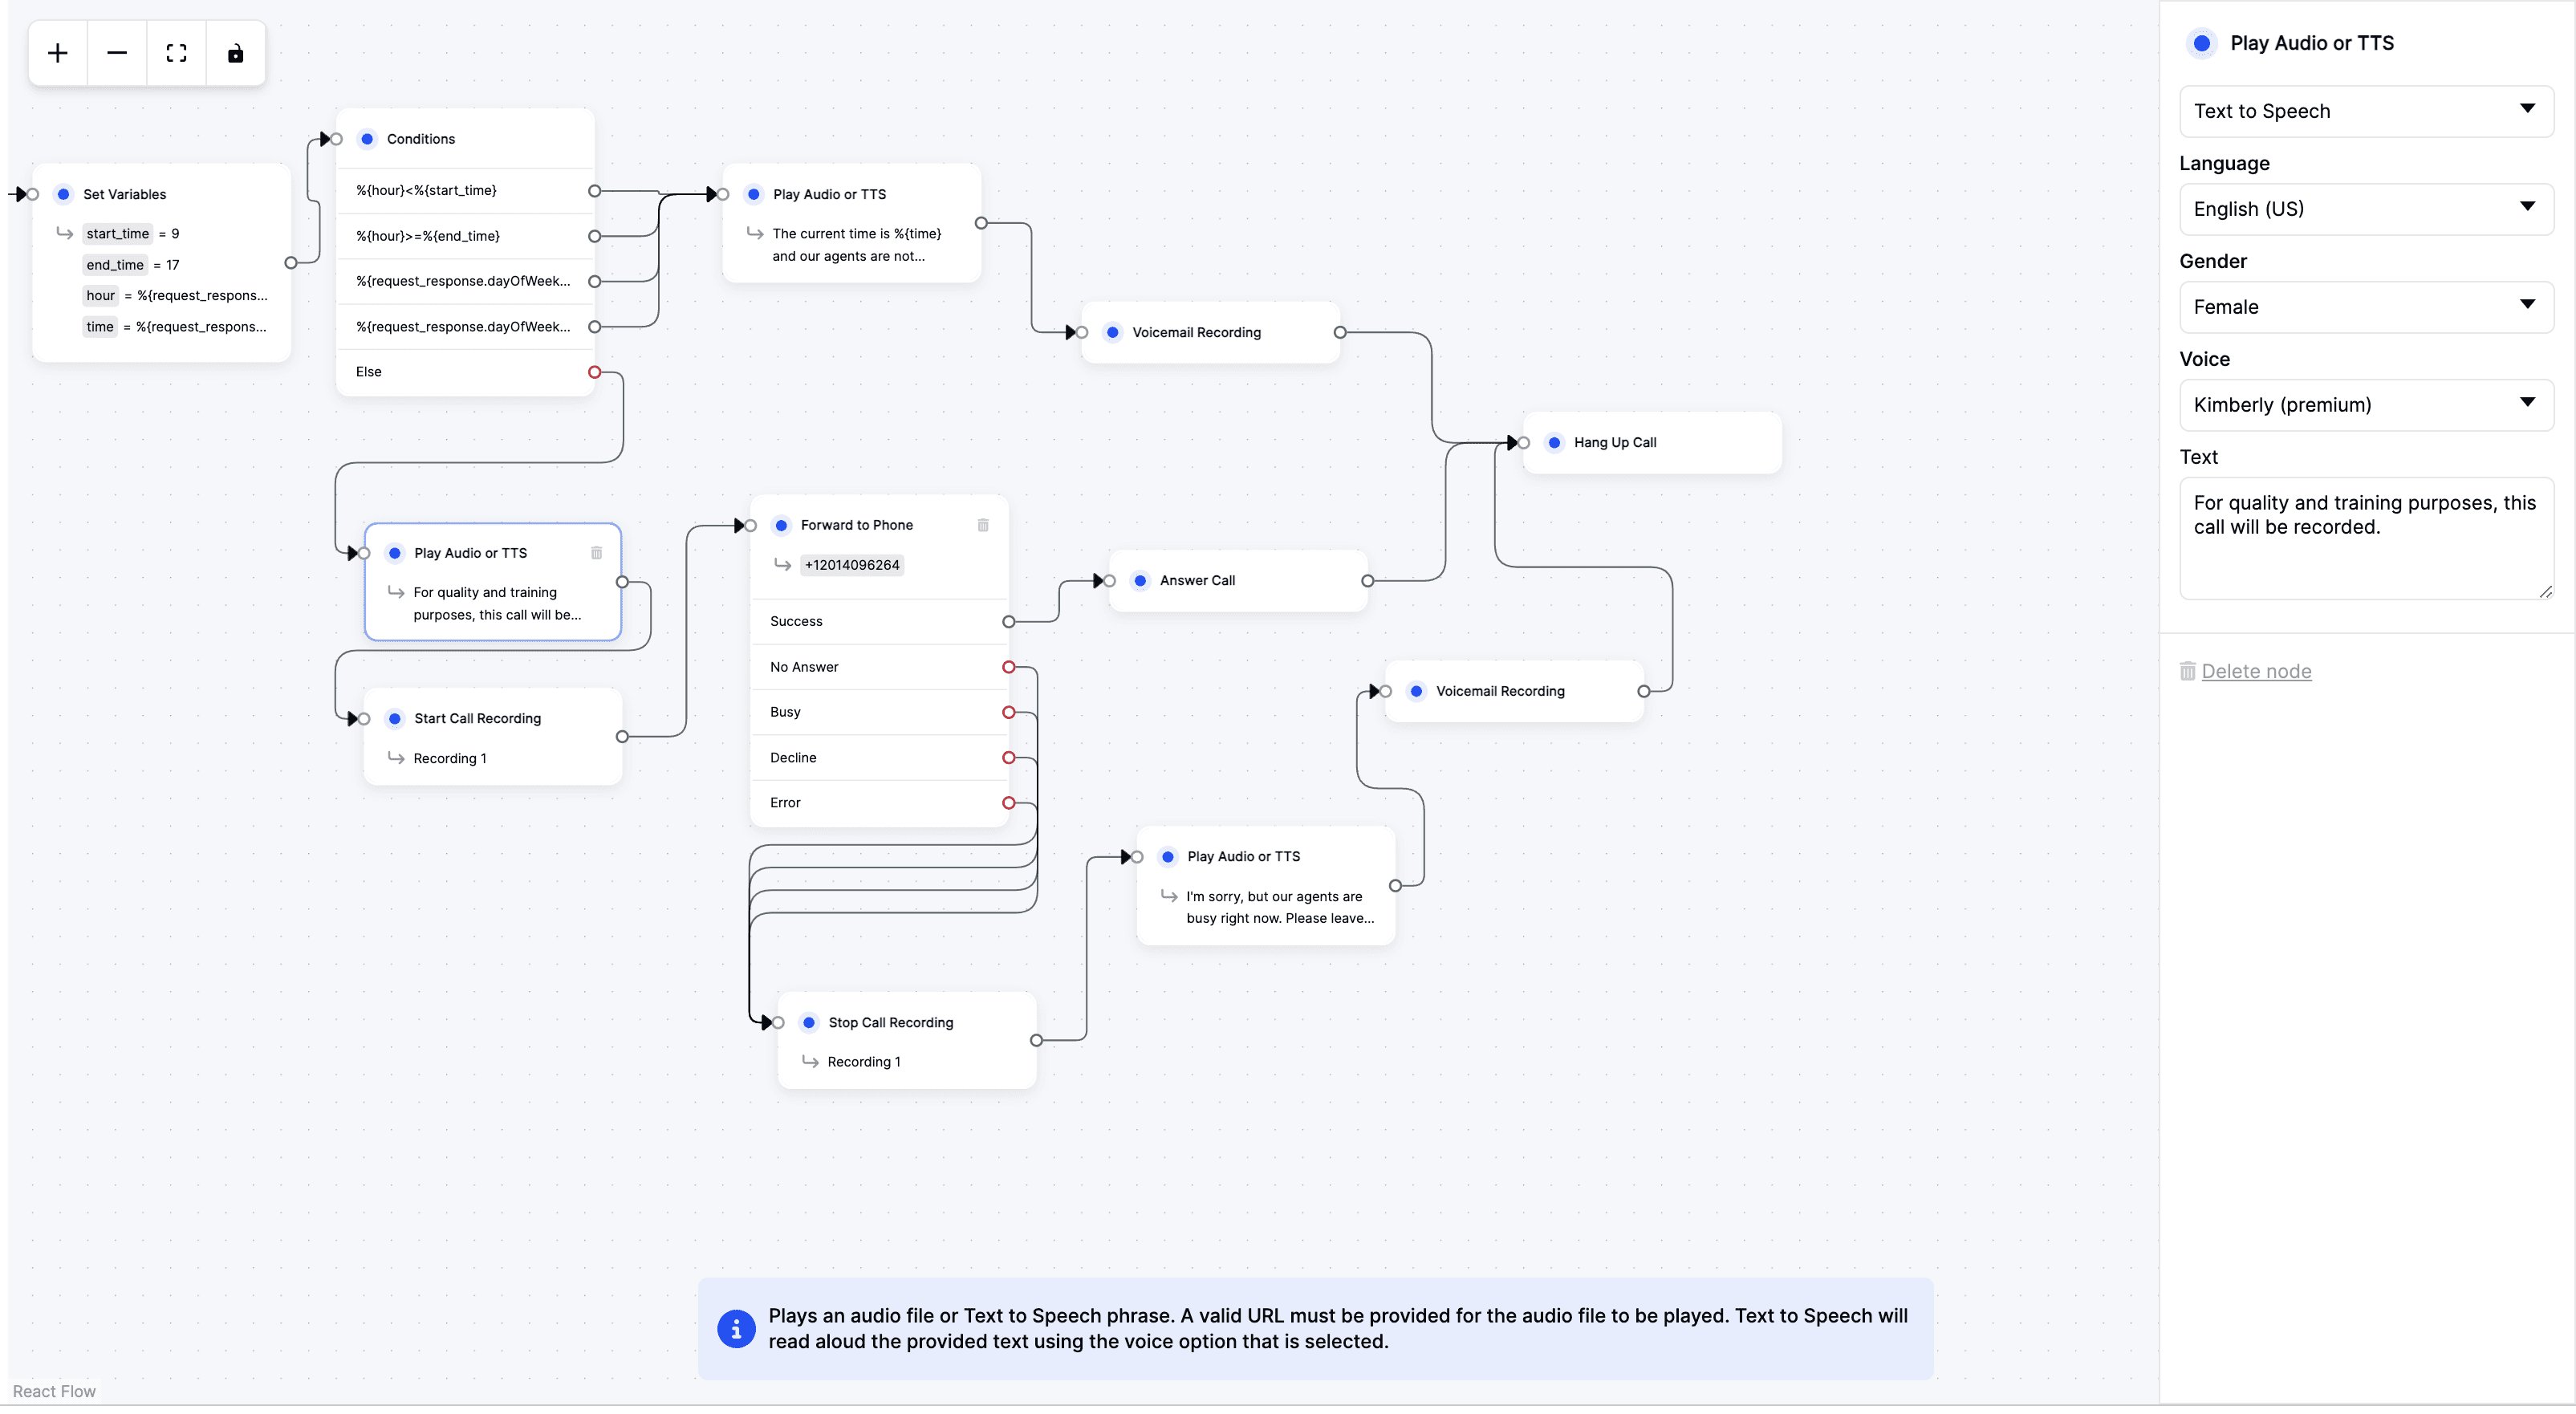
Handling errors
In any call flow, it's crucial to anticipate and handle potential errors. This ensures a smooth experience for the caller, even when things don't go as planned.
In the event of an error or unexpected response within our Request Module, we've set up a series of fallback actions:
Play TTS: This module will inform the caller of an issue or provide a relevant message.
Voicemail Recording: If necessary, the caller can leave a message, ensuring that their concerns are captured even in the face of technical issues.
Hang Up Call: After the necessary information is conveyed or recorded, the call is ended.

Deploying up your call flow
The Request Module is a testament to the power and flexibility of SignalWire's Call Flow Builder. This tool transforms the intricate task of designing dynamic and responsive call flows into a straightforward, user-friendly experience.

Once you're happy with your call flow design, deployment is simple: click the 'Deploy' button at the top of your canvas. Next, head over to the phone number settings within your SignalWire Space.
From the 'Handle Calls Using' dropdown, select 'Call Flow'. From the 'When a Call Comes In' dropdown, choose the title of your designed flow. Pick the appropriate version and save.
Your call flow is now live!
Test its functionality by dialing your designated phone number. With Call Flow Builder currently in its Beta phase, some features and assets might undergo changes leading up to the final release.
If you have any questions as you build your call flows, bring them to our community Discord!
Frequently asked questions
What does the Request Module do in Call Flow Builder (CFB)?
The Request Module connects your call flow to the web so you can fetch data from an API, store the response as variables, and use that data to drive call routing decisions.
How do you store an API response as variables in Call Flow Builder (CFB)?
Enable storing the response as variables in the Request Module, then reference response fields using SignalWire Markup Language (SWML) variable syntax, for example pulling the current hour from the response for business-hours logic.
How do you route calls by business hours using the Request Module?
A common pattern is calling a time API, saving the current hour, then setting conditions that check whether the call is before start time, after end time, or on weekends, and routing accordingly.
What should you do if the Request Module fails during a live call?
Set up fallback actions on the Request failure path, such as playing a Text to Speech (TTS) message, offering voicemail recording, and then ending the call cleanly.
How do you deploy a Call Flow Builder (CFB) flow to a phone number?
Deploy the flow from the canvas, then in your phone number settings select Call Flow under “Handle Calls Using,” choose the flow name and version, and save.
Related Resources


