By Steve Pao
Just about every survey platform provides a standard question for contact information to collect mobile phone numbers, but almost none of them provide a direct integration to use that mobile number for follow-up communications via SMS.
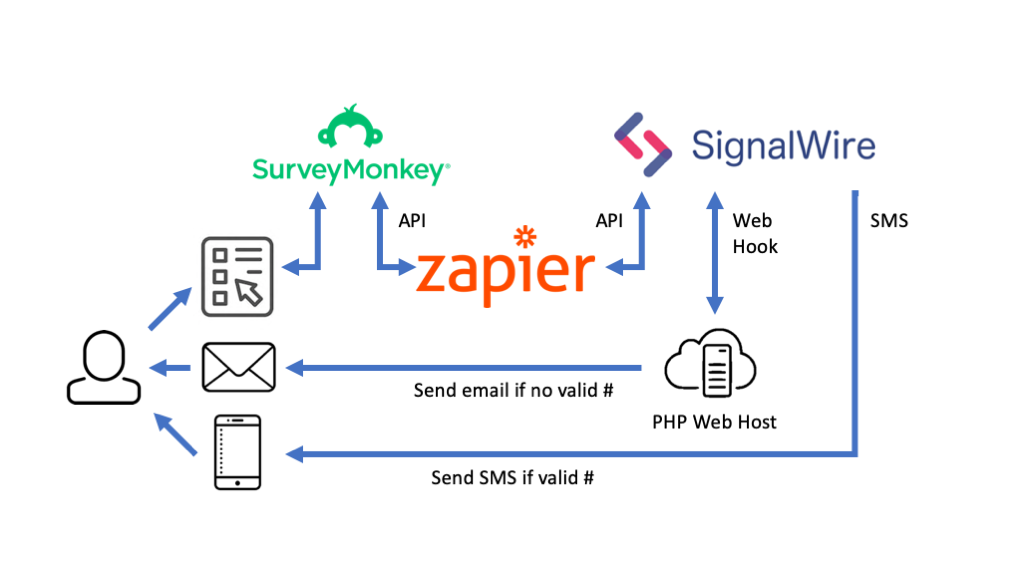
While these survey platforms often have their own API integration, utilizing these APIs often requires more expensive premium licensing as well as a learning curve. With Zapier, you can easily forward events from survey platforms right into SignalWire.
In this example, we’ll connect SurveyMonkey with SignalWire and send a simple follow-up SMS message to thank people for taking a survey. We’ll make it easy to say “Thanks” for filling out our surveys!
What’s Needed
For our example, all you need is the following:
- A paid SurveyMonkey account
- A Zapier account to integrate the APIs (a free one can work!)
- A SignalWire account with enough credit to purchase numbers and transact text messages
- A PHP Web host to process logic and send email as fallback
Try Out the Demo Version
A demo version of this application is running on SurveyMonkey today. Check it out! Visit: http://surveymonkey.com/r/sw1
Fill out the survey and be sure to enter your mobile number and your email! If you’ve entered your mobile number right, you should get an SMS message. Otherwise, you should get an email.
Let's Build it from Scratch
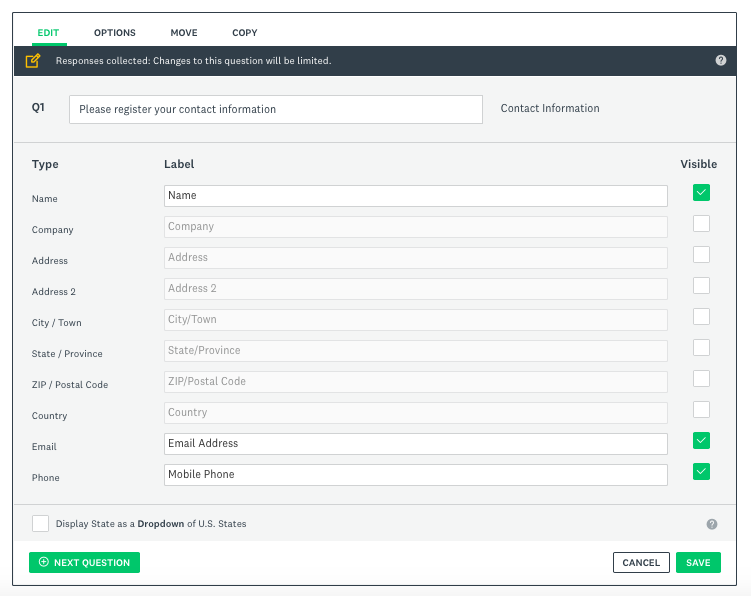
To build this application for ourselves, let's start by creating a SurveyMonkey account. Make sure that your SurveyMonkey survey uses the standard Contact Information question and that you display the name, email, and Mobile Phone fields.
Once you’ve created your survey, go ahead and create a collector and respond to it with a valid email and mobile phone number. Zapier requires that there is at least one valid response to the survey to create the integration.
Set up two Numbers in SignalWire
If you don't have one yet, you need to create a SignalWire space, then go ahead and purchase two telephone numbers. For this example, we’ll use one telephone number for outbound API access from Zapier, and another number to receive text messages from the outbound API call to send text messages back to the user. In this example, we’ve purchased two numbers:
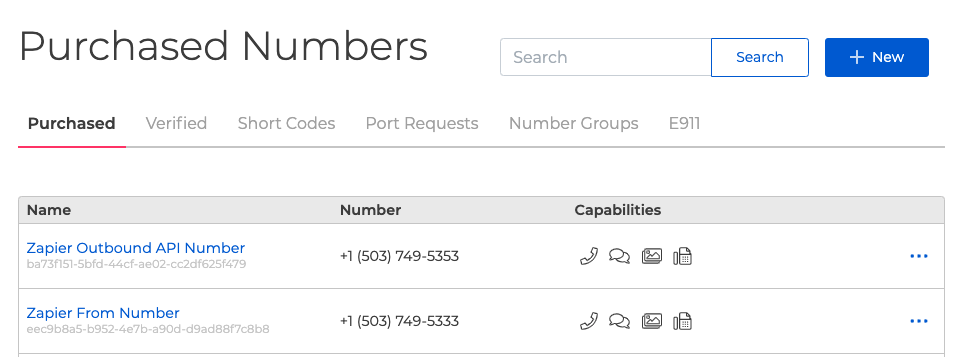
- Outbound API access: +1 (503) 749-5353
- A “public” telephone number that will receive messages from Zapier and send messages to users: +1 (503) 749-5333
Customize and Upload a PHP File
For this example, we’ll use a Web hosting platform that supports PHP. Download this file and customize it with four values:
- The telephone number for Outbound API access. (In the example, it was +1 (503) 749-5353).
- The subject line of your any emails or the first line of an SMS.
- The body of any emails or the second line of an SMS.
- A valid email “From:” address from your PHP Web host.
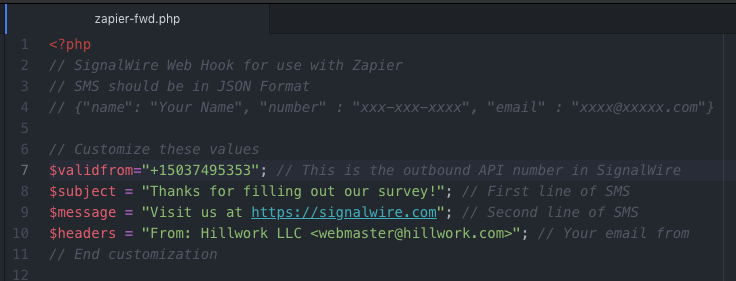
When done, just upload this file straight to your PHP Web host and note your file location! In this example, the file was uploaded to: https://hillwork.com/surveymonkey/zapier-fwd.php.
One important purpose of this PHP file is to translate telephone numbers from a format that a user might enter them in (e.g., (503) 555-1212) into an e.164 format (e.g., +15035551212) usable by SignalWire APIs.
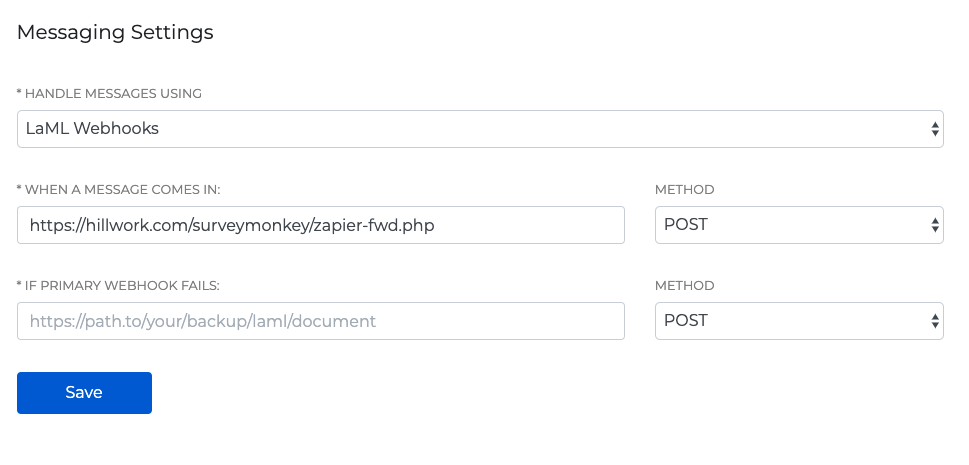
Set up the SignalWire Number with a LāML Webhook
Now, go back into your SignalWire space and edit your “public” telephone number that will receive messages from Zapier and send messages to users. In the example, the following number was configured with the Webhook - +1 (503) 749-5333. Now, under “Messaging Settings”, “Handle Messages Using,” select “LaML Webhooks”. Under “When a Message Comes In,” enter your URL from the previous step. Then, Save the setting.
Set up the Zapier Integration
The Zapier integration is actually quite simple, as it is only two steps.
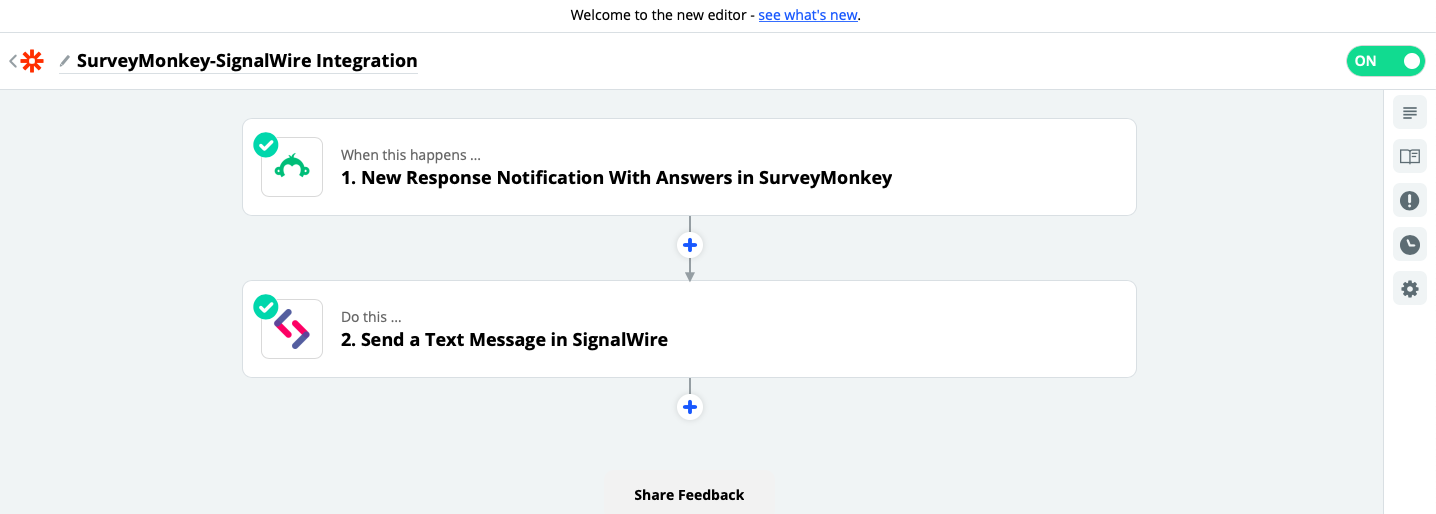
Configure the SurveyMonkey Step
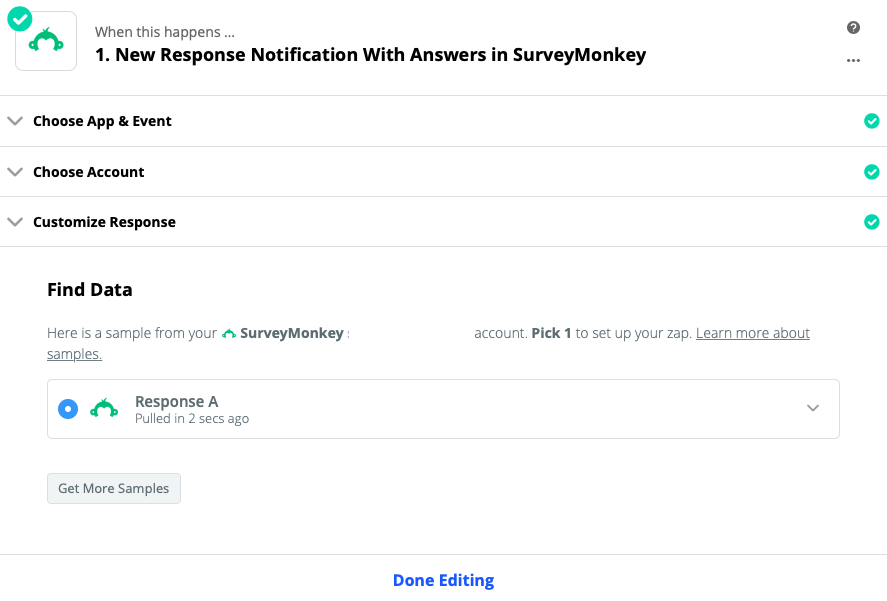
Start by selecting SurveyMonkey as the App for the first step and choose “New Response Notification With Answers” for the event type.
After choosing the proper account, it’s important to select the valid response (with a valid email address and mobile phone number) to the test survey you just took. The fields from the previous response will be used to set up the second step of the Zap and to test your integration.
Configure the SignalWire Step
For Zapier's second step, go ahead and select SignalWire as the App and “Send a Text Message” as the Action Event.
If you haven’t yet used SignalWire with Zapier, you will be prompted to "Sign in to SignalWire". A pop-up screen appears requesting your Space URL, your Project ID, and your Authorization Token. When you return to your SignalWire space on the API page you'll find that all three strings can be copied with one click by hovering over each element and pasting them in their respective fields on the Zapier pop-up page. With all three strings pasted over, click on "Yes, Continue" at the bottom of the window.
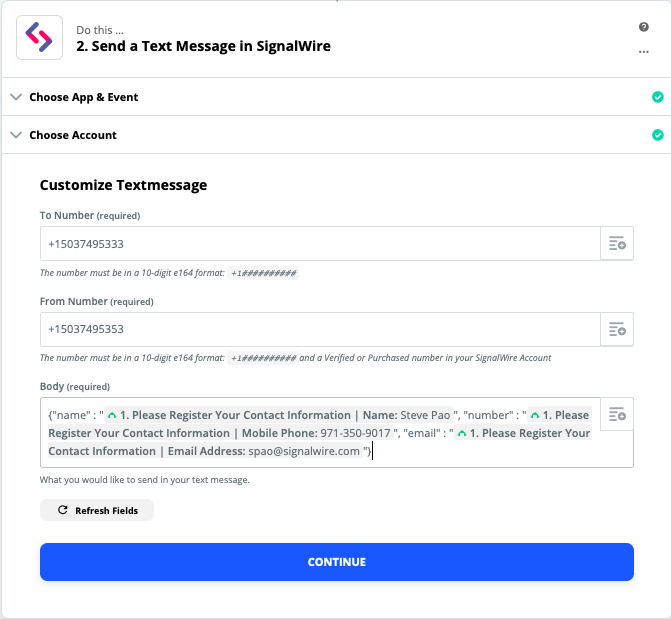
Customizing the text message requires that you configure the To: number to the “public” number you set up to receive messages from Zapier and to send messages to users (+15037495333 in the example). The From: number is your Outbound API access number (+15037495353 in the example).
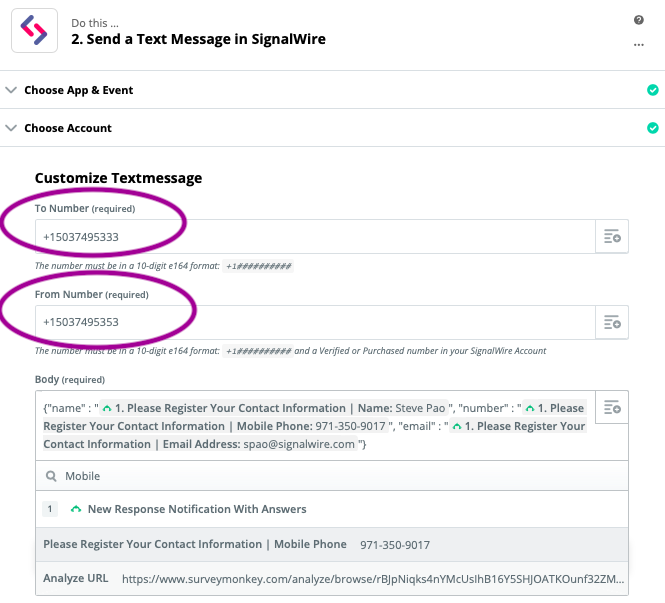
After entering the To: and From: numbers, it's time to construct the text message. The message will be sent to the PHP handler in the following form:
{“name” : “Xxxxxx Xxxxxx”, “number” : “XXX-XXX-XXXX”, “email” : “xxx@xxx.dom” }
However, instead of the X’s, use the button to the right of the Body field (see the magenta arrow on the right side of the screenshot) to paste in the fields from the survey into the Body field. Don’t forget to surround the pasted fields with quotation marks.
Once completed, the screen should look something like this:
Test it Out!
You can test your integration right from Zapier by using the big blue button that says "Test and Continue." If everything worked, you should get a text message to the number you entered in your survey! Once tested, don’t forget to “turn on” the Zap.
Seeing it all in Your SignalWire Space
On the LaML menu on the right hand side of your screen, you can navigate to the Messaging tab to see your Message Logs.
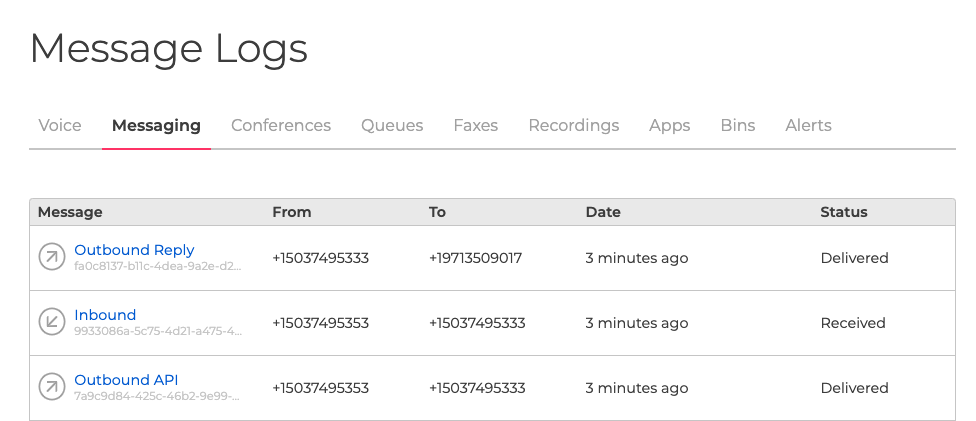
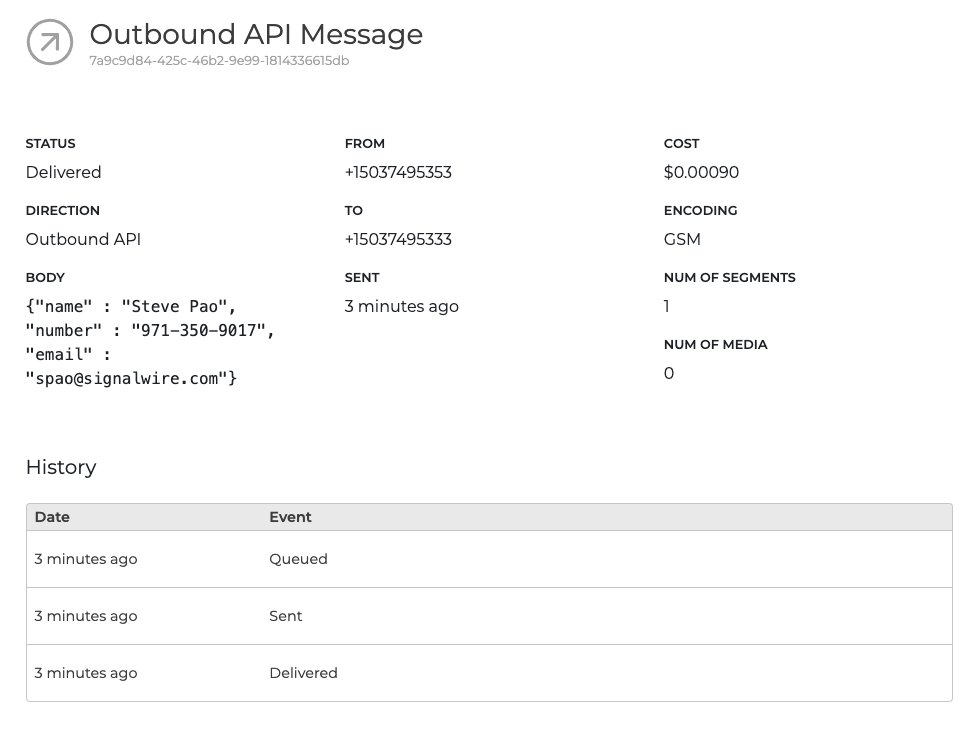
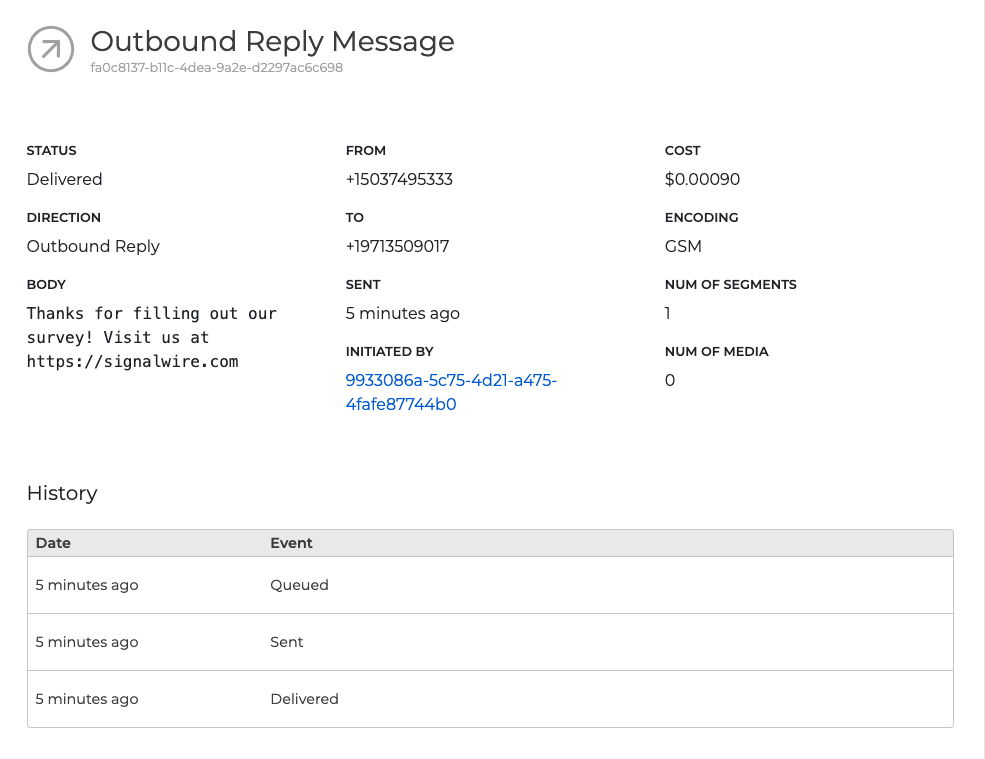
You’ll notice that your test generated three messages. The first was the Outbound API call from Zapier out to SignalWire. The Body of the message is the formatted API message.
The next log was the inbound text message to your “public” phone number (at zero cost) with the same message.
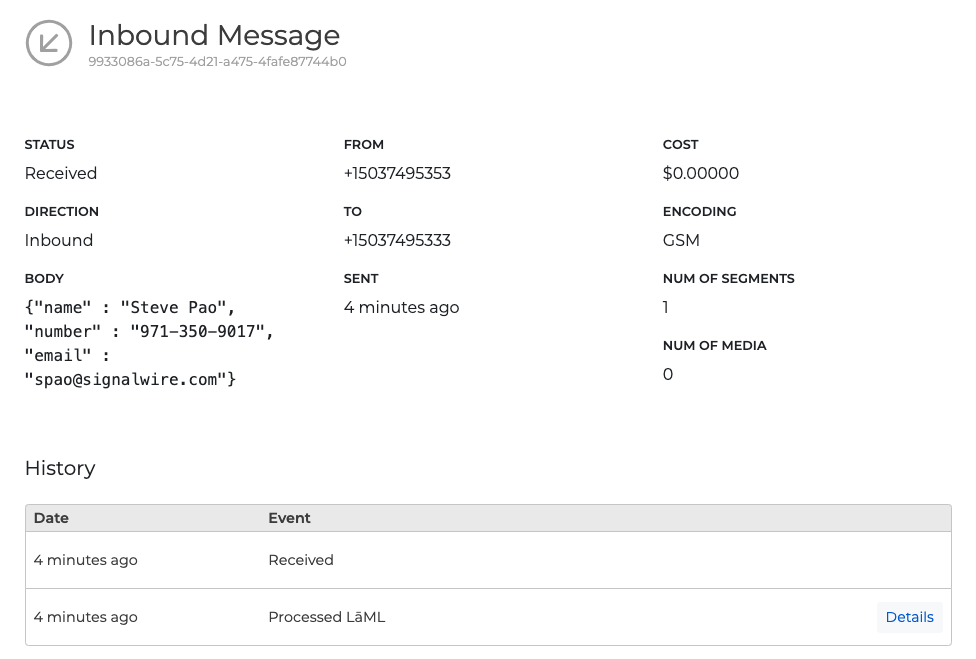
Clicking on “Details” shows the processing of the message and the conversion of the phone number in XXX-XXX-XXXX format to e.164 format and a request to send a text message to that number.

And finally, you can see the message being sent from your “public” phone number to the survey respondent’s number.
Congratulations!
You’ve just made SurveyMonkey work with SignalWire.
And that's just the beginning. Using SignalWire with Zapier allows you to set up many different applications without having to learn their APIs!
Watch out for continued enhancements to this Zapier integration as we continue to make the process even easier.
Come and build something great on SignalWire!
Need additional help or have questions? Come and talk to us on our community Slack channel! A SignalWire OG will be happy to assist you.
Main developer documentation site: https://docs.signalwire.com/
Please check our pricing page to learn about our disruptive pricing.