In our previous blog post, we discussed why a cloud communications system works for most businesses and gave an overview on what tools you can use when creating your own cloud based phone system with SignalWire.
Today, we will dive into the Node.js code and demonstrate how to install, test, and run the code locally. We will build example applications that demonstrate how to:
- Create an Interactive Voice Response (IVR) menu using Text To Speech (TTS)
- Make and receive Voice over IP (VoIP) calls in a web browser
- Receive and respond to SMS messages
Requirements:
- A SignalWire account (signup for free here)
- A SignalWire phone number
- A Node.js host (You can host this yourself for development purposes but you will likely want something more robust than ngrok when you push to production)
- A familiarization with the SignalWire API documentation.
Getting started with the Node.js code
In this example we will show you how to host the Node.js code locally. If you would to like have your code hosted in a production environment, a commercial Node.js host will need to be configured.
Installation
To get started, make sure that Homebrew is installed locally, then, in a terminal window, install npm if it is not already installed:
brew install node
Then, to view the code, navigate to https://github.com/cpetrosi/signalwire-ivr. To install the repository:
git clone https://github.com/cpetrosi/signalwire-ivr.git
cd signalwire-ivr
npm install
Testing
For testing purposes, download ngrok here. In a new terminal window, navigate to the directory where ngrok is installed and run:
./ngrok http 3000
You should see something similar to this:
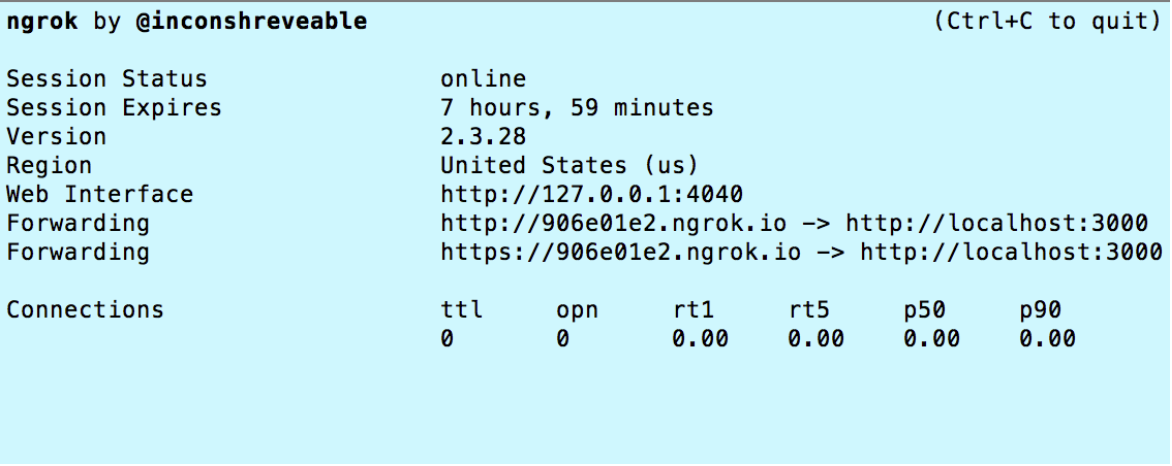
From this window, grab the second Forwarding URL (the one with https) and navigate to the index.js file from the signalwire-ivr repository.
Here, replace all the http://190.102.98.249:3000 URLs with your Forwarding URL. In my case, it would be https://906e01e2.ngrok.io.
Note: when you terminate and restart the ngrok session, these URLs will change and you will have to update them again in the index.js file.
Other Edits
In the index.js file, edit the project, token, and client variables with your own Project ID, Authentication Token, and SignalWire Space URL.
To receive transcription messages, edit the to variable to your phone number. Change the from variable to your SignalWire phone number. You can also edit the dial.number()’s to sample phone numbers you can use for testing.
Running
In the same terminal window where you installed all the dependencies (npm install), run:
node index.js
Note: If you make any changes to the index.js file from the repository, be sure to terminate and restart the node index.js command in terminal.
Code Examples
Building an IVR
To build an interactive voice response (IVR), you should start with a main menu to present all the different menu options (i.e. press 1 for help, etc.) to the caller.
In my example, the caller will hear the three options and choose which party they would like to be connected to. If no input is received, SignalWire will wait 10 seconds before asking the caller to make a selection or listen to the options again. If there is still no input, the call will end.
After you have created a main menu, you will need to point to a URL (in my case, mmv-response) where SignalWire will make a request to when the entering of digits or speech is completed.
Then, in mmv-response, you need to tell SignalWire what to do when one of those options is selected. For example, if the caller pressed 1 or said “help”, dial the number +1.650.382.2000.
If an incorrect option is pressed or said, the caller will hear this and the call will end:
“We received an incorrect option. Goodbye.”
Messaging
For messaging, you will have to create a separate “message” section to handle messages to your SignalWire phone number. In this example, the user is presented with three options to respond with (blog, docs, story). Each of these choices will result in a separate message with its respective response.
What to expect in Part 3
In the coming blog post, we will discuss how-to:
- Configure your SignalWire phone number
- Configure Voice and Messaging settings
- Transcribe voicemail messages into text, forwarding to a mobile number as an SMS message
- Setup a Web Browser client
- Test voice, video and messaging
Come and build something great on SignalWire!
Developer documentation for SIP:
https://docs.signalwire.com/topics/relay-rest/#resources-sip-endpoints
Main developer documentation site:
https://docs.signalwire.com/
Friendly support can be found in our online community.
P.S. We always announce features to our community before bringing it to the general public, so sign up for your free SignalWire account today and join our Community!
* Please check our pricing page for up-to-date pricing.