Answering Machine Detection (AMD) screens outbound calls to determine whether a human or a machine, such as an Interactive Voice Response (IVR) system or voicemail, answered the call. This guide shows how to build a simple web dialer that uses AMD to route live answers to an agent destination and play an automated message when voicemail answers, with setup steps for deploying the app on a Platform as a Service (PaaS) provider like Dokku and configuring required environment variables in your deployment.
What is Answering Machine Detection (AMD)?
Answering Machine Detection (AMD) is used to screen outgoing calls and determine whether a human or a machine (such as IVR or voicemail) has answered the phone. If a human does answer the call, they can be programmatically routed to a queue or directly connected to an agent. This helps to filter out calls that get routed straight to voicemail, saving agents time by only connecting them with actual humans to speak with.
This post is an example of how to build an application to implement AMD. Be sure to follow our guidelines for acceptable and compliant use cases.
AMD use cases
There are several use cases where this technology is incredibly useful. For a simple batch of sales calls, for example, agents can save time by only being connected to other humans, and not machines, with the help of AMD.
As a business, you may find that after-hours calls have piled up quickly, leaving you with dozens of calls to return during business hours. When returning all these calls, this dialer app paired with AMD can detect if a machine has answered, then play an automated message if connected to voicemail or connect you directly if a human answers.
This app could also be useful for a call back queue, where if a line is busy and the wait is long, a person can press a button to be called back when it’s their turn. It also keeps track of the call logs and interactions, making it easy for you to review if any calls need to be returned.
When you have completed your app setup, you’ll simply be able to enter a list of phone numbers to call into the dialer. It will then leave a message for any machines that answer the call, or route humans to the agent destination.
All you need to get started on your Dialer Application is a SignalWire account with at least one phone number and a PaaS (platform as a service) provider of your choice. Here, we used Dokku. In your SignalWire Dashboard, you can purchase more 10DLC numbers at any time under Phone Numbers in the right-hand sidebar.
How to set up your web application in Dokku
You can use any PaaS of your choice to build this app. If you aren’t familiar with Dokku but you would like to use it, check out their Getting Started with Dokku guide.
Start by using this example web application, and clone it from here to you local machine:
git clone git@github.com:shane-signalwire/answering-machine-detect.git
Create the app container on the remote Dokku instance and then deploy the app to it.
On the Dokku host, you’ll use:
dokku apps:create answering-machine-detect
Then configure the remote container as a git remote on your local machine:
# Add a git remote to the newly created instance
cd answering-machine-detect
git remote add dokku dokku@dokku.your-domain.com:answering-machine-detect
git push dokku main
The app requires 3 different environment variables to be set in order to run. The environment variables are:
PROJECT: Your SignalWire Project ID
TOKEN: The API token associated with the SignalWire Project ID above
AGENT_DEST: The number or destination that calls should route to when a non-machine (a human) is detected.
You can set these variables one of two ways:
- If available, set them via the Dokku UI in the Environment Variables tab for the app.
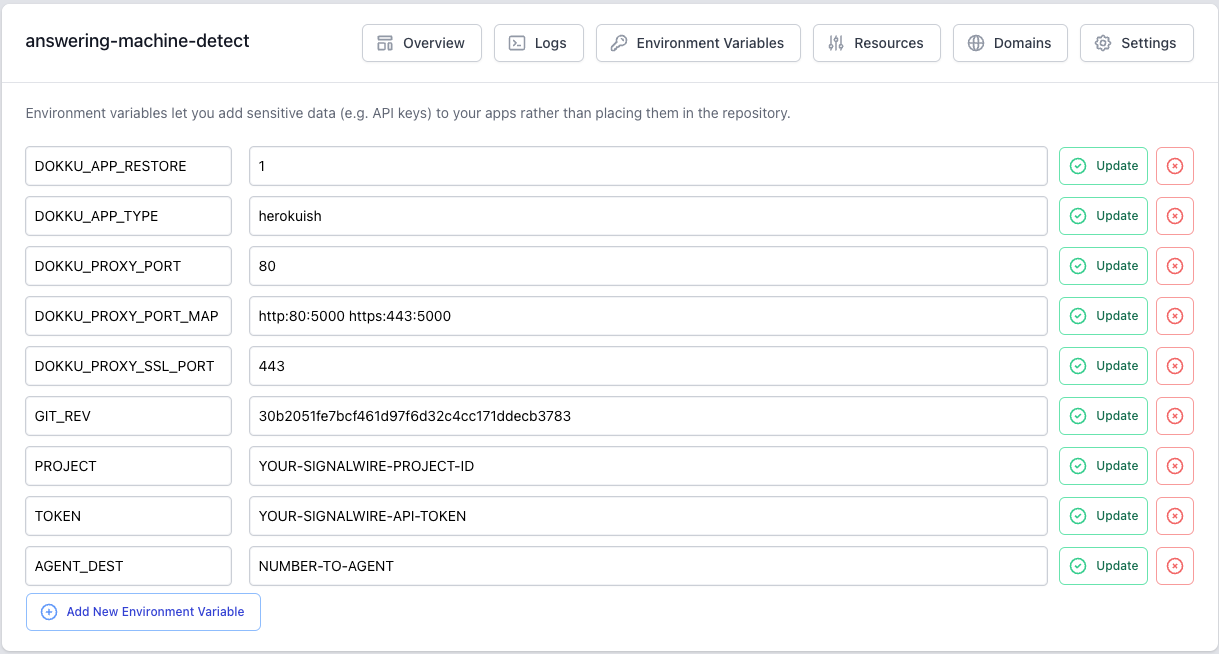
You can alternatively add the variables via the CLI of the Dokku instance:
dokku config:set PROJECT=YOUR-SIGNALWIRE-PROJECT-ID
dokku config:set TOKEN=YOUR-SIGNALWIRE-TOKEN
dokku config:set AGENT_DEST=NUMBER-TO-AGENT
The application needs to be restarted once the environment variables have been added.
Next, add persistent storage for the application. The app utilizes frontend and backend services that both need access to the same backend database. This is accomplished by creating a shared storage volume, and having the database stored in that mount point. Run the following on the remote Dokku instance:
dokku storage:mount answering-machine-detect /var/lib/dokku/data/storage/answering-machine-detect:/app/storage
How to use your app to make calls
After installation, the dialer application should be ready to run. Use a web browser to navigate to the application. This should be answering-machine-detect.yourdomain.com, which will look like the following:
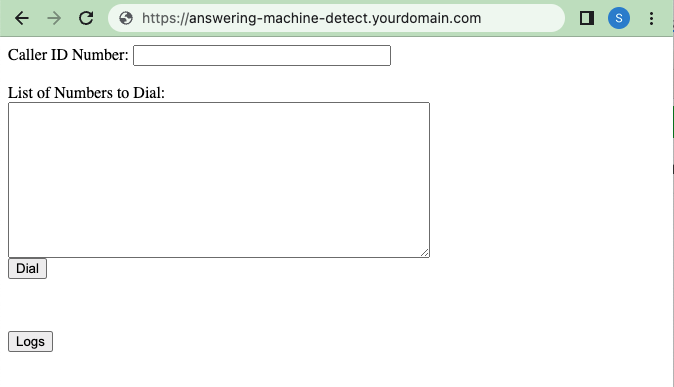
To use the dialer, fill out the text boxes with the relevant data. For Caller ID Number, you can use any caller ID associated with the SignalWire project being used. A space separated list of numbers can then be added into the form under List of Numbers to Dial.
Press 'Dial' in order to have each number called. If a human is detected, the call will then be connected to the AGENT_DEST. If a machine is detected, a message will be left for the called party.

Once the Dial button is clicked, the app will let you know what numbers have been added into the queue, and they will be dialed sequentially.
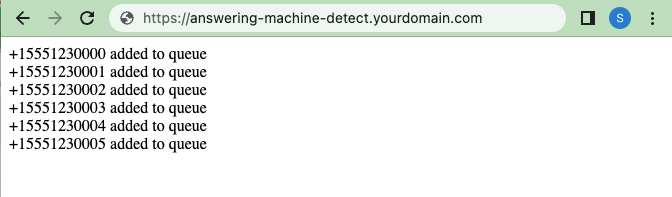
Logs are kept in the database for the AMD result so that they can be reviewed. Pressing the 'Logs' button will give output similar to below. This can be used to determine if numbers need to be called back at a later time.

Lastly, the logfile can be a useful tool both for troubleshooting purposes, or just to watch the calls as they are dialed from the queued list of numbers. Running the following tail command within the Dokku instance will show the live output from the container:
root@ip-172-26-9-198:/var/lib/dokku/data/storage/answering-machine-detect# dokku logs answering-machine-detect --tail
The output will look something like this:
2023-02-21T23:13:44.269300788Z app[worker.1]: INFO:root:Client connected!
2023-02-21T23:13:44.269339359Z app[worker.1]: INFO:root:Trying to receive contexts: ['dialer']
2023-02-21T23:13:44.323223649Z app[worker.1]: INFO:root:Receiving all inbound related to the requested relay contexts and available scopes
2023-02-21T23:13:44.323249020Z app[worker.1]: INFO:root:Dialer App Consumer Ready
2023-02-21T23:14:59.402753983Z app[worker.1]: INFO:root:nothing to do
2023-02-21T23:15:02.403323268Z app[worker.1]: INFO:root:nothing to do
2023-02-21T23:15:05.406747568Z app[worker.1]: INFO:root:nothing to do
2023-02-21T23:15:08.410290988Z app[worker.1]: INFO:root:+15551230000: Dialing destination number
2023-02-21T23:15:18.431092879Z app[worker.1]: INFO:root:+15551230000: HUMAN
2023-02-21T23:15:18.431138068Z app[worker.1]: INFO:root:+15551230000: Playing Message to user
2023-02-21T23:15:26.906565200Z app[worker.1]: INFO:root:+15551230001: Dialing destination number
2023-02-21T23:15:35.290267200Z app[worker.1]: INFO:root:+15551230001: MACHINE
2023-02-21T23:15:35.290308397Z app[worker.1]: INFO:root:+15551230001: Leaving Voicemail
What are you building with SignalWire? Stop by our Community Discord to show us or get your questions answered by our experts!
Frequently asked questions
What is Answering Machine Detection (AMD)?
Answering Machine Detection (AMD) is used to screen outgoing calls and determine whether a human or a machine, such as an Interactive Voice Response (IVR) system or voicemail, answered the phone.
What are common use cases for Answering Machine Detection (AMD)?
AMD is useful when you want to connect agents only when a real person answers, and handle voicemail differently, for example outbound sales dialing, returning after-hours calls efficiently, or running a callback queue that can leave a message when a machine answers.
What happens in the call flow when AMD detects a human vs a machine?
When a human is detected, the dialer routes the call to the configured agent destination. When a machine is detected, the dialer plays or leaves an automated message for the called party.
What configuration does an AMD dialer typically require?
This implementation uses environment variables for your SignalWire Project ID, an API token for that project, and an agent destination number or route that should receive calls when a human is detected.
What should teams consider for compliant use of Answering Machine Detection (AMD)?
AMD is commonly used in outbound calling workflows, so acceptable and compliant use cases matter. Follow the platform’s published guidelines for AMD usage and ensure your dialing behavior aligns with applicable policies and regulations for your region and traffic type.