SignalWire Video API
Add high-quality, high-performance video to your application or website

SignalWire Video APIs allow you to host real-time video calls and conferences on your website or app. In this guide, we'll use the SignalWire APIs to create our own minimal video calling website.
To get access to the SignalWire APIs, you'll have to sign in to the SignalWire website. You can sign up in trial mode which comes with a $5 credit, which will be plenty to follow along to this guide.
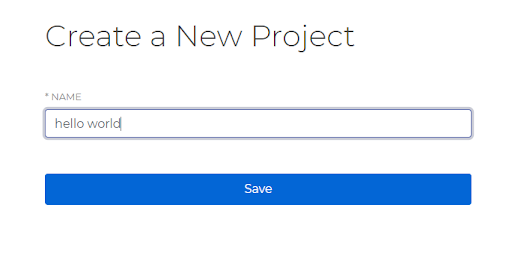
Once you've signed up and verified your email, create a new project. You can give it any name like 'hello world'.

After the project has been created, you'll be taken to that project's page.

Two important pieces of information about our project are displayed there:
Space URL: You'll use this URL to access SignalWire APIs
Project ID: You'll use this UUID to specify your project to the API
There's one more piece of information we'll want to note from our new project. Since we want to use the API, we'll have to generate the API token.

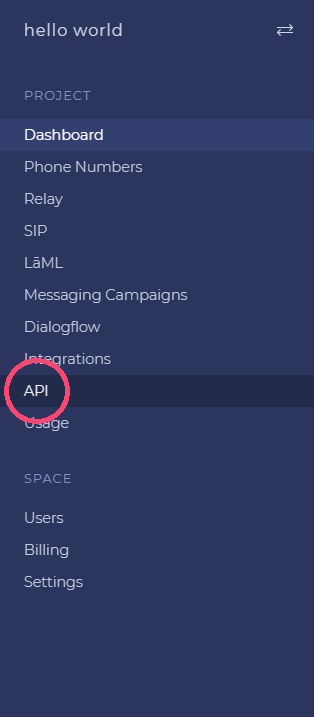
Go to the API link from the sidebar and click on Create Token. Give it a name so you can identify it later. Then hit "Save". After the token is created, you will see it listed in the table.

CAUTION: It is important that the API tokens are kept confidential. They can be used to make API requests on your behalf. Take extreme care to make sure that the tokens don't get pushed to GitHub. Make sure that the tokens aren't publicly accessible. For Node.js backend, you can use dotenv files [link] or similar mechanisms to safely store confidential constants.
The previously noted Project ID combined with this API token will be used to authenticate with the REST APIs.
With this, we have collected all the pieces of information needed to access SignalWire Video API for our getting started app. To be exact, we've collected:
- The Project ID (xxxxxxxx-xxxx-xxxx-xxxx-xxxxxxxxxxxx)
- The space URL (<username>.signalwire.com)
- The API token
Writing a video calling web-app
To help you get started with using SignalWire Video APIs in your software, we'll code a very minimal video-calling web app.
Before we begin, try using the demo app below. This is what we will be trying to code. Feel free to explore the codebase.
Try the live demo here.
Our app has two parts:
A backend written in Node.js (it's a simple proxy server so you can trivially replace Node.js with your favorite backends like PHP or Python)
A frontend written in JavaScript (SignalWire JS SDK will do most of our work for us)

The backend
Rooms: For the SignalWire Video API, the room is the basic unit where video calls and conferences are hosted. Think of it as a virtual room, which you must create before you link a call. Rooms are created, managed, and deleted using a simple REST API.
Once you create a room, you can bring users into the room using the SignalWire JS SDK. All users in the same room will be linked to the video conference. To authorize the users, you need to request a JWT through the REST API.
A JWT access token looks like this:
eyJhbGciOiJIUzM4NCIsInR5cCI6IkpXVCJ9.eyJpYXQiOjE2MjEwOTY4NDIsImp0aSI6ImRmZmRkZmYtMzk0OC00ZmM2LXNkZGQtZGNiOGMwNGZjMTk0Iiwic3ViIjoiZTkwODA0NzgtMTAwMC0xMDAwLTEwMDAtY2YzZGUxOWUzNTAwIiwidSI6InVzZXJuYW1lIiwiciI6InJvb20iLCJzIjpbInJvb20uc2VsZi5hdWRpb19tdXRlIl19.K8dT9K8wRHvMoThTf8jEvISP5zQ6BzyCtIqlIBUklqUqPzok2U8jwmXOMtH2ukGU
You can think of this token as a secret passphrase that, when whispered to the client-side JS SDK, will let the user into the room and join the video call.
NOTE: Since the REST API requires that you provide both the Project ID and the API token for basic authentication, you should never use this API via the browser. For your application, you should set up a proxy server only accessible to users that you have authorized. We'll see an example proxy server written in Node.js below.
Take a look at this function which creates a new room if the room doesn't already exist. We'll use this function in our backend.
Notice the two API calls executed using axios.get and axios.post functions.
The first one sends an authenticated GET request to <username>.signalwire.com/api/video/rooms. If the call is successful, the API returns an array with the details of all rooms.
await axios.get(apiurl + "/rooms", { auth })The second one executes only if the room didn't already exist. It sends an authenticated POST request to the same endpoint, creating the room in the server.
await axios.post(apiurl + "/rooms", { name: room_name }, { auth })
Every request to the REST API must include a basic auth header: Authorization: Basic <credentials>. The credential is a base64 encoded text in format <Project Id>:<API Token>.
When using Axios.js to make requests, you can simply include the auth option with project ID as username and API token as password, as we've done above.
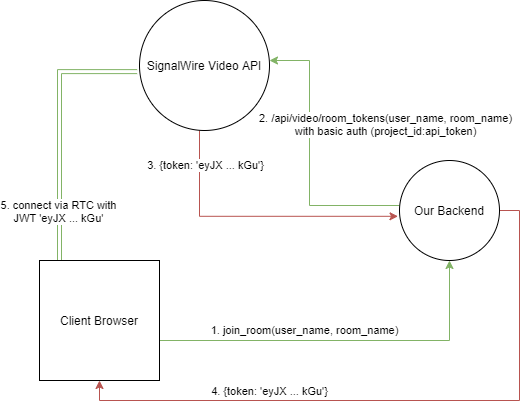
Getting the JWT for the client: Our backend will only need to expose a single endpoint, which will be used to relay a JWT token to the client SDK. The client SDK can then use it to connect to the SignalWire server. Have a look at the code below:
Let's break this piece of code down.
The user's user_name will be used to identify him in the video call, so the frontend will send this information.
We send a post request to the room_tokens endpoint of SignalWire REST API. The `room_tokens` endpoint sends back a JWT that we can forward to our client.
To get the token, you need to send an authenticated POST request to <username>.signalwire.com/api/video/room_tokens with at least the following data:
{
  room_name: <your room name>,
  user_name: <your user name>
}
The frontend
The SignalWire Video JS SDK makes it surprisingly easy to integrate video calling into any web application. It only takes a few minutes to set up a basic example. First, we need to include the SDK in our HTML.
<!-- Import SignalWire library -->
<script src="https://cdn.signalwire.com/lib..."></script>
Then you can interact with the SDK using the global variable `SignalWire`. We'll mainly be interested in the SignalWire.Video.joinRoom method for this guide, but if you'd like to explore this API, feel free to browse the SDK docs.
To start the video link, we'll use the joinRoom method like so:
roomObject = await SignalWire.Video.joinRoom({
                token,
                rootElementId: 'root',
            })
joinRoom method takes at least two parameters: the JWT (token) that'll be used to authenticate against SignalWire servers, and the rootElementId which is simply the id of an empty HTML element that serves as the container for the video stream. It will automatically set up the room object and join the room.
We'll request this token from the /get_token endpoint that we wrote in the previous section.
const backendurl = "http://localhost:4000"

let token = await axios.post(backendurl + "/get_token", {
            user_name: username
        });
console.log(token.data)
token = token.data.token
Events: RTCSession allows the standard .on() method to attach event listeners and a corresponding .off() method to detach them. The events that can be listened to are:
room.joined - You have joined the room
room.updated - A room's property has been updated
room.ended - The room has ended
member.updated - A member's property has changed. (eg:video muted)
member.updated.audio_muted - The audio_muted state is changed for a member
member.updated.video_muted - The video_muted state is changed for a member
member.updated.visible - The member is now visible in the MCU
member.left - A member left the room
layout.changed - The layout of the room has changed
Here's how these events are used in our example program:
roomObject.on("room.joined", e => logevent("You joined the room"))
roomObject.on("member.joined", e => logevent(e.member.name + " has joined the room"))
roomObject.on("member.left", e => logevent(e.member.id + " has left the room"))
All the above ideas can be combined to create the following function, which we'll use in the frontend:
The full code is available here. You can also try tinkering with the online demo here.
The really neat thing about SignalWire Video technology is that it only streams a single video stream no matter how many participants there are. The video is composited on powerful SignalWire servers by stitching all individual video streams together. So you can go ahead and invite as many people as you like to your virtual video-party. Your app will run without a hitch.