SignalWire’s programmable Fax API lets developers integrate cloud faxing into modern applications without traditional machines or dedicated phone lines. This article explains how to get started by setting up a Node.js environment, configuring your SignalWire space and credentials, sending faxes via remote URLs or local files, and building both backend and frontend components to collect user input and trigger fax transmissions.
The SignalWire Programmable Fax API for Developers
In an era dominated by instant messaging, email, and video calls, it's easy to assume that fax machines are a relic of the past. The truth is that modern faxing systems continue to play a significant role in many industries where secure and reliable document transmission is crucial. Recognizing this, SignalWire has revolutionized cloud-based faxing with its Fax API.
SignalWire’s programmable fax API combines the convenience of digital communication with the reliability and security of fax transmission, offering businesses a modern and efficient way to send and receive faxes in the digital age. By harnessing the power of the cloud, SignalWire Fax eliminates the need for traditional fax machines and phone lines, streamlining the entire faxing process.
You can get started with sending a fax by running a curl request as shown below:
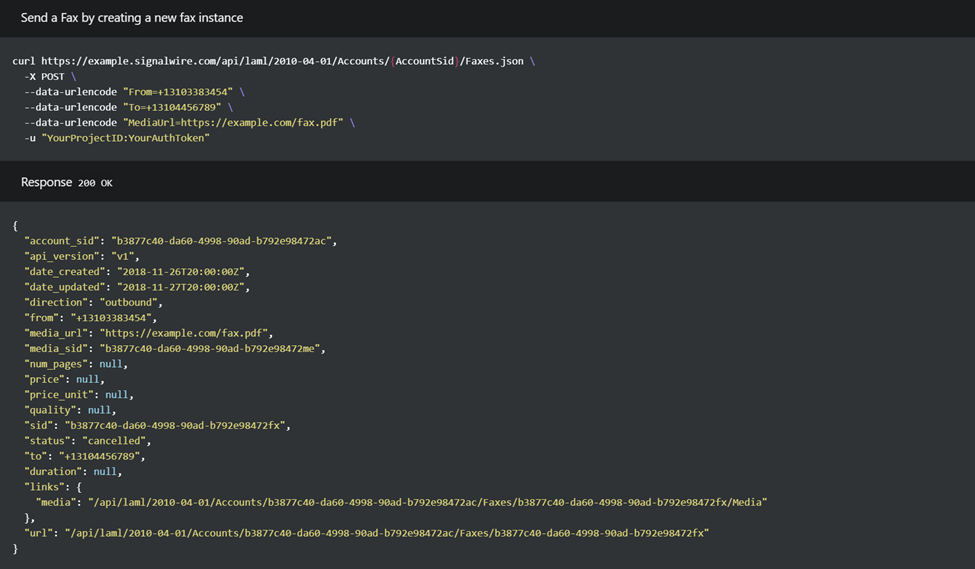
To begin faxing in the cloud, you need to have a SignalWire Space, which will provide you with a ProjectID and the ability to create an API token, which you will then use when calling the Fax API.
In this post, we’ll go through the steps for creating an application that allows you to send a fax with remote URL files or files stored on your Personal computer. You’ll need some basic knowledge of NodeJS, Express, and Ngrok in order to follow this example.
Getting started with programmable fax
To start building our fax application we need to create a NodeJs environment, and we can do that by running the NodeJs command `npm init -y`. This command creates a basic NodeJs environment.
Here is what your package.json should look like after running the above command:
We’ve added some dependencies to allow us to make calls to the SignalWire Fax endpoint.
Run npm install to install all the dependencies.
Backend
We need to create a set of instructions that our web application will listen to. For example, whenever a user clicks on a button to send a fax, or whenever a user tries to select a file by clicking on the select file button.
Create a new file in your working directory and name it server.js. Then we can start adding blocks of code into the server.
Import dependencies
First, we will import the dependencies needed in our application - the dependencies include Axios, express, dotenv, etc.
Declare global variables
Next, we will create some variables that will be used to initialize our server, and some other variables to be used as authentication when we call the SignalWire Fax API.
You will notice the use of some environment variables like process.env.PROJECT_ID and process.env.SPACE_NAME. These are your credentials from your SignalWire space, so be sure to keep them safe.
Creating environment variables
Create your environment variable file where you will store your credentials obtained from your SignalWire space.
Create a file named .env and add the following line of code to the file:
PROJECT_ID=<YOUR-PROJECT-ID>
API_TOKEN=<YOUR-API-TOKEN>
SPACE_NAME=<YOUR-SPACE-NAME>.signalwire.com
Replace the items in the brackets with your actual credentials from your dashboard.
Create endpoint to send fax
Back in the server.js file, we need to create an endpoint for whenever a user clicks on the submit button from our web application.
In the above code sample we are getting form data sent by the user on the frontend. The users have the option to send a media file from a remote URL or from their local computer. On a successful submission, it returns a response of the SID generated from the request.
You can also create a helper method used to call the SignalWire Fax API, which will make your code organized and clean.
Start express application
Now we can configure the application to listen to a particular port by adding the following line at the end of the server.js file:
Frontend
The frontend side of the application is where users can click on buttons and actually make use of the digital faxing service. To get started, we need to create a basic HTML file.
Creating HTML file
In the root folder, create a new file called index.html and add the following line of code:
Create JS file
We need to create a javascript file for the use of the form in our web application. To do this, make a new file in the root directory of your project and call it index.js.
Add the following line of code to your index.js file:
Run the fax application
Now that we have the frontend and backend set up, open a terminal and navigate to your working directory. Run the following command to start up the application:
node server.js
The above command will start off both the frontend and backend of the application. If you navigate to http://localhost:8000 you should see the following result:
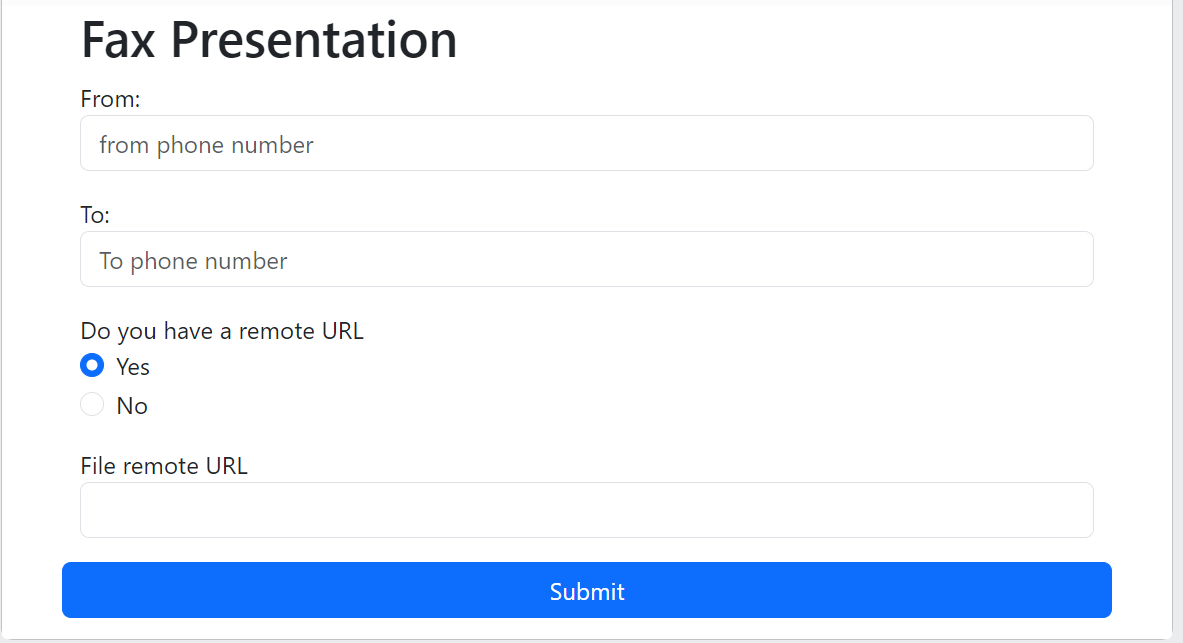
If you would like a live example, you can find that here.
Start ngrok
Finally, run ngrok to get a remote URL that will tunnel the URL request to our running web application.
You must have ngrok installed. To install ngrok follow this tutorial. Open another terminal, and run the below command to start ngrok:
ngrok http 8000
The above command provides you with a public URL that can be accessed on your web browser. With that, you should be able to access the simple fax application.
We want to see what you build with SignalWire! If you have any questions while getting started with our Fax API, stop by our Community Discord to connect with our team.
Frequently asked questions
What is SignalWire’s programmable Fax API?
SignalWire’s programmable Fax API provides a cloud-based way to send and receive faxes from applications without traditional fax machines or phone lines, streamlining fax operations and integrating with modern development workflows.
How do I start building a fax application with SignalWire?
You begin by creating a SignalWire Space, obtaining a Project ID and API token, setting up a Node.js environment with dependencies like Express and Axios, and then coding endpoints that call the SignalWire Fax API to send faxes.
What options do I have for sending fax content?
You can send faxes using remote URLs pointing to hosted files or by uploading files stored locally on your computer, with user interface forms triggering backend fax requests.
How do I test my fax application locally?
Run your backend application (e.g., with node server.js), use a tool like ngrok to expose it to the internet, and ensure your frontend form and fax endpoint can communicate with the SignalWire Fax API and receive responses in your development environment.