
Make and receive calls
Place calls to phones and answer calls to your SignalWire number with SWML, Relay, or the Browser SDK. Each section below takes one of them from a first test call on your own phone through tracking the call’s progress.
Choose an approach
Each approach has its own code and its own kind of Resource on your phone number, so pick one and follow only its section. The sections don’t build on each other, and code from one doesn’t carry over to another.
- SWML is a document of call instructions that SignalWire runs. You build it with the Server SDKs and send it in a REST request to place a call. To answer one, serve it from your server or host it in SignalWire, which needs none of your code running.
- WebSocket (Relay) is a Relay client in the Server SDKs. It holds a WebSocket open from your server, receives calls and events as they happen, and controls each call from your code.
- The Browser SDK puts a person on the call from a web page, with their microphone, camera, and in-call controls.
Prepare for your first call
Have these values ready:
- Your Space URL, such as
<YOUR_SPACE>.signalwire.com. - Your Project ID and API token from the Dashboard’s API credentials page. Enable the token’s Voice permission, and Numbers if you assign a phone number in code.
- A voice-capable phone number in your Space, and a phone you can call it from and answer.
- For the Browser SDK, a web page you can serve over HTTPS or
localhost. The guide creates the Subscriber and its token for you.
A trial project can’t call international numbers, and it only places calls to and receives calls from numbers you’ve purchased or verified. To test with your own phone, verify it: in the Dashboard, open Phone Numbers, then the Verified tab, select + New, and follow Verified caller ID. To remove the trial restrictions, add a payment method and fund the account with at least $5, as Trial mode describes. Outside a trial, enable international dialing before you call another country.
Replace these values in the samples you run:
How an incoming call reaches your code
Placing a call only takes a request from your code. Answering one takes a little setup first, because SignalWire has to know where to send the call. Every phone number has one call handler: a Resource you assign under the number’s Inbound Call Settings. When someone dials the number, SignalWire hands the call to that Resource, and the Resource type decides what happens next:
So each answering walkthrough below has the same three parts: build the handler, assign it to your number, and call the number to test it. If the number has no call handler, or still points at a different Resource, the call never reaches your code.
Make and receive calls via SWML
A SWML document lists what happens on the call, such as playing a message, forwarding the caller, or recording. SignalWire runs it; your code supplies it.
Place a call via SWML
Send a REST dial request with a SWML document in swml. SignalWire runs the document when the
destination answers.
Place the call
dial() signature depends on the SDK version
@signalwire/sdk@2.0.5 takes a single options object. Newer releases take the positional
dial(from, to, options) form.
The cURL example sends the dial command to Call commands.
The REST API returns a call id and status queued. This confirms that SignalWire accepted the
request; the call hasn’t necessarily rung or been answered yet. Save the id to identify this call.
Answer a call via SWML
When someone calls your number, SignalWire runs the SWML Script assigned to it. The script either fetches the document from your server on each call, or holds the document itself. Hosting it in SignalWire is the quickest way to hear your first call; serving it from your server lets your code build a different document for each caller.
This flow shows a call handled by a script that fetches its document from your server:

Create the SWML Script
From your server
Hosted in SignalWire
SignalWire must reach your server over the internet, so this tab has four parts: run the server, give it a public URL, check the URL, then create the script that points at it.
Run either server below. It answers requests on port 3000 at /swml, but only when they carry
the username signalwire and the password you set. SignalWire sends those credentials from the
URL you give it, so no one else can fetch your call instructions.
The Server SDKs serve the document with SWMLService and add the instructions
through its SWML builder.
While you develop, give the server a public HTTPS URL with a tunnel such as ngrok. In a second terminal, run:
ngrok prints an https:// Forwarding URL. Its hostname is your <YOUR_PUBLIC_HOST>. Keep
both the server and ngrok running while you test. A new tunnel usually means a new hostname, so
update the script’s URL whenever it changes.
Check that the document is reachable before you point a number at it:
The response is the SWML document, starting with {"version": "1.0.0". A 401 means the password
doesn’t match the one in your server. See webhook security to also verify
that requests come from SignalWire.
Then create the script in the Dashboard:
- Open My Resources, select + Add, then Script, then SWML Script.
- Name it Inbound welcome and leave Used For set to Calling.
- Under Handle Calls Using, choose External URL and enter
https://signalwire:<YOUR_BASIC_AUTH_PASSWORD>@<YOUR_PUBLIC_HOST>/swmlin Primary Script URL. - Select Create and keep the server running.
You can skip the Dashboard steps: Assign the number in code in the next step creates the script and assigns it in one request.
Assign the script to your phone number
Open Phone Numbers, select the number, and select Edit Settings. Under Inbound Call Settings, select Assign Resource, choose the Resource, and save. To assign from the Resource instead, open its Addresses & Phone Numbers tab, select + Add, then Phone Number, and pick a number you own.
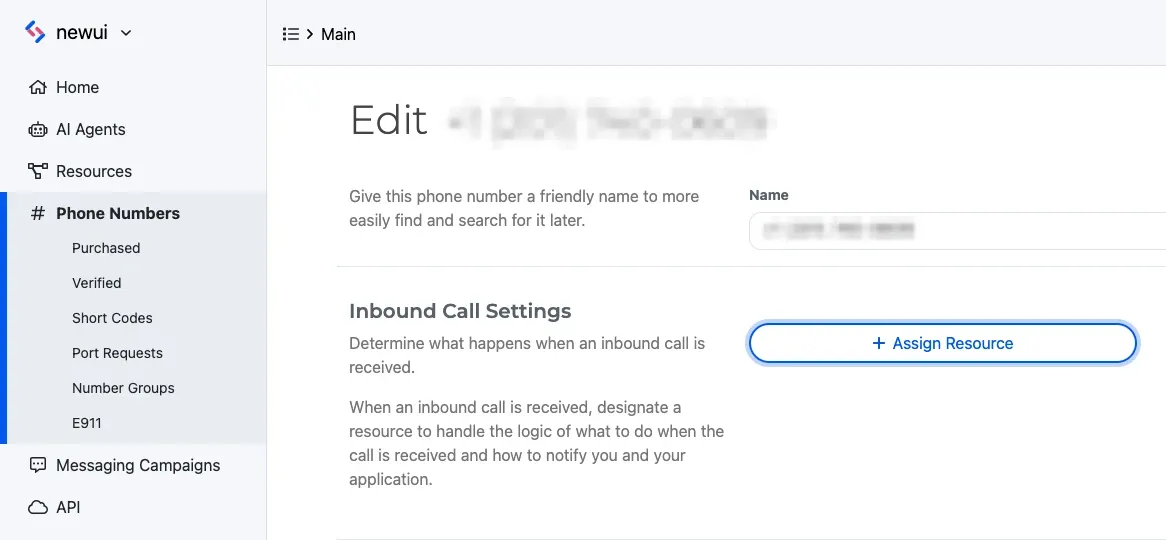
Assign the number in code
For a script served from your server, the Server SDKs create the script and assign it in one request, replacing the number’s current call handler.
The cURL example calls Update phone number.
To attach an existing hosted script by its ID, use Create a phone number address with
handler_type: "calling"; this endpoint is in beta and requires the number to have no call
handler yet.
To reach the script from a SIP client or another SignalWire app instead, give it a SIP Address or use its Alias.
Call your number
Call your SignalWire number from your phone. You hear “Hello, welcome to SignalWire!”, then the call ends.
If it doesn’t work, check the symptom:
- You hear an error or silence. SignalWire reached your number but couldn’t run the script. For
a script served from your server, rerun the
curlcheck with the exact URL in the script, and confirm the server and ngrok are still running. - You hear a different greeting, or the number’s old behavior. The number still points at another Resource. Open it under Phone Numbers and check Inbound Call Settings.
- The call doesn’t connect at all. In a trial project, call from a verified number.
Track a call via SWML
To follow an outbound call, add status_url and status_events to the dial request in
Place a call via SWML. SignalWire sends an HTTP POST to status_url as
the call reaches each state you list: created, ringing, answered, or ended. Without
status_events, you get ended only. The webhooks guide covers endpoint setup and
local testing.

For an inbound call, the request SignalWire sends your server carries the call in its call
object: from, to, direction, and call_id (see the
webhook payload reference). The same fields are available inside any SWML
document as variables. To read the caller’s number back, replace the greeting
with this one:
A SWML document can also fetch data mid-call with request and branch on the
result with switch. Methods such as record,
connect, and stream take their own status_url to report
their progress.
Make and receive calls via WebSocket (Relay)
A Relay client runs on your server and holds a WebSocket connection to SignalWire. It receives calls and events on that connection and sends commands back, so it needs no public HTTP endpoint.
Place a call via WebSocket (Relay)
Answer a call via WebSocket (Relay)
A Relay handler is a program on your server that stays connected to SignalWire, so it needs no
public URL. It subscribes to one or more topics, names you choose and list in contexts. A Relay
Application is the Resource that ties your phone number to one topic: calls to the number go to
whichever Relay client is subscribed to that topic.
Run the call handler
Run either handler below and leave it running while you test. It subscribes to the
inbound-calling topic, then waits. When a call arrives, it answers, plays the message, and hangs
up, and goes back to waiting for the next call.
The Server SDKs document every Relay client configuration option.
Assign the topic to your phone number
Create a Relay Application for the topic:
- Open My Resources, select + Add, then Relay Application.
- Name it Inbound welcome and enter
inbound-callingas the Topic. It must match thecontextsvalue in your code. - Select Create.
Open Phone Numbers, select the number, and select Edit Settings. Under Inbound Call Settings, select Assign Resource, choose the Resource, and save. To assign from the Resource instead, open its Addresses & Phone Numbers tab, select + Add, then Phone Number, and pick a number you own.
Assign the number in code
The Server SDKs create the Relay Application and assign it in one request, replacing the number’s current call handler. They can also create the Relay Application on its own.
The cURL example calls Update phone number.
To reach the handler from a SIP client or another SignalWire app instead, give the Relay Application a SIP Address or use its Alias.
Call your number
Call your SignalWire number from your phone. You hear “Hello, welcome to SignalWire!”, then the call ends.
If it doesn’t work, check the symptom:
- The handler logs connection errors and keeps retrying. It can’t sign in. Check the Project ID and API token, and that the token has the Voice permission.
- The call never reaches your handler. Check that the handler is still running, that its
contextsvalue matches the Relay Application’s Topic exactly, and that the number’s Inbound Call Settings point at that Relay Application. - The call doesn’t connect at all. In a trial project, call from a verified number.
Track a call via WebSocket (Relay)
Relay reports call state through call.on(). Add a calling.call.state listener to either
first-run program, right after it gets the call, to see states such as answered, ending, and
ended, with the end_reason once the call finishes. An outbound dial() returns after the
destination answers, so there the listener sees ending and ended.
On an inbound call, the Call object also carries the caller’s number in device.params.from_number,
with direction and call_id.
This flow shows every message an outbound call exchanges on the connection. The created, ringing, and answered states arrive before dial() returns, so a listener you add afterward sees only ending and ended:

For more handlers, see Event listeners in the Relay client guide.
Make and receive calls in the browser
The Browser SDK signs a web page in as a Subscriber, so a person places and answers calls from the page with their own microphone and speakers. The page authenticates with a Subscriber token from your backend, never your API token.
Get a Subscriber token
A Subscriber is the Resource for one person in your app, identified by a reference such as their
email. Run this program on your server once to create a test Subscriber and print a token for it.
Paste the token in place of <YOUR_SUBSCRIBER_ACCESS_TOKEN> in the pages below.
The cURL requests call Create Subscriber, then
Create Subscriber token with the Subscriber’s email as reference.
A token lasts two hours by default, so run the token request again when the page stops signing in. In production, your backend issues a token each time a user signs in, as the authentication guide shows.
Place a call from a browser
Run the page
Load this script on a page served over HTTPS or localhost, with the elements listed in its
comments. A page that only places calls can use a guest token instead of a
Subscriber token. To add the camera, pass video: true; DialOptions lists every
media option.
Call and talk
Select Call, allow microphone access, and answer the destination phone. You hear each other. Select Hang up when you finish.
If dial() rejects with CallCreateError, the token’s scope doesn’t reach
the destination.
Answer a call in a browser
Assign the Subscriber to your phone number, and calls to the number ring the page signed in as that Subscriber.
Run the page
Use the token from Get a Subscriber token.
Guest and embed tokens only place calls. The page must sign in as the Subscriber that receives the call.
Load this script on a page served over HTTPS or localhost, with the elements listed in its
comments. The page shows who is calling and lets you answer, decline, or hang up.
Awaiting register() signs the page in and marks the Subscriber online, so
the page shows Online. Keep it open while you test: calls ring only while it’s online.
Assign the Subscriber to your phone number
The Subscriber you created is listed under My Resources, so you can pick it like any other Resource.
Open Phone Numbers, select the number, and select Edit Settings. Under Inbound Call Settings, select Assign Resource, choose the Resource, and save. To assign from the Resource instead, open its Addresses & Phone Numbers tab, select + Add, then Phone Number, and pick a number you own.
Call your number and answer
Call your SignalWire number from your phone. The page shows the incoming call. Select Answer, allow microphone access, and select Hang up when you finish.
If it doesn’t work, check the symptom:
- The page never shows Online.
register()failed, most often because the token expired. Issue a new token and reload the page. - The page is Online but never rings. Check that the number’s Inbound Call Settings point at the same Subscriber the token was issued for.
- The call connects but you can’t hear each other. Allow microphone access, and serve the page
over HTTPS or
localhost. - The call doesn’t connect at all. In a trial project, call from a verified number.
The Browser SDK inbound calls guide builds a complete receiver page, including two callers ringing at once.
Track a call in a browser
The Browser SDK is the client-side counterpart of the Relay client: the page holds a WebSocket
connection to SignalWire, and call state arrives as events on it rather than as HTTP callbacks. As
in Track a call via WebSocket (Relay), you subscribe to a
call’s events, here through the call’s status$ observable instead of call.on().
An outbound dial() returns the call while it is ringing. The call then moves through
connecting and connected, and through disconnecting, disconnected, and destroyed once it
ends. With disconnected, failed, and destroyed treated as final, one subscription updates the
page for every outcome. To show the status on the calling page, add <p id="status">Idle</p> to
Place a call from a browser, then add the lookup below and replace
that page’s status$ subscription:
The answering page in Answer a call in a browser already writes each
status to #status. An inbound call follows the same path once it’s answered; one that leaves
ringing without reaching connected was declined, or the caller hung up.
Each entry in incomingCalls$ is a Call with
direction set to inbound, the browser’s equivalent of the Relay Call a server handler
receives. Read from for the caller’s number or Address, to for the number or Address they
dialed, and fromName for a display name. SignalWire sends _undef_ as fromName when the
caller supplied none, so fall back to from.