***
id: 4694ab58-dc99-4c45-bb98-f218cf69daf9
slug: /guides/remote-server
title: Handle incoming calls from code
description: Learn how to handle incoming calls from a remote server using SWML.
max-toc-depth: 3
----------------
In the [Quickstart](/docs/swml/guides) guide, we learned how to use SWML Scripts in the Dashboard to handle incoming calls serverlessly.
Handling calls from code gives us more flexibility. Instead of serving a
static SWML Script, we can use a custom web server to decide the content of the YAML/JSON
depending on the incoming call.
In this guide, we will show how to set up a remote server to serve SWML dynamically.
## Setting up the environment
If your preferred language allows you to write YAML/JSON (it probably does), then all you really need is to use your preferred library to spin up a web server:
```shell
npm install express
```
## Serving SWML
We'd like to set up an endpoint (our own "dynamic" SWML Script) which emits a valid SWML document, like this one:
```yaml
version: 1.0.0
sections:
main:
- play:
url: 'say:Hello from SignalWire!'
```
```json
{
"version": "1.0.0",
"sections": {
"main": [
{
"play": {
"url": "say:Hello from SignalWire!"
}
}
]
}
}
```
We prefer YAML for its readability, so we're going to use it instead of JSON in this example. The YAML will be sent back to the client as a response to their request. Let's see how to set up a web server to serve valid SWML.
### Setting up a web server
How you set up the web server is mostly specific to the language and framework
of your choosing. A basic skeleton might be the following:
```javascript title="index.js"
const express = require("express");
const bodyParser = require("body-parser");
const app = express();
app.use(bodyParser.json());
app.use(bodyParser.urlencoded({ extended: true }));
app.post("/start", async (req, res) => {
let instructions = `
sections:
main:
- play:
url: 'say:Hello from SignalWire!'
`;
res.send(instructions);
});
app.listen(3000);
```
Try running the application, which will listen on port 3000:
```bash
node index.js
```
Since you are likely behind a NAT, to test this application on your local machine you need a public IP address that SignalWire can reach. We suggest using [ngrok](https://ngrok.com/).
In short, while the application is up and listening on port 3000, run ngrok from a new terminal like this:
```bash
ngrok http 3000
```
You'll get a public random URL (such as `https://983f-93-41-16-193.ngrok.io/`) that you can use to access your local application.
### Configuring the number
Now that the code is ready and the HTTP endpoint is reachable from the web,
we need to configure our SignalWire number to access it.
If you don't have a phone number yet, make sure to buy one from the SignalWire Dashboard.
You will need at least one number to receive calls.
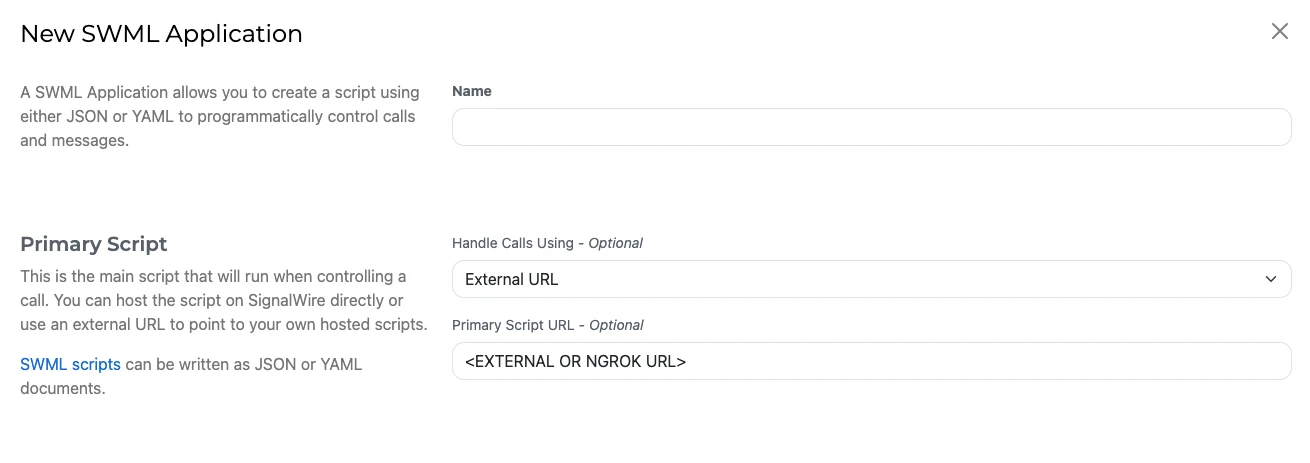
Next, create a new Resource by navigating to the Resources section in the SignalWire Dashboard.
Select a Script, and choose type as SWML.
For the primary script, make sure it's set to "External URL" and not "Hosted Script".
Input the URL you've hosted your application on.
As a quick test, you can use ngrok to tunnel your local application to a public URL.
If you don't see the **My Resources** tab, your SignalWire Space is on the **Legacy Dashboard**.
Refer to the [Legacy](#legacy-dashboard) section of this guide for instructions for your Dashboard and information about the migration.
#### In the Legacy Dashboard \[#legacy-dashboard]
Open the settings for your number. Under "Voice Settings", choose to
handle messages using "a SWML Script". Set "Handle calls using" to "a SWML Script", then check the "Use External URL for SWML Script handler?" checkbox.
Finally, paste the public ngrok URL which connects to your application.
{/* Shared component: UI Accordion for new vs legacy dashboard */}
**New Dashboard**: You have a **Resources** tab in the left sidebar.
**Legacy Dashboard**: You have separate tabs for SIP, LaML, RELAY, etc.
If you're using the exact express web server application we've provided above, make sure the SWML External URL points to the `/start` endpoint of your application. Your path
might look like this: `https://.ngrok.io/start`.
Try calling the phone number: SignalWire will ask your server for the instructions to run and say "Hello from SignalWire!", but you can make SignalWire say/do whatever you like.
### Accessing call information from the server
SignalWire will send certain information to your server in the POST request every time it is requesting a SWML script.
This gives your server a chance to customize the SWML script it sends based on the call information or the supplied parameters.
#### Case 1: SWML is being requested to service a phone call
In cases when you have configured a number to automatically invoke a SWML script (as we have done above),
a `Call` JSON object will be passed.
#### Case 2: SWML is being executed from another SWML script
You can [`execute`](/docs/swml/reference/execute) or [`transfer`](/docs/swml/reference/transfer) the control flow out of one SWML to another. In such case, in addition to the `Call` object,
extra context from the calling SWML is sent to the new SWML being invoked.
This includes the variables that were set in the executing SWML script (`vars`), and the
parameters deliberately passed to the new SWML (`params`).
```javascript title="index.js"
const express = require("express");
const bodyParser = require("body-parser");
const app = express();
app.use(bodyParser.json());
app.use(bodyParser.urlencoded({ extended: true }));
app.post("/start", async (req, res) => {
const { call } = req.body;
console.log(call.from);
let instructions = `
sections:
main:
- play:
url: 'say:Hello from SignalWire!'
`;
res.send(instructions);
});
app.listen(3000);
```
## Conclusion
We have shown how to handle incoming calls from code, by emitting SWML instructions that say something on a call, but it can do so much more! For more advanced applications, you'll want to check out [SWML's Technical Reference](/docs/swml).